
A Simple Tutorial on Infrared Post Processing…
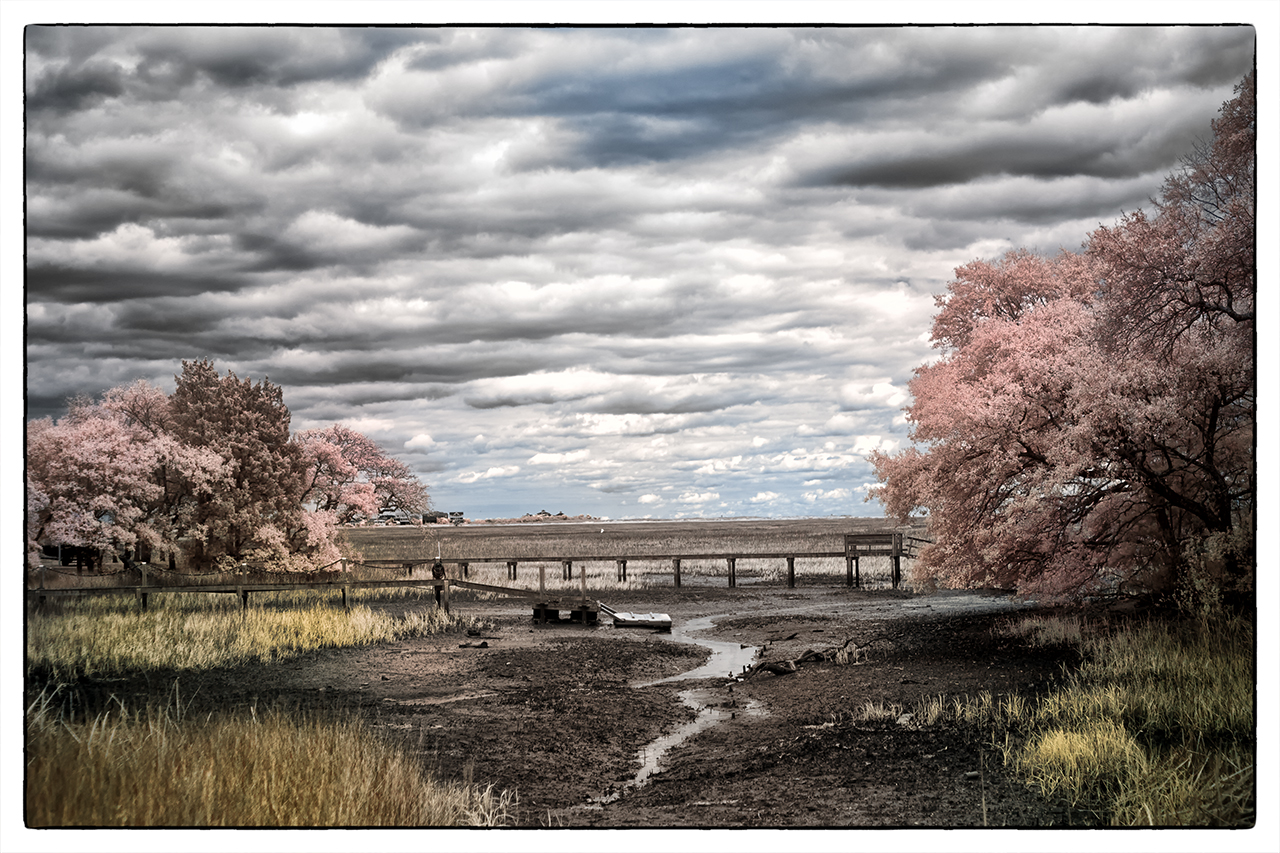
Murrells Inlet Marsh, X Pro 1 720nm IR Faux Color
The Fuji X Pro 1 has turned out to be one of the best Infrared camera systems that I have ever used… period! The only good Fuji lenses for Infrared have proved to be the 35mm f/1.4, the 18mm f/2 and the new 14mm. The Viogtlander 75mm f/1.8 has also proved to be a STUNNING lens also! So, the camera has proven its infrared capability, now it is time to discuss in detail the recipe for post processing! It is all quite simple but there are a few requirements that you must understand in order to follow my workflow with understanding.
Needed:
- Photoshop CS5 or CS6
- Nik Filters, Viveza, Define Silver EFX Pro plugins for Photoshop, NOT LIGHTROOM. (You can now purchase the entire library of Nik filters for $149)
- Kromography False Color Action which can be downloaded here from the right menu bar under the box menu. You can simply click on it to download to your computer then drag it to photoshop to install.
- A converted Infrared camera system capable of generating enough color data to make Faux Color images. This means 720nm, 665nm, 630nm and 590nm conversions.
- The ability and desire to experiment!
As you move your RAW (shoot only RAW for IR because of the ability to shift the white balance easily) onto your computer you should automatically tell yourself that you are going to process each selected image in Faux color and B&W. Sometimes you will notice that the un processed image looks great also (wonderful bronze tones) and decide to do a version like this as well!
Lets talk about the RAW conversion process a little bit. Photoshops ACR built in RAW converter will NOT apply the white balance correctly and your images will appear deep red. For this reason I use Capture One version 7 from Phase One. It is simply the BEST RAW converter that I have ever used. You can download a trial version and decide for yourself if what I am telling you is true!
My Initial Editing Steps:
- Move images from my camera to my computer with an intelligent download tool that renames them with a meaningful name and create an intelligent directory tree for my RAW Library. For this I have tested dozens of tools and found that Ingestimatic is the best and lowest cost one out there! You can find them here.
- Visually edit the RAW files by deleting the images that are simply no good. Do not clutter up your computer with these useless files.
- Batch process my RAW conversion choices and adjust the exposure, contrast and angles. Capture One will allow this and place the converted image files into a storage directory for later editing.
- Within Photoshop, open each converted image one at a time for post processing
- Run Nik Define 2.0 in its default mode on the image for noise reduction, Save.
- Run Nik Viveza and without using any selection points increase the structure around 10% and the contrast about 5%, Save.
- Having installed the channel swap action that you downloaded here, run it on your image. The last thing it will do is to open a Hue/Saturation window with the Master channel selected. Simply select the CYAN channel and vary the HUE a little bit to bring the sky to a normal blue rather than a blue/green. Then select the RED channel and adjust the saturation up to a value you like, and repeat with the YELLOW and MAGENTA channels. When you are happy with the results click on DONE to move on. REMEMBER: This is to only get the colors of the FAUX COLOR IR image into the ball park! The real adjustment will happen next.
- Run Nik Viveza again. Here is where you will use your control points to slightly adjust the colors and contrasts of various image elements to bring out a stunning, etherial work of art! LOOK closely at your image, decide what you wish to adjust (Hue, saturation, contrasts and de-saturation). MORE ON THIS LATER!
- Run Nik Define one more time.
- Flatten the image, crop to taste, correct any imperfections (healing tool and content aware fill).
- Save the image with a meaningful name in a planned and thought out master image library.
- With the finished Faux Color image still open in Photoshop, now run Nik Silver EFX Pro to do your B&W conversion. There are several built in recipes in this filter that can be used as a starting point. My favorites are:
- High Structure Harsh
- High Structure Smooth
- Full Dynamic Range Harsh
- Full Dynamic Range Smooth
- Fine Art Process
- Wet Rocks (once in a while)
Save your image again with a NEW file name that reflects the difference in your master image library tree!

Murrells Inlet Salt Marsh, X Pro 1 720nm IR
Remember: Process ALL IMAGES as both Faux Color and B&W. You really do not know what you are going to get till you do so.
All of this really is VERY SIMPLE and once you have done it a few times it will become second nature to you. Soon you will be a post processing Infrared God or Goddess! Congratulations
No, let’s take a look at the image below. Notice the areas that I have circled as places where I desire to change the colors, contrasts and saturations (both plus and minus). Also consider that this is a 720nm converted camera and as such has a very limited color range (light pinks and warm tones and blues).

Annotated Faux Color, X Pro 1 720nm IR
It is in this area and others like them (similar color values that are the same) that we are going to place control points on and change these values! If you notice that the areas around them also change a little you can place what we call anchor points which are simply control points with no adjustments to bring those areas back to where you wanted them!
You will find this ENTIRE process from the initial loading into photoshop to finish will just take 4 or 5 minutes or less as you become more practiced!
Here are a few more images for you to consider that were taken on the 720nm Fuji X Pro 1 camera system:

Stormy Seas Faux Color, X Pro 1 720nm IR

Stormy Seas B&W, X Pro 1 720nm IR
Sometimes Faux Color images simply do not work, then you still have the great B&W ones to work with!

SC School Bus Boat, X Pro 1 720nm IR

SC School Bus Boat, X Pro 1 720nm IR

Shot with handheld?
Yes, every image in this post was hand held!
Pingback: Fuji X Pro 1 - 720nm Infrared Faux Color and B&W Post Processing | Digital Photography - Fuji X-E1 | Scoop.it
Pingback: Fuji X Pro 1 - 720nm Infrared Faux Color and B&W Post Processing | Mark Hilliard | Fuji X-Pro1 | Scoop.it
Pingback: Fuji X Pro 1 - 720nm Infrared Faux Color and B&W Post Processing | Fujifilm X Cameras | Scoop.it
Pingback: Fuji X Pro 1 - 720nm Infrared Faux Color and B&W Post Processing | Fuji X-E1 and X100 | Scoop.it
Pingback: Fuji X Pro 1 - 720nm Infrared Faux Color and B&W Post Processing | X-Pro 1 by Fuji | Scoop.it
Pingback: Fuji X Pro 1 - 720nm Infrared Faux Color and B&W Post Processing | Everything about Fuji X-Pro1 and Fuji X-E1 | Scoop.it
Hey Mark, I dont know why but I always get a mostly mono-colored picture when shoting IR with my X-E1 (and my X-Pro1 before) using an R72 Hoya filter… I NEVER had a blue sky for example…And yes, I use a white balance of around 2500 or 2000 and swap channels and stuff… Any ideas ?
You will NEVER get a good white balance when using an external add on filter. Send me a raw converted file, small , of a sky, tree and grass scene. I will run it thru my post processing work flow and see.
Pingback: Fuji X Pro 1 - 720nm Infrared Faux Color and B&W Post Processing | almaphotografica | Fuji X-Pro1 | Scoop.it
aahhhh…we need to go into this further. Maybe do a tutorial step by step post processing. you are so good at teaching these types of things Mark.
Thanks John. I just got back from our first IR workshop of 2013 in Charleston for the past 5 days. It was intense yet fun. And you are correct more is needed and scheduled to come!
Pingback: Fuji X Pro 1 - 720nm Infrared Faux Color and ...
Pingback: Fuji X Pro 1 - 720nm Infrared Faux Color and ...
I have a Nikon 7000 and light room. I guess all this excludes me.
Well by using lightroom you are limited to B&W processing only. You could buy photoshop elements then the plugin called Elements Plus which will give you the necessary channel swap capability for Faux Color processing.
What conversion did you have done on your 7000?
Loving all your IR articles. I too have switched to the Fuji X system from from Nikon and Canon systems. I recently had the X100S converted by Kolari Vision to deep black infrared and love it. Thinking now of also getting an X-T1 converted to 720 so I can also do faux color. Keep those articles and images coming.
Thanks for the kind comments. I have a X100s in Dual Band IR that lives at 830nm and I love it! Let me know how the X-T1 goes!
Mark, I was wondering what you thought about creating a custom profile in DNG editor for IR Raw conversion? As I’m just building up my Fuji kit I cannot afford Capture One, so thought this might be a possible alternative.
Thanks.
Trevor, Phase one is offering a new version 8 for half the cost now. But yes you can indeed go the DNG route. Many people have reported good results with this but the workflow was difficult! Let me know how it goes!!
Thanks Mark for your reply. Capture One is around 290 Euros in the UK. DNG editor will have to do for time being. Tried out the Fuji 18-135 and can say there are no hotspots up to at least f10.
I understand! Thanks for the lens update also.
Sorry to bother you again Mark, but I’m sure I read somewhere that you don’t think 590nm or 630nm filters are suitable for unconverted cameras. Is that right? I’m getting nice B&W from my R72, but colour is failing dismally! LOL
This is true. The color light that the 590nm filter doesn’t get stopped by the cameras hot mirror and the 700nm and up does so the exposure gets ruined and the metering is not usable. If you want 590nm you need to have a true conversion done.
Many thanks Mark.
Pingback: Fuji X Pro 1 – 720nm Infrared Faux Color and B&W Post Processing | Mark Hilliard › Von TOMEN
I had a Nikon D70s converted to 590nm and had great results and loved it. I have recently sold it as I had a Nikon D2x just sitting in the cupboard doing nothing and since it was double the pixels I thought it would be the thing to do. I got it converted at 590nm also but I am rather disappointed with the results as I have to work hard to try and get foliage white. Im thinking of sending it back to get a 720nm conversion or try a 720nm filter on the front to see the results.
Greg, you are not going to get white leaves at 590nm. You need at least 720nm but even 830nm (B+W 093) is better. You can purchase a filter to put onto your lens for testing. You will not be able to use the viewfinder but hopefully your camera has a live view?
Can Aperture be used for processing ? What would you suggest/ My Mac is running El Capitan and it does not work well with Elements 14!! My camera is a Fuji XT0. How will it handle IR …Thanks BST
Bernie, no, you really need photoshop along with the nik plugin filter set.