Stormy Seas a the dock… 6×12 medium format Tmax 100 film
Dayi 6×12 showing the ground glass and shade and my custom dark cloth attached.
This Super Pano was taken on my Dayi 6×12 medium format view camera. Lens is a Rodenstock 90mm f/6.8 Super Grangdagon N and while it is a bit slow it is VERY sharp and quite beautiful! This is a very different style of camera and will take 5 images per roll of 120 film.
Dayi 6×12 Grand Glass Back
This is an amazing combination of a ground glass focus and calibrated distance focus system.
Dayi 6×12 with the Rodinstock 90mm f/8.6 installed showing the alternative, calibrated focusing system
Shrimp boats are one of several subjects that I will drive hundreds of miles away to photograph! I am very lucky to live so close to a lot of them locally! Because of the continuing loss of our shrimp fleets here I am both driven and inspired to document them every chance I have. You have to admit that they are very beautiful when done in B&W and what better way to document them if not film?
This was a very difficult shot to achieve! To get it I had to overcome the super bright sun coming over my shoulder highting the boat and buildings to the point that they were totally burned out. The storm in the background was dark and foreboding…
The lesson here is to learn and realize that you can control all aspects of your image’s exposure along with taming the dynamic range of the scene through use of thoughtful developing and scanning.
I used a Sekonic 758 to get these results by using a combination of exposure averaging with 6 one degree spot metered measurements, saving each reading in the meters memory then telling the meter to give me the zone 5 average which then became my base exposure. The 758 then showed me the the exposure with a chart of any data over or under exposed thus out of the film’s dynamic range.
Knowing this, I then used a technique where you can either compress the the dynamic range of the image into a smaller space thus allowing the film to compensate for a wider dynamic range that it was designed for! This is called +/-1N developing. You can change developing time down to compress the dynamic range of the image by squeezing the image down from the whites towards the blacks which compresses the highlights into range! The opposite is also true by going +N. But for this image the -1N was enough. I then then used another creative process during the wet mount film scanning by expanding the dynamic range to fit into the wider print profile by +1 to the highlights in Viewscan to put them where I desired for a powerful and moody print. There are a lot of books out there that will teach this technique, but my favorite is CreativeExposureControlby Les Meehan which will teach you the development side of the process. The scanning side is easily done in Viewscan and there is a good book on that on Amazon.
I will also expand upon this in future posts as well!
Rodenstock 90mm f/6.9 Grandagon N, while a slow lens it is super sharp and beautiful!
The wet mount scanning technique will be taught in a future post here along with a video on Youtube! But to do it you will need an Epson 700, 750, 800 or 850 scanner as those are the only ones that the wet mount kit will fit!
This is the Causeway to the Litchfield Inn in Pawleys Island. 100TMX processed in Xtol 1:1. Yellow filter, f/22 at 1 second metered on the white roof on the distant boat house where the water seems to end an placing that in zone 7 to 4 seconds then to 6 seconds for reciprocity..
Well… Yes, I have a NEW medium format camera system! Not new used, but NEW NEW!
It is the Dayi 6×12 and is custom made in China for each order. It is very affordable, the camera, lens cone (adjusted for you lens ahead of time) film back, focus screen and shade, viewfinder and a Arco swiss mounting foot! All in all this ran me around $1000 and took 2 months from payment to delivery. There are several companies selling them but I chose ecbuyonline2008 on Ebay, contacted them and then dealt directly with them for a nice discount. They provided a direct email at ecbuyonline@foxmail.com.
Dayi 6×12 showing the ground glass and shade and my custom dark cloth attatched.
Ok, the camera itself is very well balanced and easy to use. As with most types of cameras of this design it uses a lens cone cut specifically for the focal length of the lens used. If you use a different length lens as a 2nd then you will need another cone designed for it as well.
Dayi 6×12 showing the film back and ground glass
The focus is controlled by a CALIBRATED helical mount that gives very fine control of the focus. Because it is calibrated, you can just dial in the distance and forget the ground glass. Me? Not so much. My eyes are not calibrated very good. Now, a cheap laser rangefinder would be just the thing. Fire it, dial in the distance and shoot! I use the ground glass as my focus operation. I have a custom made dark cloth that fits the glass frame and works very well. I have a nice 8x loupe that I use to make up for my old eyes!
There are calibration screws around the outside edge of the lens cone and you can see the small hole for one at the end of the video above. These allow you to set the infinity point and place the lens in the correct position. You can find a tutorial HERE for this process.
Lenses that will work on this camera can be found HERE.
The camera is a bit heavy and not suited to handheld work, but it can be done. It is a VERY well designed and built camera system and has ZERO light leaks.
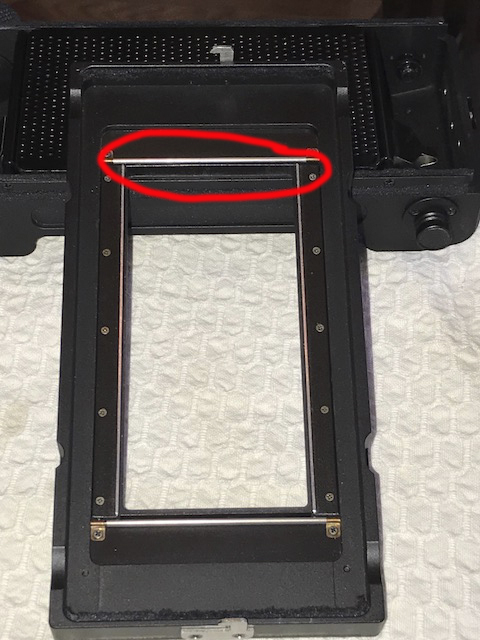
When the camera first arrived, the film holder was scratching the surface of the film emulsion.
Here is the issue, a spring next to a roller that is too high in the film plane with rough edges! It is the bright silver line under the roller. See how it is bent up in the center? It actually touched the film.
The complete assembly
I took it apart and realized that a spring was adjusted too high on the film holder back and touching the film. It was a simple adjustment to fix this but I still sent an email about it and a few days later this video arrived showing how they said to fix the issue which is exactly what I had found!
This goes to prove that they are responsive to customer complaints, problems or suggestions! That is a big plus in my book!
The system is simply a joy to use. It is bright in the corners (of course that is lens dependent) and the focus is spot on! I have put about 10 rolls of film thru it so far including some Ektar 100 (which I have not processed yet but have the chemistry). Now that the scratching issue is fixed I see a great future for the camera in my kit.
The folks at the company in Hong Kong are easy to work with and very responsive over email. I highly recommend them. They have MANY other cameras for sale also including a larger 6×17 version of this one.
Stormy Seas, Dayi 6×12, not the best composition but a good example of the quality from the camera!
I hope you enjoyed this short post on the new pano camera system. There will be more following!