A conversation on how to easily create amazing Long Exposures
What is needed to create these ethereal DAYLIGHT images!
Warning, this is going to be a 2 or 3 part tutorial and exceptionally long!

Jekyll Driftwood Beach, 400s
Ahh Peace… I love the ethereal nature of the process in ultra long exposures. Sitting there behind a good camera exploring a composition, light and movement while waiting in great anticipation of the outcome fills me with such inspiration that I can hardly contain myself!
While these types of images take a large degree of patience and dedication to the art, I have found very few photographers who having never tried them fell fast under their soulful control! I tell you now that with a bit of basic equipment and easily learned skills that ANYONE with a bit of patience will succeed in this artistic endeavor. Yes you need some extended functionality in your camera system (most modern DSLR and Mirrorless systems have it!). Yes you will have to buy a set of “sunglasses” for your camera lens called ND filters (this is where you will find the expense). But believe me this style of photography is SO worth it.

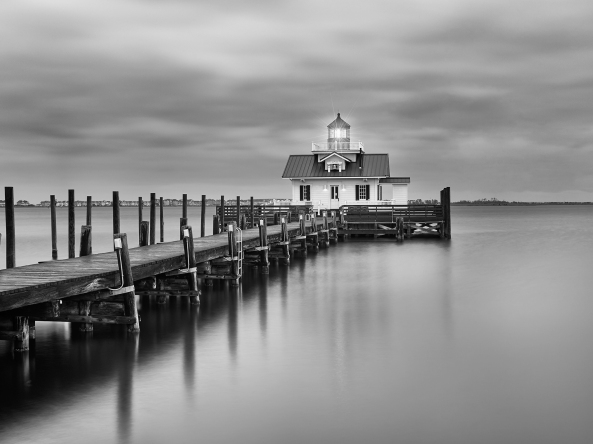
Roanoke Marshes Light, 3 seconds
But how easy is it to create these peaceful images that speak to your soul? For me the process is quite simple, but I tend to forget that 58 years of experience makes this all easy for me.
So with that in mind I am going to take you through my entire processes and share my equipment lists with the reasons why I chose them and when to use them.
Let’s start out with a quick discussion of what a long exposure actually is:
- Any shutter speed longer than 1 second is considered a long exposure.
- The upper limit is… well, UNLIMITED! Usually photographers start out at a 30 second exposure in order to get their base exposure locked in, then move up to 2 min or greater. I typically try to target 8 to 15 min for my final image but have several in the 60 min range also.
- Typically shorter exposures are needed for falling water in the 10 to 15s range. If you desire to highlight the swirls in the pool under the falls then much longer times are necessary
- There are several types of long exposure photography. Here are a few with a bit of discussion about what equipment you need to work them
- Daylight with the sun up: This style is most likely the easiest of the LE areas to explore. Most of your scenes along the beach will have brightness levels of the sky and foreground close enough to fit within the dynamic range of your camera and only need solid ND filters.
- Sunrise/Sunset: This style of LE work is more difficult as the sun nears the horizon during Sunset and as it gets close but not over at sunrise. Lighting conditions are way more difficult and still require solid ND filters but will additionally require 2 specialized filters, a 3 or 4 stop soft edge graduated square filter and a reverse graduated square filter. The light intensity around the horizon will make these image impossible without the graduated filters (more on this in the 2nd post)
- Night Long exposures: Milky Way, Star Trails and others. This is a specialized pursuit that requires different lenses and filters and will be saved for another day.
Camera Features and settings needed
Any DSLR or Mirrorless camera (I use a Fuji GFX 100 medium format digital). You will want the following features and settings:
- Aperture mode to determine base exposure
- Long exposure noise reduction set to automatic.
- Photographers new to long exposures might want to turn this setting off. Here is why: When you create a long exposure image, say 30 seconds long this is what happens with LE Noise reduction turned on or automatic.
-
-
- The camera fires and takes a 30 second exposure
- The shutter closes
- The camera keeps the shutter closed and takes a second 30 second exposure in the dark between the shutter and sensor. This is called a Dark Frame Exposure
- The camera then combines the 2 images and subtracts the noise
-
While 30+30=60 seconds does not sound like too much of a wait, if you are in the learning process and going thru the trial and error mode that 30 seconds turns into 1 min, a 2 min exposure turns into a 4 min, 4 to 8, 8 to 15 and so on it goes. This takes a lot of time especially at sunrise/sunset when the light is rapidly changing!
TIP: YES you want the LE noise reduction turned on to get the best and highest quality that the camera can provide, but when learning and making exposure mistakes while calculating ND filter offsets for the shutter these long times degrade your learning curve. So turn it off until you get used to all of this then when comfortable with LE work turn it on AUTOMATIC and leave it there. It will only affect exposures over a certain time which is dependent upon your camera. My GFX 100 turns on at 15 seconds, others at 30 and so on.
-

Pixel Remote for all cameras
RAW capture mode turned on
- Color space set to Adobe RGB
- Manual mode with a BULB or TIME setting
- Bulb is where the shutter is open as long as the remote shutter release is active
- Time mode is where you can set exposure times in full stops usually out to 30 or 60 min. With this mode you do not need a timer or a remote shutter release, you set the time fire the camera and sit back.
- Remote shutter attachment with a timer display built into it with cable for your camera. This works wired or wireless. I suggest this one HERE
- VERY sturdy tripod that you can spread the legs out wide and low. Good tripods are very expensive but can last for you entire life. Look to Really Right Stuff for the best.
- A small 3 leg photography stool (Amazon) to sit on and BE STILL. See it HERE
- A small red headband flashlight. Turn it OFF hen not needed!
Camera Lens
- Lens, a wide zoom. 95% of the time I use a 32-64mm f/4 lens (35mm equivalent of 23-58mm) on my GFX 100 for my long exposures. On rare occasions I have a GF 100-200mm when I desire a detail shot of a waterfall, and a GF 17mm for those times that demand a very wide view.
- Most of my students use a 24-105mm f/4 that will cover most all of the scenes you will run across.
- You do NOT want a fast f/2.8 lens for long exposures. By adding the extra fast 2.8 setting you loose a more closed down setting like f/22 or larger which will be useful for getting the long shutter times with less ND.
Filters needed for long exposures:
Filters you say??? But WHY?
Well the simple answer is that in order to do long exposures you need to have long shutter times! The filters we use are called ND or Neutral Density filters. They come in several types and styles and they act as sunglasses cutting the light down going into your camera forcing it to longer shutter times to compensate!
Yes, I am afraid that they do cost a bit of money, but purchase the best you can afford, you will not be sorry!
Filters companies are a subject full of differing opinions, many good and many with issues so I will discuss my personal filter decisions and why I choose as I did!
I have been through several companies filters over the years and have used the following.
- B+W. Good filters, a bit expensive and limited to round screw on only. They change the white balance of your camera to a brownish tint… They come in all of the standard values and even offer a rare graduated screw on that places the start in the middle of the frame.
- Lee. Again, Good filters, very expensive and made of plastic that are very easy to scratch with one or two in glass. They change the white balance to a blue cast. Lee offers ALL of the filters you could possibly need for any type or style of long exposure work
- Singh Ray filters. Intolerably expensive. They come as screw on and several sizes of square/rectangle styles.
- Breakthrough Photography X4 filters. These are simply the best filters that I have ever used! They are all hardened optical schott glass, ZERO color cast and have an unconditional 25 year warranty! They come in all types and styles, (more on this later) and mount options:
- Screw on
- Magnetic
- 100mm and 150mm squares/rectangles
BASIC DAYLIGHT ND Filter suggestions for after the sun is up higher in the sky or 1/2 to 1 hour before sunrise!
- 3 stop solid ND, sized to your camera lens or a square/rectangle system
- 6 stop solid ND, sized to your camera lens or a square/rectangle system
- 10 stop solid ND, sized to your camera lens or a square/rectangle system
- 15 stop solid ND, sized to your camera lens or a square/rectangle system
TIP: I find that I use the 6 stop, 10 stop and 15 stop most of the time

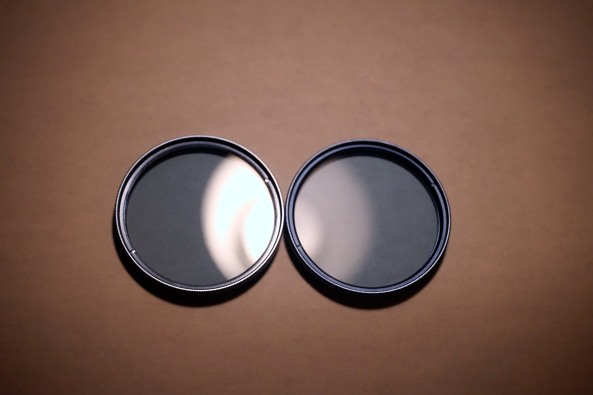
Breakthrough 3 stop ND
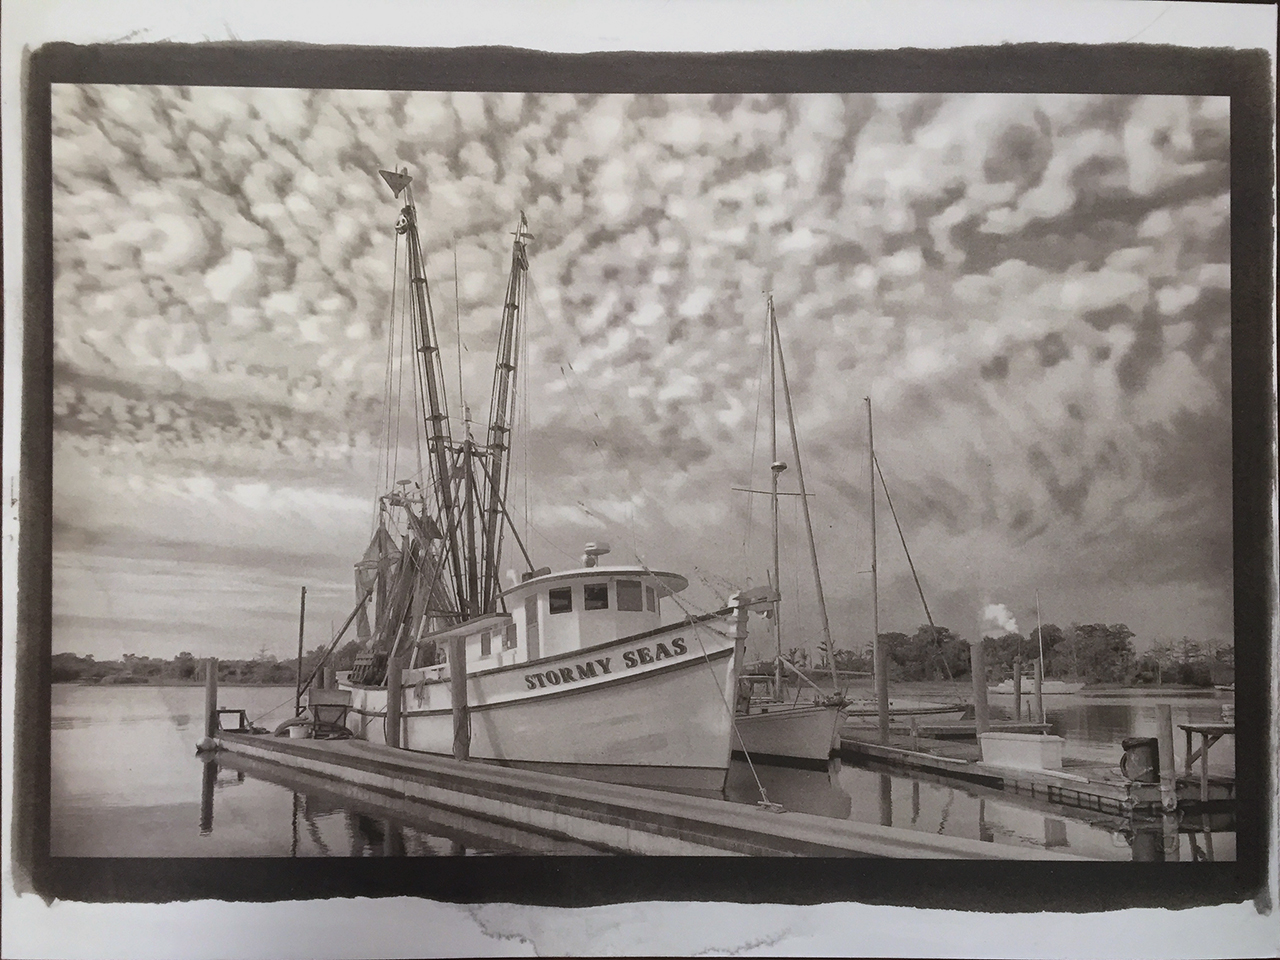
For normal daytime exposures the sky and foreground (especially the ocean) usually have the same tonal range. For this type work just a solid ND set is needed. Solids are the same dark density across the entire glass. Take a look at the 2 images below. Notice how the sky and foreground are at the same basic brightness value?
The TOP post image is also another example that is right on the edge of needing another type of filter!

Pawleys Marsh, 30 seconds. B+W 10 (110) stop solid filter
Since the difference between the TOP and BOTTOM of the image falls within the dynamic range of my camera only a 10 stop SOLID ND filter was required! Exposures like this only need a solid ND filter! For this image I used a B+W 110 (10 stop solid) and fixed the white balance in the RAW conversion.
TIP: Do NOT worry about aperture diffraction on long exposures. Remember that we are AVERAGING and the diffraction errors go away. Use the complete range of your aperture to get the shutter speed you desire!
For color work the rule is the same, as long as the upper half and the bottom half of the image falls within the dynamic range of your camera a solid is all that you need! The Roanoke Marshes Light below is an example for you.
TIP: People moving on a dock you are shooting? DO NOT WORRY! On a long exposure with people walking in the scene they will disappear unless they stand still more than 1/4 of the exposure! The image below had 4 people walking down and back on the dock!

Roanoke Marshes Light, 40 second exposure single 10 stop solid Breakthrough X4 ND.
The MOST IMPORTANT Lesson!
Ok, here it is: The HARDEST part of a long exposure image is learning to calculate the exposure values necessary to get the softness/tearing that you desire. Actually this is very simple and below you will find the steps to easily do this! I am going to show you 2 ways to do this. The first and most important way requires to you multiply/divide a simple number by 2 which is ONE STOP either for the shutter speed or the aperture! But first, we need to understand what a full Stop means for shutter speed and aperture!
Understanding Full Stop Shutter and Aperture Relationships
Shutter Speed Example Full stop Changes:

Shutter Speed Values
- 1/60s to 1/30s
- 1/30s to 1/15s
- 1/15s to 1/8s
- 1/8s to 1/4s
- 1/4s to 1/2s
- 1/2s to 1s
- 1s to 2s
- 2s to 4s
- 4s to 8s and so on.
Full stop changes to your shutter speed is simple dividing or multiplying by 2
Being off by a small amount will make no difference as the shutter speed gets longer.
Aperture: aperture values cannot be calculated like shutter speeds. Aperture is logarithmic and the math is difficult to an extreme. Todays aperture values on almost all of the digital bodies are usually in 1/3 stop values! Below you will see the FULL stop values that we want to use for ease of calculation.

FULL STOP Aperture values
Exposure Calculation Version 1
Discussion on using FULL STOP Aperture and Shutter Values to calculate exposure offset for various ND filters
- START: Set the camera ISO value to the lowest native value that the camera supports. This is usually 100 or 200. Some cameras will go down to 50 or 64. Also, most cameras have a LOW ISO setting, DO NOT USE THIS SETTING because the camera artificially gets it lower by decreasing the Dynamic Range of the camera which decreases the quality of your image!
- Start by taking a picture in the Aperture priority mode with the aperture set to f/8 to get a base exposure that was good in camera with no ND and say that it metered at f/8 and 1/60s
- If your lens goes up to f/22 then we could change 3 stops on the aperture with no ND installed from f/8 to f/11 to f/16 to f/22 which will cause an under exposure of 3 stops that we bring back into the perfect exposure by decreasing the shutter speed by 3 stops or 1/60 to 1/30 to 1/15 to 1/8 seconds. Still not long enough for the purpose of smoothing water so now we add a ND filter
- Putting a 3 stop ND on your lens would again under expose by 3 full stops which we counter by decreasing the shutter speed 3 more stops from 1/8 to 1/4 to 1/2 to 1 second. Again really not long enough but we are getting there!
- So how about replacing the 3 stop ND with a 6 stop ND? This will give us 3 more stops taking us from 1 second to 2 seconds to 4 seconds to 8 seconds! Now we are getting somewhere!
- For a longer yet shutter speed we could replace the 6 stop ND with a 10 stop ND! This gives us 4 more stops of under exposure that we compensate by making the shutter speed longer by 4 stops! So 8 seconds go to 16 seconds to 32 seconds to 64 seconds to 2 min (now round to the whole min because 8 seconds difference from 128 seconds to 120 seconds will make no difference)
- Not long enough? Let’s replace the 10 stop ND with a 15 stop ND! This gives us 5 more stops of under exposure from the 10 stop ND. We compensate by adding 5 more full stops of shutter speed going from 120 seconds or 2 min to 4 min to 8 min to 16 min to 32 min to 64 min.
- If this is too long you can now open the aperture 2 stops which will allow you to shorten the shutter speed of 16 min or 3 stops to 8 min!
Do you see the relationship between full stop changes in aperture and shutter speed?
This is all you need to do!
Exposure Calculation Version 2
There is a FREE long exposure calculator for your smart phone called: LEE STOPPER. You will need to download and install this app to use this technique!
How to determine your exposure:
- Set the camera ISO value to the lowest native value that the camera supports. This is usually 100 or 200. Some cameras will go down to 50 or 64. Also, most cameras have a LOW ISO setting, DO NOT USE THIS SETTING because the camera artificially gets it lower by decreasing the Dynamic Range of the camera which decreases the quality of your image!
- Take a picture in the A (aperture priority) mode with the aperture set to f/8
- Read the exposure data from the back of your camera and note the shutter speed the camera used!
- Set the camera mode to M (manual) mode
- Open the Lee Stopper app on your phone
- Choose which of the 3 ND values you would like to use in the app, 6, 10 or 15 stops
- Enter the shutter speed into the app by turning the white wheel (see below)
- Read the new shutter speed from the blue wheel for the chosen ND filter
- If the desired shutter speed is less than 30 seconds enter it into the camera with the shutter speed wheel on the camera
- If the desired shutter speed is more than 30 seconds then move the shutter speed wheel on the camera to B or BULB
- Connect the remote shutter release cable. If it has a timer on it like the suggested one above then put it into the BULB mode and press the button to fire the camera. Watch the timer on the shutter release and when you get to the correct time press the button again to stop the exposure.
- Remember if you have the long exposure noise reduction on in the camera the camera will now take another exposure with the shutter closed for the same time as the step above. When this is finished you can view the results on the camera and if not to your liking adjust the shutter time up or down or change the aperture up or down to adjust to your liking and re-shoot.
- If you do NOT have a remote shutter release with a built in timer you can select the stop watch button on the bottom of the Lee app (look at the pic below) and it will automatically move your shutter speed to a stop watch in the app. Press and lock the remote shutter release and press the start button on the stop watch screen of the app. When finished, the app will alarm you to stop the exposure.
TIP: for values between full stops (those shown in the app) you can partially move the wheel to the small ticks between the full stops to offset the exposure for partial stops.

Enter Base exposure and read new ND exposure

Stop watch timer in the Lee app
This is all there is to calculation version 2!
Subject considerations
Seascapes:

Clam Creek Pier Jekyll Island, 2 min exposure, 10 stop Breakthrough X4 ND
The ocean surf can give you some of the most amazing images! The waves are AVERAGED during the long exposure so that one builds on another each averaging the wave before it until you get a perfectly flat reflective surface! Notice the great reflections that you can get because of the averaging!
Shot Setup: To create this shot above I set the tripod on on some rocks along the waters edge. I looked for a composition where the pier came in from one side to the T where I could smooth out the water and get a good reflection. I also made sure that there were no ships passing by. Then did a base exposure test of 30s and used an aperture of f/8 . at 1/8s. I then added a 10 stop solid ND and adjusted my shutter speed from 1/8s to 1/4s to 1/2s to 1s to 2s to 4 then 8 then 16 then 32 then 64 then 120 (2 min)

photography stool
TIP: Sand is your enemy! It is full of water and when someone walks by (within 4 feet) the pressure of their feet pushes the water away from their shoes causing the sand to rise around your tripod legs! You might think that this is minor but it will ruin exposures from 2 min and longer! STAND STILL! ASK PEOPLE TO WALK FURTHER AWAY FROM YOUR SETUP! Take a small 3 leg photography stool and SIT DOWN and NOT MOVE! See HERE

Nags Head Pier in Fog/high surf/high wind, 15 min exposure, 15 stops Breakthrough X4 ND

Screw
For really large waves and/or fog you tend to get a more etherial look that is really pleasing! This image was a difficult one to capture due to the large surf, fog and high winds.
Shot Setup: For the above shot took serious thought. With gale force winds from right to left, the Surf was about 12 feet high filling the air with salt spray and since this was a workshop there were 14 people moving about on the sand. I took my tripod and splayed the legs way out to the sides and shortened them to put me almost on the ground. I then sat between the camera and the wind. I also took off the shoulder strap so that it would not catch the wind. Lastly I set up the remote shutter release in wireless mode so that even that wire would not catch the wind. The surf was so high that nothing less than 15 min would give me the look I wanted with pure white water and the fog. Even though there was heavy fog, please notice that the pier is angling down as it goes out. The white a the end is a combination of the fog and the ultra high waves hitting the under side of the pier! This shot was a 15 min exposure at f/32 using a 15 stop Breakthrough X4 solid ND.
TIP: Wind is your enemy and hard to overcome. Splay your tripod legs wide and drop the tripod as close to the ground as you can. Sit between the wind and the camera to block it as best you can. You can put weights under the center post and if on sand buy a dog chain screw that you turn into the sand. Attach a truck tie down strap from the tripod to the screw and tighten it down further reducing movement. Find it HERE

Nags Head Pier, 15 min exposure, 15 stops of Breakthrough X4 ND
Shot Setup: Another image (but different) of the Nags Head Pier. This scene had a 6 foot surf and hardly any real wind. As I studied the scene I realized that the faint clouds in the sky were moving away at an angle and I wanted them to be a major part of the composition along with totally smooth water surface. I setup the tripod with the legs splayed out wide and low to the ground for greater support and wind control. I did not have a lot of time to work this so I started with a 2 min base exposure and then calculated it for a 15 stop X4 ND and took one shot. Total time for this single shot was a 10 min setup with a 4 min base shot (with LE noise reduction on), then the 30 min shot, 15 exposure and 15 dark frame. There were a lot of people moving up and down the pier who simply were not captured in the averaged exposure. I am very pleased with the results.
TIP: Surf and sand is your enemy. With your tripod feet on the sand should a small wave washes over one the tripod will TILT or SINK! If this happens stop the exposure because it is ruined, move your setup higher up the sand and setup again and re-shoot!
For longer exposures in the 4 to 15 min range aside from the wave averaging you can also average the movement of the clouds! Do you see how the are streaming away from us?
TIP: Surf is your enemy. Keep your camera bag behind you higher in the sand!

Brunswick GA. Bridge, 15 seconds, 10 stops of Breakthrough X4 ND.
Shot Setup: For this shot above I was at the bridge leading into Brunswick GA. There was an old bridge this that had been cut off and turned into fishing pier. It was super stable and there was no wind. This was supposed to be a sunset shot but the bridge kept calling to me. So, listening to my inner voice I decided to shoot this in the vertical format and concentrate on color on the side of the bridge, its lights which I wanted to generate star bursts on. The color in the sky was amazing and with the clouds moving sideways I knew it would make a great image. I chose a 10 stop X4 ND. I took 2 or 3 images in this location and liked this the best!
Another advantage of the cloud tearing, water smoothing effect of the longer exposures is the starburst around any bright light in the scene caused by having a very small aperture f/11 to f/22. I think that it adds an amazing compositional image!
TIP: To capture a sharp star pattern on bright lights in your composition use a small aperture!

Duck Island NC Pier, 8 min exposure, 15 stop Breakthrough X4 ND
Shot Setup: This image above was on the boardwalk on Duck Island in the Outer Banks. The water here was green with white caps. Nothing remarkable. The pier on the other hand was stunning with its colors, textures and form! The sky was very overcast and with no form or structure but I thought that a long exposure would pull out a bit of shape. The boardwalk was very stable so I did not have to worry about vibrations. I setup carefully to directly center the pier in the frame. My focus point was 1/3 down the pier as I wanted detail in the rope. I set the aperture to f/32 for the greatest depth of field. I did one base exposure at 1 min and then calculated the exposure for 8 min. This is the single image I took here. I find it very pleasing and ethereal!
TIP: Birds flying through the scene on a long exposure will disappear from the scene due to the averaging of the exposure!
As I said above this introductory tutorial is set up to be presented in 2 or 3 separate posts. Look for Part 2 Sunrise/Sunset Long Exposures and the special filters needed in about 2 weeks!
This is the next type of long exposures we will learn about creating in post #2!

Nags Head Pier Right At Sunrise! 15 min exposure with 3 different ND filter types installed!
As always please let me know what you think of this!