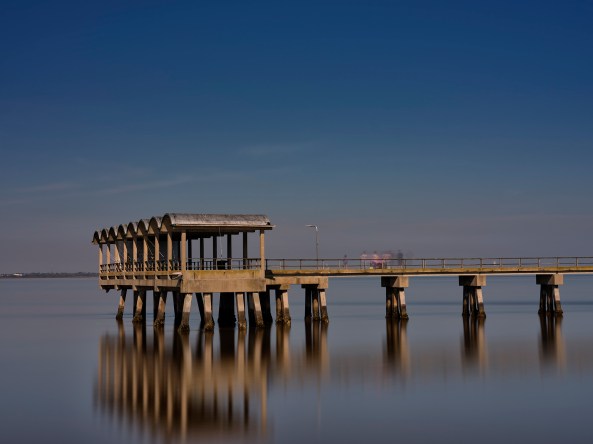
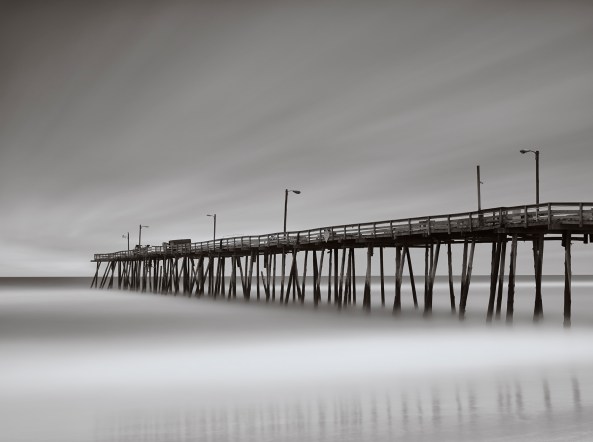
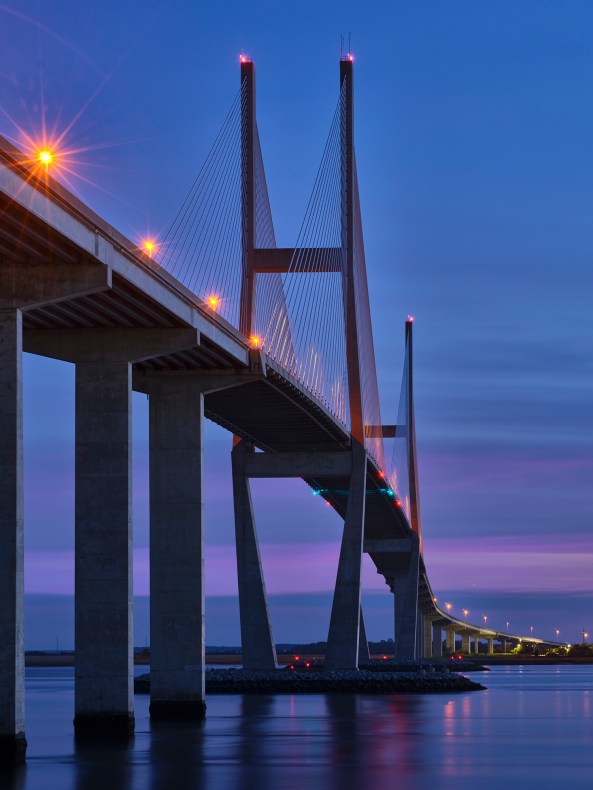
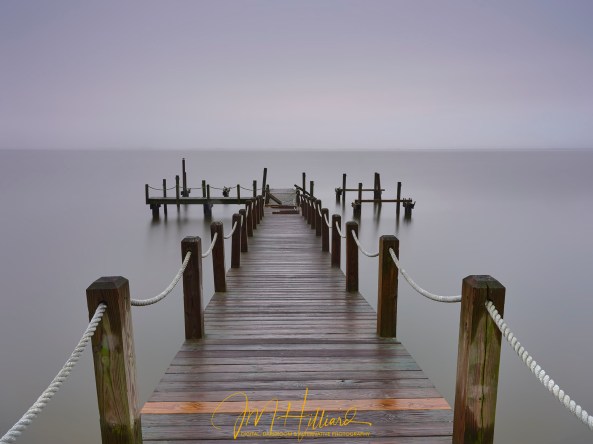
The Ethereal Nature of Long Exposures Part 1: The Daylight Exposure


A conversation on how to easily create amazing Long Exposures

What is needed to create these ethereal DAYLIGHT images!

Warning, this is going to be a 2 or 3 part tutorial and exceptionally long!

Jekyll Driftwood Beach, 400s

Ahh Peace… I love the ethereal nature of the process in ultra long exposures.  Sitting there behind a good camera exploring a composition, light and movement while waiting in great anticipation of the outcome fills me with such inspiration that I can hardly contain myself!

While these types of images take a large degree of patience and dedication to the art, I have found very few photographers who having never tried them fell fast under their soulful  control! I tell you now that with a bit of basic equipment and easily learned skills that ANYONE with a bit of patience will succeed in this artistic endeavor.   Yes you need some extended functionality in your camera system (most modern DSLR and Mirrorless systems have it!).  Yes you will have to buy a set of “sunglasses” for your camera lens called ND filters (this is where you will find the expense). But believe me this style of photography is SO worth it.

Roanoke Marshes Light, 3 seconds

But how easy is it to create these peaceful images that speak to your soul?  For me the process is quite simple, but I tend to forget that 58 years of experience makes this all easy for me.

So with that in mind I am going to take you through my entire processes and share my equipment lists with the reasons why I chose them and when to use them.


Let’s start out with a quick discussion of what a long exposure actually is:

  • Any shutter speed  longer than 1 second is considered a long exposure.
  • The upper limit is… well, UNLIMITED!  Usually photographers start out at a 30 second exposure in order to get their base exposure locked in, then move up to 2 min or greater.  I typically try to target 8 to 15 min for my final image but have several in the 60 min range also.
  • Typically shorter exposures are needed for falling water in the 10 to 15s range.  If you desire to highlight the swirls in the pool under the falls then much longer times are necessary
  • There are several types of long exposure photography. Here are a few with a bit of discussion about what equipment you need to work them
    • Daylight with the sun up:  This style is most likely the easiest of the LE areas to explore.  Most of your scenes along the beach will have brightness levels of the sky and foreground close enough to fit within the dynamic range of your camera and only need solid ND filters.
    • Sunrise/Sunset:  This style of LE work is more difficult as the sun nears the horizon during Sunset and as it gets close but not over at sunrise.  Lighting conditions are way more difficult and still require solid ND filters but will additionally require 2 specialized filters, a 3 or 4 stop soft edge graduated square filter and a reverse graduated square filter.  The light intensity around the horizon will make these image impossible without the graduated filters (more on this in the 2nd post)
    • Night Long exposures: Milky Way, Star Trails and others.  This is a specialized pursuit that requires different lenses and filters and will be saved for another day.

Camera Features and settings needed

Any DSLR or Mirrorless camera (I use a Fuji GFX 100 medium format digital). You will want the following features and settings:

  • Aperture mode to determine base exposure
  • Long exposure noise reduction set to automatic.
    • Photographers new to long exposures might want to turn this setting off.  Here is why:  When you create a long exposure image, say 30 seconds long this is what happens with LE Noise reduction turned on or automatic.
      1. The camera fires and takes a 30 second exposure
      2. The shutter closes
      3. The camera keeps the shutter closed and takes a second 30 second exposure in the dark between the shutter and sensor.  This is called a Dark Frame Exposure
      4. The camera then combines the 2 images and subtracts the noise

While 30+30=60 seconds does not sound like too much of a wait, if you are in the learning process and going thru the trial and error mode that 30 seconds turns into 1 min, a 2 min exposure turns into a 4 min, 4 to 8, 8 to 15 and so on it goes.  This takes a lot of time especially at sunrise/sunset when the light is rapidly changing!

TIP: YES you want the LE noise reduction turned on to get the best and highest quality that the camera can provide, but when learning and making exposure mistakes while calculating ND filter offsets for the shutter these long times degrade your learning curve.  So turn it off until you get used to all of this then when comfortable with LE work turn it on AUTOMATIC and leave it there.  It will only affect exposures over a certain time which is dependent upon your camera.  My GFX 100 turns on at 15 seconds, others at 30 and so on.

  • Pixel Remote for all cameras

    RAW capture mode turned on

  • Color space set to Adobe RGB
  • Manual mode with a BULB  or TIME setting
    • Bulb is where the shutter is open as long as the remote shutter release is active
    • Time mode is where you can set exposure times in full stops usually out to 30 or 60 min.  With this mode you do not need a timer or a remote shutter release, you set the time fire the camera and sit back.
  • Remote shutter attachment with a timer display built into it with cable for your camera. This works wired or wireless. I suggest this one HERE
  • VERY sturdy tripod that you can spread the legs out wide and low. Good tripods are very expensive but can last for you entire life.  Look to Really Right Stuff for the best.
  • A small 3 leg photography stool (Amazon) to sit on and BE STILL. See it HERE
  • A small red headband flashlight. Turn it OFF hen not needed!

Camera Lens

  • Lens, a wide zoom.  95% of the time I use a 32-64mm f/4 lens (35mm equivalent of 23-58mm) on my GFX 100 for my long exposures.  On rare occasions I have a GF 100-200mm when I desire a detail shot of a waterfall, and a GF 17mm for those times that demand a very wide view.
  • Most of my students use a 24-105mm f/4 that will cover most all of the scenes you will run across.
  • You do NOT want a fast f/2.8 lens for long exposures.  By adding the extra fast 2.8 setting you loose a more closed down setting like f/22 or larger which will be useful for getting the long shutter times with less ND.

Filters needed for long exposures:

Filters you say???  But WHY?

Well the simple answer is that in order to do long exposures you need to have long shutter times!  The filters we use are called ND or Neutral Density filters. They come in several types and styles and they act as sunglasses cutting the light down going into your camera forcing it to longer shutter times to compensate!

Yes, I am afraid that they do cost a bit of money, but purchase the best you can afford, you will not be sorry!

Filters companies are a subject full of differing opinions, many good and many with issues so I will discuss my personal  filter decisions and why I choose as I did!

I have been through several companies filters over the years and have used the following.

  • B+W.   Good filters, a bit expensive and limited to round screw on only.  They change the white balance of your camera to a brownish tint… They come in all of the standard values and even offer a rare graduated screw on that places the start in the middle of the frame.
  • Lee.  Again, Good filters, very expensive and made of plastic that are very easy to scratch with one or two in glass.  They change the white balance to a blue cast.  Lee offers ALL of the filters you could possibly need for any type or style of long exposure work
  • Singh Ray filters.  Intolerably expensive. They come as screw on and several sizes of square/rectangle styles.
  • Breakthrough Photography X4 filters.  These are simply the best filters that I have ever used! They are all hardened optical schott glass, ZERO color cast and have an unconditional 25 year warranty!  They come in all types and styles, (more on this later) and mount options:
    • Screw on
    • Magnetic
    • 100mm and 150mm squares/rectangles


BASIC DAYLIGHT ND Filter suggestions for after the sun is up higher in the sky or 1/2 to 1 hour before sunrise!

  1. 3 stop solid ND, sized to your camera lens or a square/rectangle system 
  2. 6 stop solid ND, sized to your camera lens or a square/rectangle system 
  3. 10 stop solid ND, sized to your camera lens or a square/rectangle system 
  4. 15 stop solid ND, sized to your camera lens or a square/rectangle system 

TIP I find that I use the 6 stop, 10 stop and 15 stop most of the time

Breakthrough 3 stop ND

For normal daytime exposures the sky and foreground (especially the ocean) usually have the same tonal range.  For this type work just a solid ND set is needed.  Solids are the same dark density across the entire glass.  Take a look at the 2 images below.  Notice how the sky and foreground are at the same basic brightness value?

The TOP post image is also another example that is right on the edge of needing another type of filter!

Pawleys Marsh, 30 seconds. B+W 10 (110) stop solid filter

Since the difference between the TOP and BOTTOM of the image falls within the dynamic range of my camera only a 10 stop SOLID ND filter was required!  Exposures like this only need a solid ND filter! For this image I used a B+W 110 (10 stop solid) and fixed the white balance in the RAW conversion.

TIPDo NOT worry about aperture diffraction on long exposures.  Remember that we are AVERAGING and the diffraction errors go away.  Use the complete range of your aperture to get the shutter speed you desire!

For color work the rule is the same, as long as the upper half and the bottom half of the image falls within the dynamic range of your camera a solid is all that you need! The Roanoke Marshes Light below is an example for you.

TIP: People moving on a dock you are shooting?  DO NOT WORRY!  On a long exposure with people walking in the scene they will disappear unless they stand still more than 1/4 of the exposure!  The image below had 4 people walking down and back on the dock!

Roanoke Marshes Light, 40 second exposure single 10 stop solid Breakthrough X4 ND.


The  MOST IMPORTANT Lesson!

Ok, here it is:  The HARDEST part of a long exposure image is learning to calculate the exposure values necessary to get the softness/tearing that you desire.  Actually this is very simple and below you will find the steps to easily do this!   I am going to show you 2 ways to do this.  The first and most important way requires to you multiply/divide a simple number by 2 which is ONE STOP either for the shutter speed or the aperture! But first, we need to understand what a full Stop means for shutter speed and aperture!

Understanding Full Stop Shutter and Aperture Relationships

Shutter Speed Example Full stop Changes:

Shutter Speed Values

  • 1/60s to 1/30s
  • 1/30s to 1/15s
  • 1/15s to 1/8s
  • 1/8s to 1/4s
  • 1/4s to 1/2s
  • 1/2s to 1s
  • 1s to 2s
  • 2s to 4s
  • 4s to 8s and so on.

Full stop changes to your shutter speed is simple dividing or multiplying by 2

Being off by a small amount will make no difference as the shutter speed gets longer.

Aperture: aperture values cannot be calculated like shutter speeds.  Aperture is logarithmic and the math is difficult to an extreme.  Todays aperture values on almost all of the digital bodies are usually in 1/3 stop values!  Below you will see the FULL stop values that we want to use for ease of calculation.

FULL STOP Aperture values


Exposure Calculation Version 1

Discussion on using FULL STOP Aperture and Shutter Values to calculate exposure offset for various ND filters


  • START: Set the camera ISO value to the lowest native value that the camera supports.  This is usually 100 or 200.  Some cameras will go down to 50 or 64.  Also, most cameras have a LOW ISO setting, DO NOT USE THIS SETTING because the camera artificially gets it lower by decreasing the Dynamic Range of the camera which decreases the quality of your image!
  • Start by taking a picture in the Aperture priority mode with the aperture set to f/8 to get a base exposure that was good in camera with no ND and say that it metered at f/8 and 1/60s
  1. If your lens goes up to f/22 then we could change 3 stops on the aperture with no ND installed from f/8 to f/11 to f/16 to f/22 which will cause an under exposure of 3 stops that we bring back into the perfect exposure by decreasing the shutter speed by 3 stops or 1/60 to 1/30 to 1/15 to 1/8 seconds.  Still not long enough for the purpose of smoothing water so now we add a ND filter
  2. Putting a 3 stop ND on your lens would again under expose by 3 full stops which we counter by decreasing the shutter speed 3 more stops from 1/8 to 1/4 to 1/2 to 1 second.  Again really not long enough but we are getting there!
  3. So how about replacing the 3 stop ND with a 6 stop ND?  This will give us 3 more stops taking us from 1 second to 2 seconds to 4 seconds to 8 seconds!  Now we are getting somewhere!
  4. For a longer yet shutter speed we could replace the 6 stop ND with a 10 stop ND! This gives us 4 more stops of under exposure that we compensate by making the shutter speed longer by 4 stops!  So 8 seconds go to 16 seconds to 32 seconds to 64 seconds to 2 min (now round to the  whole min because 8 seconds difference from 128 seconds to 120 seconds will make no difference)
  5. Not long enough?  Let’s replace the 10 stop ND with a 15 stop ND!  This gives us 5 more stops of under exposure from the 10 stop ND. We compensate by adding 5 more full stops of shutter speed going from 120 seconds or 2 min to 4 min to 8 min to 16 min to 32 min to 64 min.
  6. If this is too long you can now open the aperture 2 stops which will allow you to shorten the shutter speed of 16 min or 3 stops to 8 min!

Do you see the relationship between full stop changes in aperture and shutter speed?

This is all you need to do!


Exposure Calculation Version 2

There is a FREE long exposure calculator for your smart phone called:   LEE STOPPER. You will need to download and install this  app to use this technique!

How to determine your exposure:

  1. Set the camera ISO value to the lowest native value that the camera supports.  This is usually 100 or 200.  Some cameras will go down to 50 or 64.  Also, most cameras have a LOW ISO setting, DO NOT USE THIS SETTING because the camera artificially gets it lower by decreasing the Dynamic Range of the camera which decreases the quality of your image!
  2. Take a picture in the A (aperture priority) mode with the aperture set to f/8
  3. Read the exposure data from the back of your camera and note the shutter speed the camera used!
  4. Set the camera mode to M (manual) mode
  5. Open the Lee Stopper app on your phone
  6. Choose which of the 3 ND values you would like to use in the app, 6, 10 or 15 stops
  7. Enter the shutter speed into the app by turning the white wheel (see below)
  8. Read the new shutter speed from the blue wheel for the chosen ND filter
  9. If the desired shutter speed is less than 30 seconds enter it into the camera with the shutter speed wheel on the camera
  10. If the desired shutter speed is more than 30 seconds then move the shutter speed wheel on the camera to B or BULB
  11. Connect the remote shutter release cable.  If it has a timer on it like the suggested one above then put it into the BULB mode and press the button to fire the camera.  Watch the timer on the shutter release and when you get to the correct time press the button again to stop the exposure.
  12. Remember if you have the long exposure noise reduction on in the camera the camera will now take another exposure with the shutter closed for the same time as the step above.  When this is finished you can view the results on the camera and if not to your liking adjust the shutter time up or down or change the aperture up or down to adjust to your liking and re-shoot.
  13. If you do NOT have a remote shutter release with a built in timer you can select the stop watch button on the bottom of the Lee app (look at the pic below) and it will automatically move your shutter speed to a stop watch in the app.  Press and lock the remote shutter release and press the start button on the stop watch screen of the app.  When finished, the app will alarm you to stop the exposure.

TIP: for values between full stops (those shown in the app) you can partially move the wheel to the small ticks between the full stops to offset the exposure for partial stops.

Enter Base exposure and read new ND exposure


Stop watch timer in the Lee app


This is all there is to calculation version 2!


Subject considerations

Seascapes:

Clam Creek Pier Jekyll Island, 2 min exposure, 10 stop Breakthrough X4 ND

The ocean surf can give you some of the most amazing images!  The waves are AVERAGED during the long exposure so that one builds on another each averaging the wave before it until you get a perfectly flat reflective surface! Notice the great reflections that you can get because of the averaging!

Shot Setup: To create this shot above I set the tripod on on some rocks along the waters edge.  I looked for a composition where the pier came in from one side to the  T where I could smooth out the water and get a good reflection. I also made sure that there were no ships passing by. Then did a base exposure test of 30s  and used an aperture of f/8 .  at 1/8s.  I then added a 10 stop solid ND and adjusted my shutter speed from 1/8s to 1/4s to 1/2s to 1s to 2s to 4 then 8 then 16 then 32 then 64 then 120 (2 min)

photography stool

TIP: Sand is your enemy!  It is full of water and when someone walks by (within 4 feet) the pressure of their feet pushes the water away from their shoes causing the sand to rise around  your tripod legs!  You might think that this is minor but it will ruin exposures from 2 min and longer!   STAND STILL!  ASK PEOPLE TO WALK FURTHER AWAY FROM YOUR SETUP!  Take a small 3 leg photography stool and SIT DOWN and NOT MOVE! See HERE

Long Exposure Example

Nags Head Pier in Fog/high surf/high wind, 15 min exposure, 15 stops Breakthrough X4 ND

Screw

For really large waves and/or fog you tend to get a more etherial look that is really pleasing!   This image was a difficult one to capture due to the large surf, fog and high winds.

Shot Setup: For the above shot took serious thought.  With gale force winds from right to left, the Surf was about 12 feet high filling the air with salt spray and since this was a workshop there were 14 people moving about on the sand.  I took my tripod and splayed the legs way out to the sides and shortened them to put me almost on the ground.  I then sat between the camera and the wind.  I also took off the shoulder strap so that it would not catch the wind. Lastly I set up the remote shutter release in wireless mode so that even that wire would not catch the wind.   The surf was so high that nothing less than 15 min would give me the look I wanted with pure white water and the fog.  Even though there was heavy fog, please notice that the pier is angling down as it goes out. The white a the end is a combination of the fog and the ultra high waves hitting the under side of the pier!  This shot was a 15 min exposure at f/32 using a 15 stop Breakthrough X4 solid ND.

TIP: Wind is your enemy and hard to overcome.  Splay your tripod legs wide and drop the tripod as close to the ground as you can.  Sit between the wind and the camera to block it as best you can.    You can put weights under the center post and if on sand buy a dog chain screw that you turn into the sand. Attach a truck tie down strap from the tripod to the screw and tighten it down further reducing movement. Find it HERE

Nags Head Pier, 15 min exposure, 15 stops of Breakthrough X4 ND

Shot Setup: Another image (but different) of the Nags Head Pier.  This scene had a 6 foot surf and hardly any real wind.  As I studied the scene I realized that the faint clouds in the sky were moving away at an angle and I wanted them to be a major part of the composition along with totally smooth water surface. I setup the tripod with the legs splayed out wide and low to the ground for greater support and wind control.  I did not have a lot of time to work this so I started with a 2 min base exposure and then calculated it for a 15 stop X4 ND and took one shot.  Total time for this single shot was a 10 min setup with a 4 min base shot (with LE noise reduction on), then the 30 min shot, 15 exposure and 15 dark frame. There were a lot of people moving up and down the pier who simply were not captured in the averaged exposure.   I am very pleased with the results.

TIP: Surf and sand is your enemy. With your tripod feet on the sand should a small wave washes over one the tripod will TILT or SINK! If this happens stop the exposure because it is ruined, move your setup higher up the sand and setup again and re-shoot!

For longer exposures in the 4 to 15 min range aside from the wave averaging you can also average the movement of the clouds! Do you see how the are streaming away from us?

TIP: Surf is your enemy. Keep your camera bag behind you higher in the sand!

Brunswick GA. Bridge, 15 seconds, 10 stops of Breakthrough X4 ND.

Shot Setup: For this shot above I was at the bridge leading into Brunswick GA.  There was an old bridge this that had been cut off and turned into fishing pier.  It was super stable and there was no wind.  This was supposed to be a sunset shot but the bridge kept calling to me.  So, listening to my inner voice I decided to shoot this in the vertical format and concentrate on color on the side of the bridge, its lights which I wanted to generate star bursts on. The color in the sky was amazing and with the clouds moving sideways I knew it would make a great image.  I chose a 10 stop X4 ND.  I took 2 or 3 images in this location and liked this the best!

Another advantage of the cloud tearing, water smoothing effect of the longer exposures is the starburst around any bright light in the scene caused by having a very small aperture f/11 to f/22.  I think that it adds an amazing compositional image!

TIPTo capture a sharp star pattern on bright lights in your composition  use a small aperture!


Duck Island NC Pier, 8 min exposure, 15 stop Breakthrough X4 ND

Shot Setup: This image above was on the boardwalk on Duck Island in the Outer Banks.  The water here was green with white caps.  Nothing remarkable.  The pier on the other hand was stunning with its colors, textures and form! The sky was very overcast and with no form or structure but I thought that a long exposure would pull out a bit of shape.  The boardwalk  was very stable so I did not have to worry about vibrations.  I setup carefully to directly center the pier in the frame.  My focus point was 1/3 down the pier as I wanted detail in the rope.  I set the aperture to f/32 for the greatest depth of field. I did one base exposure at 1 min and then calculated the exposure for 8 min.  This is the single image I took here. I find it very pleasing and ethereal!

TIPBirds flying through the scene on a long exposure will disappear from the scene due to the averaging of the exposure!


As I said above this introductory tutorial is set up to be presented in 2 or 3 separate posts.  Look for Part 2 Sunrise/Sunset Long Exposures and the special filters needed in about 2 weeks!

This is the next type of long exposures we will learn about creating in post #2!


Nags Head Pier Right At Sunrise! 15 min exposure with 3 different ND filter types installed!

As always please let me know what you think of this!


CLiR Infrared Post Processing Photoshop Panel, 1st New IR Software In Years!


The New CLiR Infrared Processing System and Photoshop panel!


CLiR Aerochrome Processed


Working with the new CLiR Infrared Post Processing Panel in PS using my standard test image of the Covered Bridge!
 
This was shot on a XPro1 converted by Kolari to 720nm
 
I have to tell you that the power of these editing tools are beyond amazing! They are easy for beginners and the advanced functions are awesome!
 
Will be teaching the CLiR process in all of my workshops with Jamie Konarski Davidson as well as in the NECCC Photography Conference in July!
 
These 3 images edited in CLiR took me about 15 min to complete all three, one in my normal fashion, one emulating Aerochrome (TOP) and another normal but textured! You folks are going to love using this software.

CLiR My Normal Processing

 
I have a 20% discount code hilliard20 that will give you a 20% discount or you can direct order with it applied at:
 
 
For the NECCC conference I will have a slightly larger discount code for my Infrared Sessions!

CLiR Normal Processing with Texture overlay

 
If you are interested in the new IR Chrome filter with my discount you can purchase it from Kolari at:
Had you heard of this new IR system?   It has been a LONG time since new IR editing software has come out to the market.  I am still exploring the capabilities of this package but I am super impressed.  It does not matter if you are new or experienced in post processing IR images you will quickly learn to navigate the panel.  This is possible due to the great video tutorials that come with the panel!

Let me know your thoughts on this when you have tried it or watched their online intro video!

Creating Etherial Long Exposures With Breakthrough Photography’s X4 ND Filters


The  Peace Of The Creative…

Slowing down creates peace on multiple levels. 

For you as the photographer and for those who view your work, this has never been more true!

Roanoke Marshes Light. Fuji GFX 50R for 20 seconds with a Breakthrough X4 6 stop ND and the X4 2 stop soft graduated ND

I am going to do a slightly different type of post this time. 

We will discuss the art of Long Exposures a bit but we will focus more on the technical aspects of using ND filters to correct for different types of lighting as well as talk about good ND filter systems verses not so good, and why it is always best to invest your money in good filters!

DefinitionLong Exposure – To create an image in camera with the shutter open for longer than a few seconds in order to smooth out movement over timeThis can be softening the  flow of water over a waterfall, flattening of waves in lakes and oceans or tearing clouds moving across the sky.

Setup:  For camera setup you want a long shutter speed (for me usually from 20 seconds to 60 min), mid range aperture (f/16)  and the base ISO that your camera provides.  You do NOT want to switch on the L ISO in your camera. While it  forces the ISO lower it costs you in reduced dynamic range! You should also verify that your camera has Long Exposure Noise Reduction turned on.  This is a royal pain due to doubling of exposure time and forcing you to wait twice as long for a shot but it removes sensor generated noise as well as sensor hot spots.

Note:  I have added a video to the bottom.  It discusses everything and more that we are talking about in this post but it is quite long!


The top image was taken at the always inspiring Roanoke Marshes Lighthouse across the sound from Nags Head Island in NC. As one of my favorite locations for sunrises over the lighthouse it is also a most worthy location for daytime long exposures! These are usually very easy to create due to the small waves in the sound! This image was done on a Fuji GFX 50R medium format digital with a 32-64mm GF lens, 6 stops of ND (Breakthrough X4 magnetic) and a X4 2 stop soft graduated ND on the sky to balance the difference between the sky and water. The exposure was 20 seconds an hour after sunrise and in the rain.

But by what criteria did I choose the solid ND and the soft edge graduated ND?  This is where a little technical knowledge will really help you in creation of amazing long exposures.

First, there are a few points to consider when thinking about using ND filters:

  • ND filters are simply sunglasses that you put in front of your lens to limit the amount of light that reaches the camera.
  • There are 2 basic styles of ND, Full and Graduated.  Full covers and darkens light passing through the  entire lens, Graduated cover and darken only part of the light passing through the lens with the ability to rotate the edge angle of the start line and moving the line up or down in the scene.
  • In the full family there are several values and styles.Breakthrough Magnetic lens mount with the rotating dial on the back to rotate the filter
    • Screw on:  they simply screw onto the end of your lens
    • Magnetic:  these are a new (2018) system from Breakthrough Photography.  They require you to buy a special magnetic mount bracket for the filter threads on your lens.  The adapter has a rotating ring that allows the filters to be actually turned (for use with polarizers) and costs about $20. Currently, Breakthrough is re-designing both the magnetic filters and the magnetic lens adapters to allow for stacked magnetic filters.  This should be completed by summer 2019 and they will replace the older style magnetic filters and adapters. It is important to tell you that when you use the magnetic filter system alone or with the square system there is NO vignetting.
    • Breakthrough Square holder that attaches to the magnetic adapter
    • Square:  these use a square holder and in the case of the Breakthrough this holder will attach directly to the magnetic holder allowing use of and stacking of both systems at once. The square holder will hold 3 to 5 filters depending upon how you initially set it up. This is good for difficult lighting situations where you might need two different graduated filters at the same time.  This style  tends to suffer from light leaks around the edges of the square solid ND filters unless you carefully assure  that they are installed exactly right and only in the holder slot closest to the lens.
  • In the graduated family there are several types:Breakthrough Photography X4 soft Graduated 100mm filter system
    • Hard edge graduated:  where the dark area of the graduated filter is a sharp line.  This is for use on subjects which have a harsh division between the foreground and background . An example would be shooting on the ocean where the horizon is a sharp line between the horizon and the sky.  This is where you would choose a hard edge graduated ND.  These filters usually come in 1, 2 and 3 stop values where they start light and graduate to the dark.
    • Breakthrough reverse grad
    • Soft edge graduated: where the dark edge of the graduated filter starts very soft and  light and darkens as it moves up the filter.  This is for use in areas that you need to balance the foreground from the background but there is no clearly defined edge in the scene.  This is what I used in the image above to darken the sky so there was detail there and still enable the water foreground to be bright and almost a platinum look and feel.  These filters usually come in 1, 2 and 3 stop values where they start light and graduate to the dark.
    • REVERSE graduated:  this is a special graduated ND where it starts DARK and graduates up to lighter values.  If you desire to shoot sunrise/sunset this is a MUST have filter because as the sun approaches the horizon you get a very bright line of colors there that will either be blown out or if exposed correctly cause the rest of the image to be way too dark!  These filters usually come in 1, 2 and 3 stop values where they start dark and graduate to the light.
Breakthrough Photography Magnetic filter system.

So for the Roanoke Marshes Light above, I chose a Breakthrough magnetic X4 (newest technology) 6 stop solid nd to darken the entire image allowing for the 20 second exposure with the camera set to the lowest native ISO value (100),  an aperture of f/16 and a shutter speed of 20 seconds.  the initial results of this exposure was pleasing water in the foreground but the sky was also too light with little to no detail.  So I left the 6 stop magnetic filter on the lens and clipped on the 100mm square filter adapter onto the end of the magnetic adapter and installed a X4 soft edge 2 stop SOFT graduated ND filter.  While watching thru the viewfinder I adjusted the graduated ND up and down making sure that the soft edge came down to the horizon or a little above darkening the sky to allow for more detail there yet allowing the soft white water in the foreground!  It was as simple as that!  The entire process after the first shot took about 30 seconds to setup on the camera lens then shoot!


So let’s talk about sunrise/sunset images when the sun is close to the horizon.  We have all been out at sunrise, do you remember the very bright band of intense color that it right at the horizon as the sun approaches?   This is why the reverse grad ND filter was created, to keep the bright colors from destroying the overall exposure!  Here is an example image, amazingly at the same spot!

Roanoke Marshes Light, 3 seconds with the Breakthrough reverse grad placed on the horizon
Breakthrough X4 reverse grad.  See how you might place the dark area on the bright line at the horizon?

Do you see how bright the light is at the horizon?  The ONLY WAY I was able to capture this image was to use the reverse grad ND placing the dark section right on the bright band of light. Because the overall exposure was only 3 seconds no other ND filters were required.  Should I have desired a longer exposure to further soften the water’s surface I would have dropped in the 3 or 6 stop X4 magnetic filter into the adapter already on the camera!

Let’s take a short side trip here and discuss the actual filters.  By now you all have seen that I am a strong user and promoter of the Breakthrough Photography X4 line of magnetic and graduated filters.  There is a reason for that:

  • All dark solid ND filters suffer from some sort of light leaks around the slide in filter holder.  The magnetic mounted X4 Breakthrough filter line has solved this problem.
  • The X4 Breakthrough filters have ZERO COLOR CAST!  This is a really big deal.  I have been a big user of B+W and Lee filters over the years and still have them on hand.  Unfortunately, both of those both have strong color casts that force me deeper into post processing to attempt to correct these color casts.  I had always thought that this was simply the cost of doing long exposure!  Well NO MORE!   I am so pleased to report that those problems are not the case with Breakthrough, ALL BREAKTHROUGH filters!  Cost wise they all cost about the same when you get up into the same quality levels (B+W, Lee, SinghRay and Breakthrough).  So for me it was an easy choice, I have totally converted over to the Breakthrough X4 line of filters. I currently am using the magnetic and square system from them.
  • There is ZERO vignetting with the magnetic system on ANY of my lenses.  I currently and using 72mm, 77mm and 82mm lenses and mounting both the magnetic system and the 100mm system together!
  • Breakthrough filters come with a 25 year guarantee and their customer service is crazy good.  They are currently (Feb 2019) working on an updated magnetic system where the filters can be stacked in the holder!


So my advice is this.  Cameras come and go, it is your glass (lenses and filters) where your quality lays.  Invest in the best you can.  You will never go wrong with the Breakthrough system!  (gee I wish they would pay me…)

Ok, back to images.  After sunrise is done and before sunset is anywhere near we can still create AMAZING long exposures!  There only 2 problems that we must overcome!

  1. Slowing down the shutter speed to give the long exposure.  During normal daylight we will likely be using a 10 or 15 stop solid magnetic X4 ND as long as the sky and the foreground are near the same exposure value.
  2. Should the sky be brighter than the foreground we will also use a X4 soft edge graduated ND filter to balance the foreground and sky.
Pawleys Island Pier in dense fog. The foreground and sky are close to the same brightness so I only needed a 15 stop X4 magnetic filter

Here is an example of a scene with little difference between the sky and the foreground. The waves were HUGE this day so I used a X4 14 stop magnetic filter so smooth them down (490 seconds) and give the feel I desired.  The fog in the sky took care of itself and I walked away with a balanced ethereal image that I just loved creating! Another example of this is shown in the image below.  This again was a super foggy day so the need for detail in the fog was unnecessary so the oly ND needed was again the X4 15 stop magnetic filter!

Nags Head Pier in super dense fog.  X4 15 stop solid magnetic filter for 10 min


Ok, let’s take a look at a problem image where the sky has detail that you can see but when you only use a solid nd the sky is totally blown out!  What you simply need is a X4 Soft Grad filter to balance the sky and water to give you a bit of detail in the sky!

Duck, NC boardwalk and Tdock (broken) with a X4 6 stop magnetic filter plus a X4 2 stop soft grad ND on the sky down to the horizon.

These last two images show a extreme case of no balance between the water and the sky and more nd was needed on the sky to correct the imbalance.


P

Pier, Outer Banks, 12 min exposure, 15 stop X4 magnetic filter and a 3 stop X4 soft graduated filter down to the horizon.  The sun was up to the right and lighting the bottom side of the clouds.

Ok, one last thing… I had a live group hangout last night with some of my online students and we discussed everything in this post but with more info and thoughts on choosing the correct ND filters for a number of scenes.   Here is the link:

https://youtu.be/_qFkUJZzXmw

I know that this has been a long post but it was necessary to show the technical side of creating pleasing long exposures.    Next time I will discuss how to meter for long exposures.

As always please let me know what you think!


Learn the art of long exposure at our Georgia Coast Photo Workshop!


Georgia Coast Photo Workshop

March 7 – 10, 2019

Boneyard on Jekyll Island at sunrise

I LOVE working with long exposures…

There is so much peace in the long exposure process. At the scene, behind the camera and the results after processing simply takes my breath away. It does not matter what you decide to shoot with, Color, B&W, IR or Film because It simply does not matter, It all works. The processes of working with LE is that as we slow down the shutter of the camera we too are forced to slow down our mental process and be drawn into the scene! This works for boneyard shots at the beach, moving clouds over a building or simple rocks in the surf, It is an amazing journey in one single shot!

THE AMAZING IS POSSIBLE!

That is the thing about coastal Georgia. there are so many amazing photographic opportunities. Aside from the biggies, You all know how I love working in film and wabi/sabi, but creating long exposures is the one single photographic technique for me that always brings me peace…

This is your chance to learn the process, from artistic vision, choosing the correct filters and camera settings to post processing! Come along and learn all of these and more with Jamie and I. You will not be disappointed.

What exactly is needed in terms of equipment?

There are some equipment requirements for long exposures and as you find your self drawn into the process you will likely expand your catalog of gear, especially filters!

  • Good steady tripod.
  • Remote shutter release (wireless allows you to move around while working)
  • Fresh full battery.
  • Camera that allows a T or B mode
  • Low ISO capability
  • A basic set of screw on solid ND filters.  These will work during the day time when the sky and foreground are the same brightness level.  For times around sunrise/sunset you will need to add  2 basic graduated filters as well. ND filters are like sunglasses for your camera that come in different densities (darkness values).

My solid set includes: 

  1. 3 Stop X4 solid magnetic Breakthrough
  2. 6 Stop X4 solid magnetic Breakthrough
  3. 15 Stop X4 solid magnetic Breakthrough
  4. Polarizer X4 filter magnetic Breakthrough
  5. Night Sky X4 filter magnetic Breakthrough


My square (75mm and 100mm) set includes:

  1. 10 Stop 100mm X4 solid Breakthrough 2.5 Stop 100mm  soft edge graduated Lee
  2. 3 Stop 100mm X4 Reverse graduated Breakthrough
  3. 2 Stop 100mm X4 Soft Graduated Breakthrough

There are many makers of ND filters, I have always gone with B+W  and Lee but the Breakthrough  are much higher quality with a much higher cost. Because I have recently added a Fuji Medium Format digital system I am building a set of the Breakthrough filters in both solid and graduated using both their new magnetic system and the 100mm square filters for the graduated.

To start, you do NOT need all of these and the basic set will allow you to get started but you will run into trouble as the sun approaches the horizon on sunrise/sunset.

Learning how to use all of these filters is not difficult but you will be miles ahead of everyone if you consider a workshop that covers all of it PLUS the art of post processing your long exposures after capture.  The Georgia Coast is a great place to do just this.  We will be out all day learning behind the camera as Jamie and I wander around with you helping along the way, sharing our secrets for in camera, as well as the art of post processing in evening classes at the hotel!  This is a great workshop to learn the technique of long exposure but not limited to that!  We will spend time at a lighthouse, a old broken down building, piers, beaches and of course AMAZING SHRIMP BOATS!

Another view of the boneyard after sunrise!

You can download a PDF info link here:

https://app.box.com/s/qcw6ekysxgbe8tm8hb1l7a6nfytinly0

Using B&W To Grab Your Viewers By The Throat…


Yes, deep moody B&W can capture and hold your attention!

Pawleys Island Marsh, North Causeway

I am always curious as to what people like and dislike about my images and make a point of posting them online to see what people think and how they respond.  Sometimes the result of this practice really surprises me.  The funny thing is that most of my personal favorites in B&W are not well received by the public!  Yet those that I consider not as good get better reviews…

It does not matter what camera I choose to create with, Medium Format FIlm (Mamiya 645 AFDii) or digital (Fuji GFX 50r medium format), the output results are difficult to tell apart. I love working in film, its process from end to end defines art to me.  But I also love working in medium format digital as well.  It is a much shortened and simpler  process and only takes a fraction of the time when compared to film.  I think most of you will be hard pressed to pick the film/digital images that I am going to place in this post! So the source of the images make little difference to me.

Approaching Storm at Pawleys Island

Have you ever considered what it is about B&W photography that you are attracted to?  What about it grabs you?   For me, it is simple, the removal of color strips the scene to it soul allowing you to really become one with it.  It removes the confusion and gives a pure view of the scene!

Consider the image of the approaching storm above.  The clarity of the image draws me into the scene, the sharpness captures my interest and holds it.   The dark moody tones make me feel like I am still standing right there!

Pawleys Island Beach Crossover in the fog.

I am not saying color work is bad, rather that I personally enjoy working in monochrome and enjoying the finished images processed in B&W much more that color work.   I suppose that is why working in film is so addicting to me, everything about the process from working behind the camera, film processing, scanning and printing I find very enjoyable.  But with the introduction of the Fuji GFX 50R camera system I am equally thrilled!  You can shoot in both color and B&W on the fuji system. The real difference is that you can set it up with film emulation profiles in camera and generate and output true B&W RAW images!  I find that I like using the Acros/red profile in camera because it matches my film work with actual Acros film!   This gives me another entire workflow that matches my B&W film work 1:1! The fog image above in a good example of the ethereal nature that you can achieve when working in B&W.

Charlee Marie

The image above if Charlee Marie highlights this relationship between working with medium format Acros film and the medium format Fuji GFX 50r camera system.   The amazing tonality of the boat and sky capture my attention and will not let it go.  The subtle tonality of the wheel house is flawless.  Overall this is one of my favorite images produced by the 50R, capturing the heart and soul of the shrimp boat in a non cluttered fashion usually associated with them on the easy to use medium format digital 50R!  This particular image is one of my favorites from the 50R that has not been well received by the public, yet I cannot let it go…

Port Royal Shrimpers

The Port Royal Shrimpers is an example of everything coming together for a powerful image; Good Light, Clouds, Boats and reflective water plus being there!  Of all the images captured with the 50R this one has the highest number of likes and comments online.  Yes it is a powerful moody image but I am not sure if I personally like it more than the image above!

Daddys Girls, medium format Acros film

OK, on last image of Daddys Girls was taken last week on Acros Film on my 645 AFDII  using a deep red contrast filter so the sky is a little darker.  To me this is a powerful image and different from the digital work above it due to the deep red filter.  Yet all other aspects of the image match equally to the work generated on the 50R system.   

To me, this illustrates how well the film and digital systems can work together.  There are times when working in film is just not possible or practical during travel where the 50R would work much better and easier.

I am happy that each camera system can complement each other so closely!  It will make my life much easier and allow me to concentrate on creating art rather than on how I capture it!


As always please let me know what you think, I value your input!


The ART of creating MOOD


What Makes Ethereal Moody Images?

Kathy Dean, medium format film

This post is going to be a bit different from my otherwise technical (Geeky) posts of the past.  I am going to share my philosophy of creating MOOD in my art.

I spend a LOT of time studying the fine art photography of the past masters (Ansel and others) and current photographers.  I visit galleries, web sites like 500px scouring  for examples of the creative process that generates images that speak to me.   This takes up a lot of my time but I feel that it is a worthwhile investment to further my understanding of what makes great art that reaches out and grabs my attention!  I do NOT do this in order to copy others, (that is not my way) rather it is to understand what about an image makes it reach out and tweek my artistic desire!  You would think that after 55 years of personal photography that this would not be necessary, but if you think about it you will realize that life is learning and we never stop that process.  Sometimes it is re-learning forgotten lessons, other times it is about learning new lessons.  We all change and our tastes also change as we age, so to me this is a natural progression in our path in artistic endeavor.

I personally tend to work mostly in B&W Film, but do not limit myself to it.  I create as well in color both digitally and on film too, but my real passion is B&W. Here we are going to discuss only B&W and all of my examples are created on various 6×4.5 medium format camera systems because working with flim and the process of film motivates and enhances my creative process.  I am going to leave out the technical details of the images because I want you to really study the images without considering the technical aspects of the creative process.

Let us consider the image above of Kathy Dean, a shrimp boat in Port Royal, SC.    What about this image gives you pause, making you want to really study it?   Sit back and consider the mood of the image and what you are drawn to as you study it.  For me, it is the dark moody sky and reflections contrasted against the bright whites of the boats.  My eyes continuously circle around these details and re-settle on the boats again and again.  The dark sky and water create a moody ethereal frame that traps our attention on the boats themselves yet provides a scene free of the distractions of color

If we were standing there today with camera and tripod wouldn’t we be thinking that we could have a much better image with fluffy clouds?  Let me suggest that if indeed there were clouds the day I created this image that they too would have been a distraction from the mood of the image. 

I will honestly tell you that as I stood before this scene that it was my primary thought that this could be an amazing moody image provided that I set it up as a longer exposure to smooth the water and darken the sky and reflections.   In other words, I studied the scene, pondering what it was that drew me to it and how to use the camera (my tool) to create my vision! 

These are my secrets to successful fine art photography:

Stop, Look and Think about the scene:

  • Why are you attracted to it?
  • How do you compose for a simple yet powerful image free of distractions?
  • How to super charge the image with mood?
  • How to use the camera to create this vision?

Lindale Denim Mill, a study of extreme dynamic range in a single image…

Let’s take a look at another image, this one digital (yet another tool), and the camera on hand when visiting the inside of the Lindale denim mill in Georgia.  This is one of those  location that  will NEVER fail to deliver scenes full of wabi/sabi goodness full of amazing mood providing you approach it with the right motivation and mental tools!

Lindale Denim Dye Tank

I spent 7 hours here over the course of 2 days.  It was a power parade of mood that swamped my senses and at every single turn. I was continually stunned at what lay before me as I moved through the factory!  What more motivation could a fine art photography artist desire?  I slowed down, WAY DOWN and studied each and every hint of mood before me. 

For this scene, (Blue dye tank) I studied the dark moody ceiling and walls behind the pillars, the deep tank with its grungy details, but I particularly paid attention to the play of light coming through the windows and highlighting the entire scene!   I realized that in order to capture this scene with mood that I would need to control the sunlight and keep the dark areas from loosing detail.   I setup the camera to control both and average the entire composition.   This happened quite fast (remember 55 years of experience) and it only took ONE SINGLE EXPOSURE

To me, this scene has amazing flow that draws me in thru the lighted windows, walking around the exterior of the room and moving down the ladder.  My attention never leaves the room.  It has a wonderful dark mood and speaks to me of days long gone.   

What more can a photographer ask for in such a creation?

My path in creating this image:

  • I walked around the entire room several times, studying the elements that the scene contained.
  • I constantly asked myself;  “Mark, why do you like this?”  and “What do you actually like?”  I answered; “The dark mood broken into segments by the light coming thru the window and the LADDER!”
  • Can the camera I had capture the overall mood and range before me?  “YES!”
  • What is the best vantage? “Closer to the ladder!”
  • How best can I control the contrast and range of this image? “Multiple spot meter readings to shift the scenes entire dynamic range into that of the camera!”

After this it was just a simple matter of setting the the composition, exposure and capturing the image!


Ok one last example…  Daddy’s Girls…


Daddy’s Girls, medium format film

This is one of those scenes that I visit time and time again.  It is only a few hours from home down in Bluffton, SC (a location where my oldest son lives).  There is only one single boat at this commercial dock and processing plant.  There is a boat launch and pier close to the left, but  for for this shot I wanted a more head on view.  I got my son to take me out on his boat so that I could get this angle on a terribly stormy day. Dark and Stormy it was.  Heavy rain and wind, but these were the components that were in my vision so I suffered through it to get this image.  I took several shots of the scene (waves, no tripod and a moving boat) so I invested an entire roll of 16 images knowing that a lot of them would be blurry and out of focus.   Good thing too, I only got this one single sharp image but it was so worth the effort!

Do you see what I am getting at?  I KNEW what I wanted with this image, I knew what tool (camera) I wanted to use so I returned dozens of times here, re-evaluating again and again till I got what my vision demanded!   I have been here a hundred times over the past 4 years and was NEVER satisfied with the scene!

What my vision demanded:

  • Moody, Stormy Sky.
  • Bright light on the boat.
  • Cloud detail.
  • No other boats to clutter the scene at the launch.
  • Medium Format Film only.
  • No workmen on the boat.

So it took years of returning again and again until I got the scene that matched my vision!  But to me it was well worth it!  Will I stop returning?  Heavens no, you NEVER know what nature will provide you with so keep returning!

As always, I hope that you enjoyed this post!   Please consider leaving feedback and comments!


Another Film Dynamic Range Adjustment Post!


A Quick Dynamic Range Followup and Example

Hurricane Florence is coming… Spent all day today starting to get ready. But yesterday I stopped by the causeway bridge to Litchfield beach and shot 1 roll of FP4+ film on my Fuji GA645zi changing between the red R24 and R25 filter. I was looking to the North from the bridge. It is a very beautiful spot and scene.
This is one of my go to spots when I am looking for inspiration and it did not fail to deliver for me. I was heading home but decided to stop at the studio and put the film into the processor, wait the 20 min then hang it in the dryer overnight.
 

But…

When standing there looking at the clouds I realized that the whites were going to be blown so I subtracted 30 seconds from the development time to compress them down towards Zone 8 so that I could capture the entire dynamic range, then in scanning moved them back up a bit to place them closer to my memory of them and bring the blacks up a bit! I love the effect the deep red filter gives to the blue sky.

How did I do this you ask?  I am glad you asked!

With a hand held spot meter I measure the brightest white I desire texture in, then measured the darkest black for texture.  Pushed the average button on the meter and got the zone 5 reading along with a chart showing max and min.  This tells me that the whites will be blown out on the negative.  SO I adjusted my exposure to give texture (Zone 3) in the blacks I wanted and let the whites fall where they will.   In the processing knowing how far over exposed the whites are I can now adjust the developing time (-1N in this case) to compress the whites down to zone 8 (-30 seconds).  Easy!
In the scanning software (VueScan) you have the opportunity in the extended menus to again shift the black and white points up or down.  I simply adjusted both to expand the dynamic range back out to the range of the Gicle’e (RIP) printing system I use in my studio yet keep the whites from being blown out!
  1. Measure the range of the scene and determine if the film can capture it all
  2. Expose to move the blacks with texture to zone 3.
  3. Pick a -N developing time according to where the whites fell in the negative (1 stop for this one)
  4. Scan to keep the textured blacks at zone 3 and move the compressed whites back up where they belong in VueScan)


The Results:


The Causeway going to Litchfield Beach, SC

It was a pleasant and very satisfying endeavor and made me very happy today when I scanned this image on my way home from preparations.
 
Data: GW645zi – 55mm – Roll 95 – Fr 8 – Red 25 +3 Filter – f8 – 1_60 – FP4+ – Xtol Stock -30s – Wet Scan – T CI 50 – Litchfield Marsh- 2018-09-09
I know, this was a really short post, but I was really pleased with the image results and the entire process was one of those “By the seat of the pants” type of evolution.  I wanted to share again, now simple the process is for adjusting the range on film in development and scanning.  There will be yet another one of these in the future but it will be VERY detailed and perhaps even with a video!

As always please let me know what you think!

The Amazing (and affordable) Dayi 6×12 Medium Format System!


BIGGER is BETTER!


This is the Causeway to the Litchfield Inn in Pawleys Island.
100TMX processed in Xtol 1:1. Yellow filter, f/22 at 1 second metered on the white roof on the distant boat house where the water seems to end an placing that in zone 7 to 4 seconds then to 6 seconds for reciprocity..


Well… Yes, I have a NEW medium format camera system! Not new used, but NEW NEW!

It is the Dayi 6×12 and is custom made in China for each order.  It is very affordable, the camera, lens cone (adjusted for you lens ahead of time) film back, focus screen and shade, viewfinder and a Arco swiss mounting foot!  All in all this ran me around $1000 and took 2 months from payment to delivery.  There are several companies selling them but I chose ecbuyonline2008 on Ebay, contacted them and then dealt directly with them for a nice discount. They provided a direct email at ecbuyonline@foxmail.com.

Dayi 6×12 showing the ground glass and shade and my custom dark cloth attatched.

Ok, the camera itself is very well balanced and easy to use.  As with most types of cameras of this design it uses a lens cone cut specifically for the focal length of the lens used.  If you use a different length lens as a 2nd then you will need another cone designed for it as well.

Dayi 6×12 showing the film back and ground glass

The focus is controlled by a CALIBRATED helical mount that gives very fine control of the focus.  Because it is calibrated, you can just dial in the distance and forget the ground glass.  Me?  Not so much.  My eyes are not calibrated very good.  Now, a cheap laser rangefinder would be just the thing.  Fire it, dial in the distance and shoot!  I use the ground glass as my focus operation.  I have a custom made dark cloth that fits the glass frame and works very well.  I have a nice 8x loupe that I use to make up for my old eyes!


There are calibration screws around the outside edge of the lens cone and you can see the small hole for one at the end of the video above.  These allow you to set the infinity point and place the lens in the correct position.  You can find a tutorial HERE for this process.

Lenses that will work on this camera can be found HERE.

The camera is a bit heavy and not suited to handheld work, but it can be done.  It is a VERY well designed and built camera system and has ZERO light leaks.

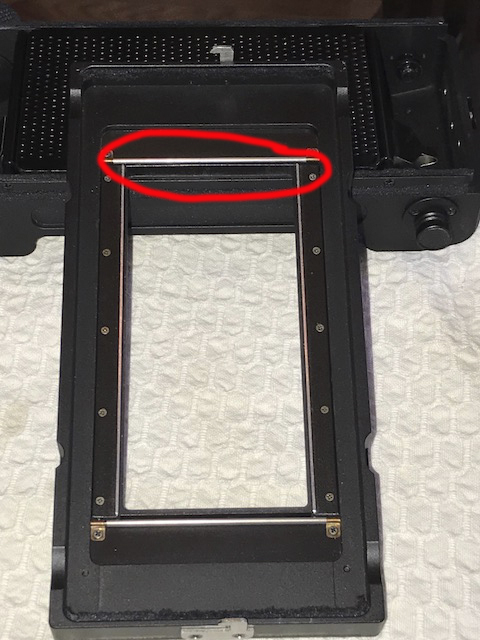
When the camera first arrived, the film holder was scratching the surface of the film emulsion.

Here is the issue, a spring next to a roller that is too high in the film plane with rough edges! It is the bright silver line under the roller.  See how it is bent up in the center?  It actually touched the film.

The complete assembly

I took it apart and realized that a spring was adjusted too high on the film holder back and touching the film.  It was a simple adjustment to fix this but I still sent an email about it and a few days later this video arrived showing how they said to fix the issue which is exactly what I had found!

This goes to prove that they are responsive to customer complaints, problems or suggestions!  That is a big plus in my book!

The system is simply a joy to use.  It is bright in the corners (of course that is lens dependent) and the focus is spot on!  I have put about 10 rolls of film thru it so far including some Ektar 100 (which I have not processed yet but have the chemistry). Now that the scratching issue is fixed I see a great future for the camera in my kit.

The folks at the company in Hong Kong are easy to work with and very responsive  over email.   I highly recommend them.  They have MANY other cameras for sale also including a larger 6×17 version of this one.

Stormy Seas, Dayi 6×12, not the best composition but a good example of the quality from the camera!


I hope you enjoyed this short post on the new pano camera system.  There will be more following!

Testing the new Fuji GA645zi Medium Format Camera


A Light Weight 120 Autofocus Travel Camera with a Zoom Lens!

Fuji GA645zi

Fuji GA645zi

Well…. I have been waiting to test out my new Fuji GA645zi camera for about a week now but due to family issues I have been unable to do so.
I finally made it out to visit the shrimp boats just west of Tybee Island and the light house there! The sky was very plain with no clouds but I really needed to test this camera out. I put on a yellow filter to slightly darken the sky and used Fuji Acros 100 film.
 
This is the shrimper Agnes Marie.
Shrimp Boat Agnes Marie

Shrimp Boat Agnes Marie

Data:
Fuji GA645zi – Acros 100 – f19 1-30 Plus 1 EV, Yellow Filter 9-18-17 – Wet Mount scanned – Agnes Marie – 2017-10-27. Processed in Xtol 1:1.
Fuji GA645zi

Fuji GA645zi

Please note that along the bottom of the frame ALL of the exposure data is recorded!  This is a feature that I really like.

 
The auto focus system is very robust, fast and dead on! It is not as loud as people claimed and I really enjoyed using it! I had an issue with my first roll in that it did not clear the take up reel and bulged out fogging most of the roll. Bad me, I used the one that came with the camera, so I then used the reel that the Acros came on and all is well there now. 
 
I know that the sky is plain but I am still happy with the results!
 
I am looking at this camera as a small light 120 travel camera. I know that the 6×4.5 negative is smaller than my 6x7and 6×9 systems but it still gives a large enough negative for sizable prints.  An other nice feature is that the camera has a 7 position zoom quasi zoom lens which again makes it attractive for travel!   
I only had time to wet mount scan 1 image today but I put 4 rolls of film thru it so there will be more on the way including the Tybee Lighthouse!
 

Testing the New Kolari Vision AR 720nm Screw On Filter


720nm Medium Format Film Photography with Rollei IR400 Film


Tomotley Plantation in 720nm Infrared with Rollei IR400 film and the Kolari Vision 720nm Filter

Infrared FILM photography has always been on the difficult side, but not because of lack for film because there are several films on the market.  Rather it is due to the poor quality of the available 720nm filters on the market.   

Kolari 720nm FIlter

Recently Kolari Vision www.kolarivision.com has come out with a new series of infrared filters with their AR (anti reflection) that stop or greatly reduce hot spots in the center of your film or digital sensor.  These hot spots are due to the various coatings, paint and other reflective coatings on the glass elements and coatings on inside of your lenses causing the light to bounce back and forth several times then hit the film dead center causing the hot spot.    

The main filter on the market has been the Hoya R72 filter which works but gives a low contrast washed out image.   Along come the new Kolari filter and now I am getting more contrast and even images with greatly reduced hot spots.  AMAZING!


So lets take a look at the image above.  This is the Tomotley Plantation about 20 min west of Beaufort, SC and  was taken with the Rollei IR400 film rated at 720nm.  Without a IR filter the ISO is 400 and the emulsion generates a very good likeness of Kodak TriX 400 film.  If you add the 720nm filter the ISO drops down to 12 or 6  but you get the amazing whites on the grass and leaves.  You even get the Wood Effect where the green items BLOOM  out with an etherial soft white energy on the image!

Few things beat a beautiful sunrise photographed in color when you want to create a dramatic image. The same scene photographed in infrared may be disappointing unless there’s some  IR reflective subject matter (we’re talking about deciduous trees here) to add interest. That’s because of the “Wood Effect,” which is the bright, white reproduction of the chlorophyll layer of deciduous plants. The effect is named after infrared photography pioneer Robert W. Wood (1868-1955) and not after the material wood which does not strongly reflect infrared.

Normally the Wood Effect is difficult to achieve at 720nm and is better seen at 800nm and and above.  I have been very happy with this new filter from Kolari in combination with the Rollei IR400 film because I am constantly getting the effect plus deep contrasty images.  It simply works as expected which is way more than I can say for others on the market!


Technical Data:

  • Fuji GF 670 Medium Format (120) folding Rangefinder with a Voigtlander 85mm Color Scopar lens.  
  • Kolari 720nm AR filter
  • ISO at 12 and 6, both are close to perfect because they are only 1 stop apart.
  • Aperture: f/32
  • Tripod mounted

Development:

  • Ilford Perceptol Stock mixture 1:0, 20c, 14 min with 5 seconds of agitation every min.
  • Water Rinse
  • Stop Bath
  • Ilford Quick Fix for 5 min with 5 seconds of agitation every min.
  • Water Rinse
  • Clearing Wash
  • Water rinse for 10 min
  • Distilled Water rinse with 3 drops of wetting solution
  • Dried overnight in filtered Mistral Drying Cabinet.
  • Wet mount scanned on a Epson 850 pro at 6400dpi.

If you are considering working in 720nm whether in film or digital I highly recommend this new filter from Kolari!


Become the Master of your craft….


Pelican Dock - Type 55 4x5 Film, Wet Scan

Pelican Dock – Type 55 4×5 Film, Wet Scan


This is the Pelican Dock on Pawleys Island, SC. It is a 4″ x 5″ FILM image taken  on Polaroid Type 55 film from one of my film workshops.

Polaroid 900 w/ 150mm Fujinon lens converted to 4x5 by Steven Icanberry.

Polaroid 900 w/ 150mm Fujinon lens converted to 4×5 by Steven Icanberry.

I did this with a Polaroid 900 converted to 4×5 format camera and the film was expired (16 years) Type 55 instant 4×5 film that also creates a fragile negative which was scanned Wet Mount on an Epson 850 . This single image costs about $35 to create and process!

But look closely at the image, notice the calm peace of the scene, the amazing clarity and sharpness that is a gift when working with large format film, but more importantly, the edge process markings created when working with this amazing film!

But of greater importance than how I created this image is the why

We all see amazing scenes as we travel through life, but how many of us actually take the time to really experience and feel on an emotional level what we are actually experiencing as we create our art? I watch so many great photographers skitter from scene to scene like a bee to pollen that it leaves me feeling sad.

Let me ask you, “How can you create art that will appeal to your viewers on an emotional level if you yourself refuse to slow down long enough to feel the emotional impact yourself as you create it?

The key here is to stand before the scene and take it all I. Get a feel for what you desire to share with your viewers before you even pick up your camera! SLOW DOWN, take your time, investigate it from many angles and exposures. Yes this is a single image, in fact the only one I took due to the cost, but I spent a half hour studying the scene, moving around looking for the best impact and knowing that I would get the edge markings and using them to increase overall impact!

This is a hard lesson to learn and harder still to practice. This is one of the the lessons forced upon us who still shoot film as I do. After all, Film = $. We have to slow down and make every shot count so the next logical step is to connect on an emotional level with your subject and thus create art that is charged with mood that will draw your viewer in.

Just because I use FILM as an example here for you do not think that it does not apply to digital!  Yes, once you pay back the investment of your digital equipment with image sales (you do sell your work don’t you?) the cost per image is basically paid only in terms of your time.   But time also has a value and if by slowing down and imparting emotional impact in your image then you will be on the true path of photographic nirvana!

Take your time, explore your scene, feel it’s emotional impact, SLOW Down!

Do not copy the Bee, rather strive to be a master of photography…

Using M mount glass on the Sony A7rii camera


The AMAZING just got better….

Stormy Seas with the Voigtlander 12mm Ultra Wide Heliar M Mount Lens and the Techart Auto Focus Leica to Sony adapter

Stormy Seas with the Voigtlander 12mm Ultra Wide Heliar M Mount Lens and the Techart Auto Focus Leica to Sony adapter

Look closely at the image above.  It was taken with a Voigtlander M mount 12mm Ultra Wide Heliar lens and the Techart M to FE AUTOFOCUS adapter on a Sony A7rii camera. The cleat on the bottom right is about 6 inches from the front of the lens!  The color rendering is amazing and there is very little distortion that is normally found with an ultra wide lens!   I can hear you asking how I accomplished this!

I recently picked up the Techart M to FE Sony mount adapter for my Leica and Voigtlander lenses.  It has been my desire to use them on the Sony A7rii, A6300 and A6500 cameras.

The Techart auto focus adapter is amazing. I actually moves the lens in and out to get a sharp focus.  It has several rules that you must follow to use it and as long as you do it will provide great service.  It is quite fast!

  • Use a center focus point on the camera
  • Set your camera aperture to f/2 and leave. It there
  • Set the real aperture directly on the lens.  
  • Don’t try to focus with the lens set to f/22, keep it around f/8 or f/11
  • The Exif data will shot f/2 but the exposure meter will correctly meter the subject.
  • Don’t try to use a heavy lens on the adapter unless you support it.

12mm Voigtlander M lens with the Techart autofocus M to FE adapter

12mm Voigtlander M lens with the Techart autofocus M to FE adapter

Here is a link to a short video demonstration of the Techart M to FE adapter on my Sony A7rii:


B&W work with this lens as well as my other Voigtlander and Leica M mount lenses are just as sharp weather in color or monochrome!

Stormy Seas with the Voigtlander 12mm Ultra Wide Heliar M Mount Lens and the Techart Auto Focus Leica to Sony adapter

Stormy Seas with the Voigtlander 12mm Ultra Wide Heliar M Mount Lens and the Techart Auto Focus Leica to Sony adapter

I also have and use a Metabones M to FE adapter which gives the same results but with manual focus only.   Sometimes manual focus is necessary depending upon your subject but reguardless of focus type both adapters and all of my M lenses work wonderfully on the A7rii camera system!

Stormy Seas with the Voigtlander 12mm Ultra Wide Heliar M Mount Lens and the Techart Auto Focus Leica to Sony adapter

Stormy Seas with the Voigtlander 12mm Ultra Wide Heliar M Mount Lens and the Techart Auto Focus Leica to Sony adapter

If you have a selection of M lenses then the cost of a M to FE adapter is well worth the money.  But I am VERY impressed with the new autofocus adapter!


Please let me know what you think!


B&W Camera Systems: Functionality/Creative Power/Affordability/Film/Digital ??


Getting your BEST B&W image!

Outer Banks Pier, Monochrom Camera System

Outer Banks Pier, Monochrom Camera System

I wish to share some images and thoughts from the Leica M Monochrom B&W ONLY camera system. I know that it is NOT FILM and a very expensive camera system, but it comes as close as you can get in a wonderfully usable B&W only system!  

Most people will take a color image then  convert  it to B&W in post processing but it will never be the same as actually shooting in B&W with a digital or film system!  Yes you can get close but you loose the amazing gradations and tonality that is part and parcel to world class B&W images.

Dugger Creek Falls, Linville, NC M Monochrom

Duggers Creek Falls, Linville, NC M Monochrom

The Pier on the top, is in the Outer Banks and is a 4 min exposure using a Leica Elmerit 28mm lens and the creek below is is in the New River Gorge in West Virginia. It is Dunloupe Creek and a 8 second exposure using the AMAZING 50mm Summilux lens. As you can see, the graduations and clarity are simply amazing. The water takes on a distinct Platinum tonality!

Why am I showing you these? Well at the end of the post I will give you a link for 2 videos where a Fuji X100T and a Leica M are compared for street photography and for a discussion on the Leica M B&W. The videos are  quite entertaining and shows why sometimes a more expensive camera can be worth the money…

Sometimes!

Dunloupe Creek, New River Gorge WV, M Monochrome

Dunloupe Creek, New River Gorge WV, M Monochrome


It can be very hard balancing the desire between camera systems and affordability, but sometimes, with SPECIAL cameras the money takes a back seat. I own 3 Leica camera systems, and 1 of them I could have done without (Leica M240), another is an amazing film system (Leica M7) and then there is the M Monochrom. The Monochrom is scary amazing with crazy good B&W output to even consider shooting color then converting. I have NEVER considered the money spent on it to be wasted! In fact, I am considering selling/trading the M 240 but will keep the Monochrom and M7 film body along with most of my Leica and Voigtlander glass.

Glade Creek Grist Mill, Babcock State Park, WV, M Monochrome

Glade Creek Grist Mill, Babcock State Park, WV, M Monochrome

For me shooting in B&W is a soul centering event. I take it very seriously and slow. When you consider how working in Monochrome strips away the confusion of color leaving the soul of the image then you can understand why I am looking for the very best way to capture the best possible image.  

  • Shooting in color then converting to B&W works but is a compromise and will only give you a compromise image.
  • Shooting in film generates a purest form of B&W image and by far is the best way to do it but requires extensive time for setup, capture, development, wet scanning then printing! One roll of 120 film in the 6×7 format will generate 10 images.  Processing takes about 45 min then it has to go into a film dryer overnight.  Lastly, comes wet mount scanning which can take 1/2 hour per exposure.  Now, I do not scan every image, I choose the very best images from the roll (usually 3 or 4) and only scan those.  All in all there is about 8 hours of work involved with that single roll!  It is a slow process to be sure but very fulfilling and leaves me with a great sense of inner peace. 
  • Now, along came the M Monochrom camera from Leica, a full frame 19 mega pixel sensor with NO COLOR FILTERS over the image wells. This means that there is no anti-aliasing filter, and no brayer array.   So effectively you get a 19 x 3 megapixel image (no brayer layer means every pixel well generate a true monochrome data value different from its neighbors!)  which is crisp and has film like gradations  that are difficult to differentiate from a film negative!
Roanoke Marsh Light, Outer Banks, M Monochrom

Roanoke Marsh Light, Outer Banks, M Monochrom

Aside from doing all of this in film (which I still work in all of the time) the M Monochrome (or its sisters) is the ONLY GAME IN TOWN! Hence, the cost of the system takes on new meaning since it is such a specialized digital system!

Sometimes I will put the film away and take out the Monochrom system.  It is not quite the same as film in the overall process but it certainly is when the finished products are compared!

This is something to consider…

Here are the video links:


One Perfect Image…


Sometimes we just have to stand there taking it all in!

Hoodoos in Bryce National Park at the Sunset Point Overlook. Olympus XA with Kodak Tmax 100 film. This is MY defining image for my entire trip!

Hoodoos in Bryce National Park at the Sunset Point Overlook. Olympus XA with Kodak Tmax 100 film. This is MY defining image for my entire trip!

Ahh, have you ever had one of those defining moments in life where you KNOW that you are witnessing something truly special that touches your soul?   Well that is exactly what this was for me.  We had been on the road for almost 11 days on a trip from Rapid City thru Wyoming and Utah.  Our last stop of the trip was supposed to be in  Zion National Park but we had to cancel due to terrible rain and flooding in the park.  We extended our time in Arches which was really nice but it was not until I stood here in Bryce National Park at the Sunset point looking down into the canyon that I realized that I had made a mistake… I should have added onto the time there.   We only had ONE day to explore Bryce and it was very nice there with many great vistas and rock formations, but this image at the Sunset Point was the defining moment for the entire trip for me.  

Hood Valley, Bryce Canyon, Sunset overview.

Hood Valley, Bryce Canyon, Sunset overview, Sony A7rii

Understand, that I am NOT talking about either of the  photographs captured and shown above, but rather the moment for me personally standing there taking it all in, becoming one with the scene, no camera, no thoughts of photography only the experience and impact of witnessing the greatness of the scene.   I stood there for a good half hour drinking it all in and I will remember the emotional impact upon me for the rest of my life.   Yes… it was that powerful.  

There is some serious food for thought in this last statement.  In these days of rapid fire digital photography don’t you think that we can quickly loose sight of what it is that we are trying to create in our art?  Shooting in film slows you down which aids in the creative process.  This is not to say that we cannot do this with our digital systems because we can and I do, but rather most of us who practice this art tend to “hurry, capture and move on to the next thing!”   

Olympus XA 135mm

Olympus XA 135mm

It was almost as if it was an afterthought that I actually took my Sony A7rii with me up the trail to the overlook and took a few images which were actually quite nice in color, but after the sensory overload of the scene I could only think of one thing, B&W and FILM.  Yes, I could convert the color image above to B&W in post processing and do quite a good job of it but NOTHING can compare to what I can create with film!  So, it was a bit of a walk back down to the car where my wife and 7 year old grandson were resting because of the long drive to get here, but down I went with only one task, to trade the digital for a TINY B&W film camera, the Olympus XA.  The XA is the worlds smallest 35mm rangefinder camera. It has an amazingly sharp lens with easy focus, but the key is the fact that it is pants pocket (not those bulky cargo pockets but regular ones), it is light and handy.

I took so much camera equipment on this trip that the only space I had for a film system required that it be tiny.   Against all of my experience I threw in this tiny camera along with just 5 rolls of Kodak Tmax 100 film and off we flew.  I am so glad that I did now but having said this it is only fair to share that this was a colossal mistake.  I should have made room for a medium format (120 6×7) camera and taken out a lens or two for the Sony.   I have learned my lesson and will never repeat this mistake.  Don’t get me wrong, the XA captured an amazingly detailed and  sharp image. I love how it turned out.  The Kodak Tmax 100 film along with the Perceptol developer generated a image (yes small) with tiny grain and great sharpness.  Am I happy with the result?  You bet!  Would I have been happier with a larger 120 negative, OMG YES!!  Can I have a do over please?  Yes, I know, not to much of there ever being a chance for that.

So lets sum this up a bit shall we?  

  • SLOW DOWN,  take the time to really look at your subject!  If you do this your chances of creating a world class image will greatly improve.
  • Look closely at what is in front of you, take the time to feel its emotional impact upon you and only then bring out the camera and with your skill and insight to the scene make the camera (nothing more than a tool) capture what you saw!
  • Think in both color and B&W.  Remember though that B&W removes the clutter and confusion of normal color work.  In my opinion, B&W allows you to capture the soul of the scene! So yes, take color but also take B&W, you might be surprised at how well you can do.
  • If you are working in digital only, during post processing work color first completely, save the image THEN process for B&W generating all of the mood that you possibly can!

Ok, this post is done.  Get out there, shoot and create, but slow down and think about what and WHY you are doing it!

Going Home to Mama…. Returning to Film!


The joys of returning to our photographic roots…

Pier

Murrells Inlet Fleet, Polaroid Type 55 4×5 film, Wet Mount Scan

Have any of you considered film photography?

There is something about working with film that is very calming which can center one’s soul allowing you to really connect with your art. For me it was like going home to Mama.  The feeling of working with your hands as part of creating your art will make it more involved and enable you to to really influence the hidden nuances in your work. It will add a bit more complexity to your workflow but trust me it is worth the effort.  The single largest change is forcing you to slow down in your creative process, it forces you to really consider every part of your workflow. It really is not any more difficult than digital photography, but it is a bit more involved.

Polaroid 900, Tmax 100 4x5 @ 64, Perceptol

Polaroid 900 with a Fujinon 150mm lens, Tmax 100 4×5 @ 64, Perceptol 1:1 developing

Take a really close look at the details in this image, click on it and look at it in the full screen mode.  Look at the GEARING on the edge of the wheel.  The detail there will take your breath away!

Film Cameras

Olympus XA 135mm

Olympus XA 135mm

I have way too many film cameras to list them all, some really small like the Olympus XA which is the worlds smallest 35mm rangefinder and a joy to use.

I also have an Olympus RC 35 camera that is another fixed lens rangefinder. It is simple and fun to use and can be found for very little money.  I have mine rebuild and given a bright blue suite that suites it quite well!

My Custom Olympus 35 RC Film Camera, one of dozens of film systems I shoot.

My Custom Olympus 35 RC 

My Leica M7 Film Body

My Leica M7 Film Body

My last 35mm camera system is a Leica M7 system. It has interchangeable lenses and is one of the best built camera systems that I have.  Couple it with the world class Leica lenses and you have an unbeatable 35mm system.

Confusion, Petri 7S 35mm, Eastman XX flim

Confusion, Petri 7S 35mm, Eastman XX flim

Fuji GF670 Medium Format

Fuji GF670

Fuji GF670

Fuji GF670

Moving up to Medium Format 120 film systems I have three.  I have the Voigtlander Bessa IIIw system that is 6×7 format and the Fuji GF670 camera (also sold under the name of Bessa III) with a longer 85mm lens (left & right). The 670 is my medium format travel camera of choice.  Not only is it a functional camera with a built in meter but it is attractive and it always will draw a crowd when I get it out to use! Another nice point to the GF670 is that it folds down on itself to a thin easy to store camera in your bag!

Mamaya RZ Pro II system

Mamaya RZ Pro II system

And lastly the Mamaya RZ Pro II SLR ( Right) with interchangeable lenses and a world class metering system. This camera is large and heavy but easy to use and a very powerful camera system! I have a f/4 65mm and f/4 180mm lens for it.  I also have both the waist level finder and a metering prism with spot and matrix!  Like I said, heavy and big, but I use it for ultra long exposures on the coast with the Fuji Acros 100 film which has almost NO RECIPROCITY failure up to 140 seconds then only 1/2 stop after that!   The film base is a little on the thin side but still my film of choice for long exposures.

Stormy Seas, Fuji GF670, Tmax 100, Perceptol 1:1, Wet Mount Scan

Stormy Seas, Fuji GF670, Tmax 100, Perceptol 1:1, Wet Mount Scan

Beautiful!

Polaroid 110 with 90mm lens converted to 4×5!

My 900 converted to 4x5 by Alpenhause Kamera Werke

Polaroid 900with 150mm Fujinon lens converted to 4×5

Moving up to 4×5 Large Format cameras, I have three. first I have a Shen Hao cherry field camera.  Functional as it is beautiful.  I rarely take it out, rather I am using a Polaroid 900 converted to 4×5 with a Fujinon 150mm lens and a Polaroid 110B camera converted to 4×5 with a Schneider Super Angulon 90mm lens.  It is a beauty and very wide!

Yes, as you may have noticed, some of these cameras are quite large.  This is due to the negative size.   Let me give you some idea as to why digital cameras can never come close to the resolution of film.

Focus Test - Epson Wet Adapter Across 100 Perceptol 1:2 Springmaid Pi

Montreat Cascades, 4×5 Tmax 100 developed in Perceptol and wet mount scanned.

Lets start with medium format:

  • Medium Format 6×7 format makes an image 2 1/4 inches tall and much wider.  Scanned at native resolution of 6400 dpi on an Epson 850 Pro scanner gives me a file resolution of 16452 x 19668 dpi or a print size at 300 dpi of 4.5 feet by 5.3 feet!  This is huge.
  • Large Format of 4″ x 5 ” scanned at 6400 dpi (native) gives a file size of 29107 x 36070 dpi or a print size of 8 feet x 10 feet!  There is not a digital camera system in the world that can come more than a small fraction of this!

Film

Film has turned wildly popular again in the past several years and many of the big film manufacturers have started increasing their film production lines again. This is especially true in the medium format lines (120) and 4×5 large format films! Film can be found in single rolls or in bulk almost everywhere again.  The big box companies like B&H, Adorama and many others carry almost every type and format that you could ever want!

Processing in B&W has never been easier at home with eco friendly chemistry with no darkroom needed. Only an initial outlay of around $150 will get you started. Cameras can be found anywhere for next to nothing!  You will need:

  • Dark Bag, a cloth bag that it light proof with arm sleeves that enable you to put your film, developing tank, reel an lid inside with your arms to move the film into a light tight developing tank!
  • Developing Tank, I recommend a stainless steel version.
  • Film Reels, I like the Hewes stainless steel ones.
  • Developer, comes either in a powder or a Liquid.  I like Perceptol and/or Rodinal R09.
  • Fixer, to remove un-used silver
  • Liquid wetting agent to prevent drops to dry on your negative.
  • Clips to hang you film up to dry!

You can scan your film into your computer with a good Epson scanner like the 700, 750, 800 or 850.  You can also buy an adapter for your camera allowing you to scan by photograph!

While I work in both color and B&W, digital and film I find time after time I pick up a film system and load it up with a good B&W film. The process of developing your film can really help you connect to your work as well.

I like several films, here they are in order of favor:


  1. Kodak Tmax 100 in 35, 120 and 4×5, very small grain, good dynamic range easy to process
  2. Fuji Acros 100 in 35, 120 and 4×5, very small grain, good dynamic range NO RECIPROCITY FAILURE, easy to process
  3. Rollei IR400 in 35, 120 and 4×5, Infrared or normal B&W, good dynamic range, easy to process
  4. Rollei Retro 80S in 35 and 120, amazing clarity and sharpness, good dynamic range easy to process
  5. Eastman XX in 35, motion picture film used in B&W movies of the 50’s, smooth gradient transitions.


As an example here is the top image from last week of the fishing fleet taken on 20 year out of date Polaroid Type 55 monochrome instant film. The camera is also a Polaroid 900 that my daughter sent me years ago from a garage sale that I had converted to 4×5 with a Fujinon 150mm lens. A MOST beautiful camera in a bright new blue suite that is just fun to use. It is both rangefinder and ground glass focusing that forces you to slow down and really consider each and every image you capture!

The Type 55 film, even outdated, works flawlessly and generates amazing images where the edge markings add to the artistic impact of your subject

Pelican Dock - Type 55 4x5 Film, Wet Scan

Pelican Dock – Type 55 4×5 Film, Wet Scan

So what do you think?  Are you tempted to try this out?  It is easy.  For starters, you can look at the continuing education departments at a local college or hight school.  Most offer B&W film photography with darkroom work.  This will teach you enough to allow you to determine if you would like to further investigate this wonderful medium!

You can also contact me and request info on one of my film workshops held in Pawleys Island SC.  I would love to have you and share this amazing link to our past!

Please let me know what you think of this post!

My Thoughts on the Art of travel photography…


Or… What I Did On My Summer Vacation!

Warning, LONG post…

Canyon Lands Pano, Sony A7rii with the 24-240 and polarizer

Canyon Lands Pano, Sony A7rii with the 24-240 and polarizer


Devils Tower

Devils Tower

Travel Photography… Say it, let it roll off your tongue, think about it!  I bet that the first thing that comes to mind are images from National Geographic, fine, super saturated color photographs that could take you anywhere in the world by simply looking at them!  You know the kind, they enabled you over the years to travel vicarisly around the world just with the magazine and its images!  

But is that what travel photography really is? 


What is the intent of travel photography  to document a place or a trip?  Is it designed to tell a story on an individual level or to the masses?

A6300-3886- S1_500-Whodos Bryce-2016 1 copy

Well for me, it is a combination of the two.  Most importantly, the images are to refresh the memories of the trip.  But there is a real market out there for well done travel photography whether in print publications, web, advertising or fine art prints.  It can be quite profitable if you work at it and can step back and look at your own images in terms of the above markets.  Even the housing deceration market has room for this type of photography provided that you can simplify your work to show colors and contrasts over locations.

Jordan, My 7 year old photographer grandson

Jordan, My 7 year old photographer grandson

For this trip, and pretty much all the time when I am shooting digital, I exclusively use the Sony 42 mpix A7rii camera system and the new Sony A6300 for high speed work with Sony G lenses or Sony Zeiss lenses. They are very well suited to this type of photography and give you enough (42 mix)  resolution to get amazing images yet still have room to crop!

The drive for this post was a recent  two week trip out West with my wife and 7 year old grandson Jordan who I am teaching film photography and darkroom processing to (photographically, I had grand plans for him this trip).  Given time I plan on turning him into a photographic GOD for something fun while making sure he is a Rocket Scientist!

We flew into Rapid City, SD and picked up a one way rental car and our first night in a long string of hotels.

Devils Tower

Devils Tower

Our Itinerary:

  • Prairie Dog

    Prairie Dog

    Day 1. Rapid City layover and rest.

  • Day 2. Pick up rental car and drive to Mt. Rushmore in the morning and then the Devils Tower in the afternoon. Continue on 1/2 way to Codie, WY.
  • Day 3. Famous Hot Springs of Thermopolis, Wyoming then an afternoon visit and guided tour to the most successful dinosaur dig on our continent.
  • Day 4. Codie WY for several stops including the famous old west town and the Codie Rodio.
  • Day 5-7. Yellowstone for 3 days in a park lodge.
  • Day 8. Leave Yellowstone, drive thru and stop along the way in the Tetons finishing in Jackson WY.
  • Day 9. Drive just north of Salt Lake City in the town of Herbor for a 3 hour train ride around the valley.
  • Day 10-12. Drive to Moab for 3 nights and visit Arches and Canyonlands National Parks with extra boat and jeep rides thru the park as well as Dead Horse Point State Park.
  • Day 13. Early morning drive to Bryce National park for 2 days of Bryce National Par
  • Day 14. Drive to Salt Lake for flight home on day 15.

Drugstore of the West, Cody, WY

Drugstore of the West, Cody, WY

So as you can see there was a well thought out family plan for travel and location visits!  But, I also had a plan, my photographic plan!

So lets talk first about my TRAVEL photographic equipment plan.  I wanted to travel light (yea right).  No backpack, rather a small rolling camera case that would fit into the over head of a small commuter plane so that I would not have to check it.  I would not have room for a film camera… Dang!

So here is what I brought along:

  1. Sony A7rii camera body
  2. Sony a6300 camera body for Jordan
  3. Sony 24-240mm one lens does it all for Jordan
  4. Sony 24-70 Zeiss f/4
  5. Sony 70-200 G f/4
  6. Tamron 150-600 for those exotic animals I expected to see
  7. And yes… A Olympus XA 35mm film camera (but it is the worlds smallest rangefinder) with 6 rolls of Tmax 100
  8. Filters, ND for long water falls and polarizers for all of the rest in 67mm and 72mm.
  9. Batteries an chargers (both cameras used the same)

This was a good plan (or so I thought) until our very first stop at Mt. Rushmore where Jordan informed me that the 24-240 was too long and heavy.  Oh well, I took that and gave him the 24-70.

RULE ONE:   No camera plan survives first contact with a 7 year old!

Ok, so at least the part of the photographic plan of me being able to NOT check my camera equipment worked! (I did put all of my insulin and supplies in the camera case just to prove my need to have the case with me but did not need it).

RULE TWO: A super  zoom really works best when you have to carry lots of glass around while traveling.  See Rule One, Jordan did me a favor here!

Yes, I know that one would not normally trade a light 24-70 Sony/Zeiss f/4 lens for a 24-240 f/3.5-5.6 Sony super zoom but I have to be honest, I was VERY impressed with the super zoom!  It was not really that much heaver but it was longer. I NEVER put on the 24-70 after that.

Things to look for on a cross country western trip:

  1. Wildlife
  2. Landscapes & Vistas
  3. Unique rock formations
  4. Waterfalls
  5. Wild colors
  6. Unique photographic visions

Trip Highlights!

Yellowstone

Old Faithfull

Old Faithful

Querimony: To Questionably Moan & Complain!

I expected great things of Yellowstone and that showed in the number of days there as well as staying in the park.  Yellowstone is HUGE, so much so that you have to allow for HOURS of driving time from location to location.  The roads are all good, 2 lanes with adequate pull offs.  BUT having said that there are rules of behavior in pulling off and rules for how you treat the wildlife.   I cannot tell you how many people (especially foreign visitors) who would jump out of the car (still in the road) and run off into the fields right up to the wildlife.  To say that this is bad behavior is an understatement.  It for one, keeps others from being able to photograph the wildlife and two puts the peoples lives in grave danger that approach the wildlife!  Yet this happened almost every time wildlife was near the road.  The park rangers had simply given up on trying to educate people who would not listen. They spend most of their time dealing with the MANY dreadful traffic accidents that happened every day.  The traffic jams were terrible whenever an animal was near.  Sometimes this was due to the animal being on the road but most of the time it was because people parked right in the middle of the road who left their cars. 

Buffalo on the Yellowstone

Buffalo on the Yellowstone river in the early morning mist

I am going to share a few of my favorite images from Yellowstone with you.   It is a good cross section of what you can expect to see while visiting!


Blue Pool, Prismatic Spring Yellowstone

Blue Pool, Prismatic Spring Upper Yellowstone


Prismatic Spring Yellowstone

Prismatic Spring upper Yellowstone


Yellowstone Antelope

Yellowstone Antelope, North Entrance


Teal Pool, Upper Yellowstone

Teal Pool, Upper Yellowstone

And last….


Lower Yellowstone Falls Detail

Lower Yellowstone Falls Detail 1 second  Exposure with 10 stops of ND

I would travel again to Yellowstone but in the spring or fall in order to see more of the wildlife there.  I realize that in the heat of August even the animals would move to higher locations in order to reduce the heat.  The only wildlife I really saw in abundance on this trip were Buffalo, Elk and Antelope.  

Moab, Arches & Canyonlands National Parks

Delicate Arch

Delicate Arch

The Moab area offered some of the most amazing locations of our trip.  I had thought that nothing could beat Yellowstone, but Moab came very close.   

Sandstone Arch, Arches

Sandstone Arch, Arches

There are 3 offerings here, the Arches National Park, Canyonlands National Park and the Dead Horse Point State Park.  ALL three are must see locations.  For me Arches was the best, but honestly, we spent time exploring all three in detail (well sort walk detail).  We also paid extra for a boat trip on the Colorado River thru Canyonlands for a low view and a back country jeep tour to see area and arches not available to the general public in Arches!  If you get here I advise that you do both side trips.

Courthouse Rock, Arches

Courthouse Rock, Arches


Whale Tail Arch, Backcountry Tour

Whale Tail Arch, Backcountry Tour


Windows Arch on the Back Country Tour, Arches

Windows Arch on the Back Country Tour, Arches


Dead Horse Point

Dead Horse Point. Look at the lower left corner 1/3 up to see the dead horse outline.


Canyon Lands, Isle in the sky

Canyon Lands, Isle in the sky


General Utah


High Desart Train Pano

High Desart Train Pano

So…. I had this vision stuck in my head of a parked line of freight train box cars parked in the high desert with a mesa behind them.  I found myself looking to the sides of the car as we traveled endless miles through Wyoming and Utah.  Finally my wife asked me what I was looking for and when I told her she made a point to help me look and stop me when we came upon them.  I know that out West there are ultra long stretched of road.  Most are 4 lanes with lots of traffic.  If you see that special scene make sure that you safely stop so as not to irritate the 7 year old in the back seat, pull safely off to the side of the road as you watch for the perfect compositional setup and get out and shoot it!  DO IT!  

Because

RULE THREE:   There are NO GO BACKS!  If you see a subject or scene on the side of the road immediately stop and shoot it!

Bryce National Park

Whodos in Bryce Canyon

Whodos in Bryce Canyon

To say that Bryce National Park is anything less that amazing is an understatement.  It was right up there with Arches and Yellowstone in amazing views, colors and the wow factor!  This is the location that I would choose to visit again to try some different styles of photography.  The colors of the Hodoos are simply amazing and full of wild colors and contrasts.  

Natural Bridge Bryce

Natural Bridge Bryce

RULE FOUR:   Revisit those scenes and compositions as many times a possible!

While in Arches, my 7 year old grandson decided that he had enough nature and vistas after driving Arches all day long.  I took them (at my wife insistence) back to the hotel and went back out to Arches and drove it again in different light conditions and the 2nd time there were clouds in the sky.  This made for much better images that I would not have gotten if I did not go back out again!

Final thoughts on what makes travel photography great!

Now as you have seen here, I presented this trip as a travel log.  Attempting to document the many wonders of the high plains in the west. For images that have the possibility of selling you need to:

  • Pay more attention to your editing, scene selection and composition.  
  • You must re-visit local scenes several times in order to get the best light and clouds.  
  • You MUST shoot with your best equipment in order to produce high resolution images for future publication.
  • In your post processing you must choose only your best images and throw the non used images out.
  • Be your WORST critique and select only what you would consider to be world class images.  Case in point, the image above of the Court House Rocks in Arches.  Yes it is a nice image but the lack of clouds in the sky reduce its impact to the point of it being a weak image!

Hood Valley, Bryce Canyon, Sunset overview.

Hood Valley, Bryce Canyon, Sunset overview.

This type of travel photography is more difficult that personal travel images traditionally done by the millions of photographers who roam the country.   These types of images are still travel photography but basically serve to show and remember your great trips!  They will include more family member in the scenes, less care about the total compositional elements because those are simply not as important to the memory of the trip and locations! They are just as important, but will not generally generate income from sales and publication. 

Colophon:  Very Important Lessons Learned:

  1. NEVER, and I do mean NEVER plan a 14 day photographic trip with a 7 year old and expect him to be excited beyond the first week.   I would have been better off leaving the A6300 and 24-70 f/4 at home thus lightening my load and giving him MY camera when he desired to take a photograph!
  2. Make SURE that you explain to the said 7 year old that “NO!  There are places that not only will there be no TV but also no internet!  (I was able to get around this most of the time with my iPhone as a hot spot for his iPad!)
  3. Build in several fun days (as viewed by a 7 year old) that includes things like movies, water parks and so on!  This is a small price to pay for 7 year old mental health and will refresh his young mind and keep it open for those wonderful scenes you travel to!
  4. How can you get those great travel shots when your walking is limited?  As a cranky 63 year old man, make sure that you plan photographic stops THAT YOU CAN DRIVE TO!  We (actually my thoughtful wife) did this ahead of time thus insuring my mental health and happiness at the stops we made!
  5. Take the time to occasionally stop at nice restaurants  that actually serve wine and beer (this will assist with the mental healty of said wife!)  Happy marriages are NOT built and fast food places in a rush!
  6. If you desire to shoot medium format film, you damn well better plan on space for the camera and film!  Regrets upon your return will leave a sour taste in your mouth!
  7. Be flexible, very flexible.  This will leave you happy in the hotel at night!
  8. Take your pain drugs! (See #7)
  9. If you see a photo subject on the side of the road STOP!  There are no go backs! (see RULE THREE about this very thing and really your wife know this and will support your urges to stop in the middle of nowhere!
  10. Wildlife… What wildlife?  How did I miss all the great shots of wolves, coyotes, and bears?  I was in Yellowstone for heavens sake!  The lesson here is to make sure you check the season for high animal activity.  I have listened to my photographer Son talk about so much wildlife in Yellowstone that it was not safe to drive!   I guess he should have mentioned when he was there!  Oh well.  I AM happy with what I actually did see (Buffalo, Antelopes, Elk and Prairie Dogs)
  11. Stop at EVERY overlook in every park.  You will be happier having done so (and vicariously so will your wife).  You will hate yourself when you return home only to have a photographer friend tell you that the one overlook you skipped was the only one you should have stopped at!
  12. If you find a scene that is magical for you revisit at a different time of day.  This is VERY IMPORTANT and promote photographic health for those who have heeded these magic words.
  13. Would I do it all over again with a 7 year old?  YOU BET!!  But I would plan differently.  If I take any of my grandkids I need to remember that it is their vacation as well.  This means that you build in days doing fun stuff for their age also!

Please let me know what you think of this long post!  I welcome all feedback.


Bryce Canyon

Bryce Canyon in camera pano

Amazing Polaroid 4×5 Camera Conversions: Alpenhause Kamera Werke


Let me introduce you to Steven Icanberry!


My 900 converted to 4x5 by Alpenhause Kamera Werke

My 900 converted to 4×5 by Alpenhause Kamera Werke

The story begins…

Several years ago my oldest daughter and her husband gave me a complete Polaroid 900 Camera system for fathers day.  I like old cameras and this one sat in a glass display case in my studio for years.  It was a beautiful camera but with film no longer being made it was living its life as a hanger queen only.

My Polaroid 900 Camera Set

My Polaroid 900 Camera Set

Steven Icanberry at Alpenhause Kamera Werke

Steven Icanberry at
Alpenhause Kamera Werke

One day while exploring one of the 4×5 Facebook groups I came across a post from  Alpenhause Kamera Werke and Steven Icanberry,  He was advertising a conversion on the older Polaroid  Land Cameras like my 900 to 4×5 film with a film back and a coupled rangefinder calibrated to the new 4×5 lens he would install!  Steven is a disabled veteran who makes his living from converting these cameras!

This was simply too good to be true and after calling him and with his advice for options and lens selection I sent off my camera to him to be converted.

About the film holder!

About the film holder!

Now, a little bit of info on his designs and options.  His 4×5 film back is of his own design and is small and lighter than any other on the market.  He has them made by a local machine shop and I can attest to the quality of it!  He removes the old lens and makes a new lens plate mounting your choice of lenses.  

I choose a Fujicon 150mm lens.  He couples the lens to the rangefinder system in the camera and calibrates it to be perfect. (This was the big draw for me as I was looking for a simple 4×5 carry around camera).  

He also cleaned all of the rangefinder optics assuring sharp clear viewing.  

I was offered a large selection of colors and new clothes for my camera, I choose bright blue and a silver top along with a built in shutter release cable.   Look at the top image above and tell me that the camera doesn’t look stunning!

His camera conversions are simply stunning in their beauty and functionality!  For those of you who like and desire to shoot film I strongly suggest picking up one of his cameras.  You will not be disappointed at all and you will be helping a disabled US Veteran make a living.  But more importantly you will have a camera system that is as beautiful as it is functional.   I am going to close this with a few images of some of Stevens cameras and the first shot I took with mine.  

He advertises starting pricing at around $500 for a converted camera in stock and also does custom conversions (like mine).  I paid $900 for mine, but I chose a new custom lens and several other options!   

Am I satisfied?  YOU BET!!

Please consider having Steven Icanberry and Alpenhause Kamera Werke do a conversion or sell you a stock conversion!  It is my wish to spread the camera goodness around and this is one good company!

Handheld Converted 900 image with TMX 100

Hand held image from my Converted 900 image with TMX 100

Colors colors colors

Colors colors colors

Beautiful!

Beautiful!

Screen Shot 2016-07-03 at 7.51.07 AM


4x5 Film Back

Stevens custom designed 4×5 Film Back


My converted 900

My converted 900

Testing The Sony A6300


Smaller, Faster and able to leap over tall buildings!

Yes, you are correct, I shoot with the Sony A7rii 42 mega pixel full frame mirrorless camera!  What you cry am I doing with the A6300 which is only 24 mega pixel and an APS-C sensor?  Well friends, the answer to that is simple, well perhaps not…   I envision the A6300 as a 720nm Infrared camera.  

Pawleys Island Marsh, Sony A6300 with the Sony/Zeiss 24-70 f/4 and a polarizer. B&W conversion

Pawleys Island Marsh, Sony A6300 with the Sony/Zeiss 24-70 f/4 and a polarizer. B&W conversion Look at the detail in the gate and grass.  This has a 3 dimensional effect! 

But it has several very interesting and powerful functions that have engaged my curiosity.  Those are:

  • 11 fps shooting speed.
  • Faster and more accurate focus than the A7rii
  • More focus and metering points.
  • Half the weight of the A7rii
  • Much brighter and accurate focus peaking system.
  • Ability to work macro at 1:1 with live view and not have an over pixelated display.
  • The ability to turn my 600mm lens into a 900mm lens!
Sony A6300 Front View

Sony A6300 Front View

The 4 test images I took today were shot hand held at 1/250s and in RAW with Zone Focusing.  I also had the LIVE VEIW DISPLAY: Setting Effect: ON.  This enabled the camera to simulate the exposure effects during composition to give me an idea of what I am actually seeing. 

The A6300 is a TINY camera system.  It is so light (even with a L Bracket installed) that I had to be very careful when carrying it around.  I worried over dropping it and not knowing!

Sony A6300 Back View

Sony A6300 Back View

The camera does NOT have a built in Stabilizing system, rather it relies on the fact that most Sony lenses have that built in.   I has 3 custom WB memories for those of you who are considering the camera for Infrared and it also has 2 custom setup memories that I have found to be very helpful with my A7rii camera!

I found the camera very easy to use and control.  I setup all of the custom functions and buttons to make my life easier when shooting it.   

As I said, this camera was meant to be converted by http://www.kolarivision.com into a 720nm infrared system and it may actually meet that end, but I really like the ability of the APS system to give me 900mm from a 600mm lens!


Pawleys Island Marsh, Sony A6300 with the Sony/Zeiss 24-70 f/4 and a polarizer.

Pawleys Island Marsh, Sony A6300 with the Sony/Zeiss 24-70 f/4 and a polarizer.

Here is the color version (with polarizer) of the image above.  The colors are nicely saturated and the overall image is sharp and offers enough detail and sharpness to draw the viewer into the image!

Pawleys Island Marsh, Sony A6300 with the Sony/Zeiss 24-70 f/4 and a polarizer.

Pawleys Island Marsh, Sony A6300 with the Sony/Zeiss 24-70 f/4 and a polarizer.

Here is another view of the salt marsh.  I have to say that the camera with the 24-70 Zeiss lens is easy to hold and control.  The camera control buttons are easy to reach and control without using them by accident.

Pawleys Island Marsh, Sony A6300 with the Sony/Zeiss 24-70 f/4 and a polarizer. B&W conversion.

Pawleys Island Marsh, Sony A6300 with the Sony/Zeiss 24-70 f/4 and a polarizer. B&W conversion.

Lastly, a B&W conversion of the same image.  

I am really excited with the functionality of this little system.  I am pleased with the results and will use it for a few months as a color system for my long lens. Ultimately it will be converted to IR but for now I will play with it.  

There are several issues with its firmware (same as when the A7rii came out).  Overheating during hight speed continuous shots is the big one but Sony assures me that a fix is in work as it was when the A7rii camera came out!

I will be experimenting with the system for a few months and see what it can offer me in terms of images and use.  Later this week it is going to the beach for some ultra long exposures to see if it has any body light leaks!

What do your think?


Out And About With Film….


Wandering the shrimp fleets of Georgetown with my Voigtlander Bessa III 120 film camera….

Voigtlander Bessa IIIw 120mm camera system

Voigtlander Bessa IIIw 120mm camera system

Yep, early this morning I grabbed the bag with my wide angle 120mm camera system and headed out to Georgetown where I was going to spend a bit of time with the shrimp fleets and some film….  I chose the Voigtlander Bessa IIIw system.  It has a 55mm lens on it which at 6x6mm equates to around 35mm and at 6x7mm to 30mm.  This is pretty wide and allowed me to capture several very wide angle shots of various shrimp boats around the water front.

One of the other things that I do when shooting film is to keep a accurate written record of the exposure data for each and every frame.  This assists in keeping my process the same once I get the proper exposure, contrast and desired grain for each of the film types I use.

I enjoy this camera system very much.  It has a lot going for it specifically its 6x7mm negative size which makes for some pretty big scanned files when all is said and done.  I also like the fact that it is a rangefinder which pretty much defines my youth and what I had learned to use when very young!  It is not too heavy, has a leaf shutter which is totally silent and goes up the 1/500 second for exposures. This could be a little faster but I can work with it.  A 120 roll of B&W film gives me 10 exposures at 6×7 which is the format I like the most. 

Rodinal One Shot

Rodinal One Shot

I normally use stand film processing with Rodinal at 1:100 ratio with water, a water bath then the 1 hour processing and normal fixing and a wash, but for these rolls I am going to use Ilford Perceptol ultra fine grain developer in hope of a sharper  image with greater contrast.  So, we will see next week how this new combination works for my finished film!

Stand processing is not dependent upon chemistry temperature, ISO or even Film type!  You put the film in its can, give it a 5 min water wash, then pour the developer in, gently agitating for 1 min then letting it sit for another 60 min!, Water Stop, since and done!     But there are trade offs with Stand processing, namely Bromide Drag which is shown as the slightly darker vertical streaks in the image below.  These come from the developer chemistry being exhausted.

Voigtlander Bessa IIIw with Rollei IR400 120

Voigtlander Bessa IIIw with Rollei IR400 120

Jordan and his film camera

Jordan and his film camera

So with the Perceptual chemistry (6 min develop time) I will not see Bromide Drag and it is supposed to give sharper smaller grain and higher contrast.   So instead of a 1 hour develop time we are looking at 6 min now, sharper negatives with higher contrast!  We will see….

I will hold of processing these images till the first weekend in May so that my 7 year old grand son come come with me to the studio and process his own 35mm film at the same time!  Yes, I am teaching him how to photograph and process film! You gotta start them young so that they catch the film bug!

Cooking the film!

Cooking the film!

Come on back in a few weeks to see the results of todays outing!


Advanced Work With The Sony A7rii


Using the Sony A7rii for advanced photographic work….


Long Exposure In Charleston, SC

Long Exposure In Charleston, SC, 30 seconds with a 6 stop B+W ND

I was in Charleston, SC last weekend with the a7rii camera system to see how far I could push it!   I find the Sony system to be refreshingly powerful and very capable of any style of photography I desire to shoot.   The Image above of the boat house (Sunrise) was just another example of the power of this system.  I was looking for some long exposure and the water of Charleston Harbor was very smooth to start, with only 6 to 12 inch waves.  The sunrise was blocked by a tremendous super cell thunderstorm system so I just concentrated on the boathouse and smoothing out the water.   I was using the Sony FE 70-200mm F4 G OSS lens at 150mm with a 6 stop B+W ND filter attached which was giving a 30 second exposure.  I was sure that 30 seconds would give me a very smooth water (which it did).  I also desired to capture detail in the stormy clouds but keep the white water.  I metered the waters surface and placed it in Zone 7.5 (what!  You do not know the zone system?  Shame…. We will have to fix this!).  This at ISO 50 and f/16 gave me a 30 second exposure and allowed the 14 stop dynamic range of the camera to capture both the withe of the water as well as cloud details!

Granted, the Sony has a LARGE menu system but the provide you so many programmable custom buttons AND several system setup memories that you can with the turn of a control knob chance the camera functions over to the specific style of shooting you desire!  In my case, I have the M2 memory setup for long exposures, and by simply turning the command dial to M2 the camera is ready for long exposures!

Miss Lulu, Georgetown, SC

Miss Lulu, Georgetown, SC

Here is another example of the amazing capture ability of the Sony.  This is the shrimper Miss Lulu on the dock in Georgetown, SC last Monday morning.   The water of the bay was at slack tide, super high and mirror smooth.   I decided that for this image I wanted B&W but still captured it in color since a color starting image gives the best B&W conversion.   I was using the Sony/Zeiss FE 24-70mm F4 ZA OSS lens at ISO 100 at f/8 with a shutter speed of 1/320 second.  I waited till a Pelican flew into the scene from behind the boat for the capture.  The clouds were slight but still stunning but the boat and its reflection really made the image.   

As I said, During my pre-visualitlation of this image I decides upon monochrom with a flying bird.  I setup the boa further into the image space to allow for a bird to fly into the scene and balancing the overall image with the boat centered with the trees on the right.   This is not a simple snap  shot, a lot of thought went into its setup!

Shrimp Boats are one of my favorite subjects and each and every time I happen by them they always present something new and different!