
And now for something different!
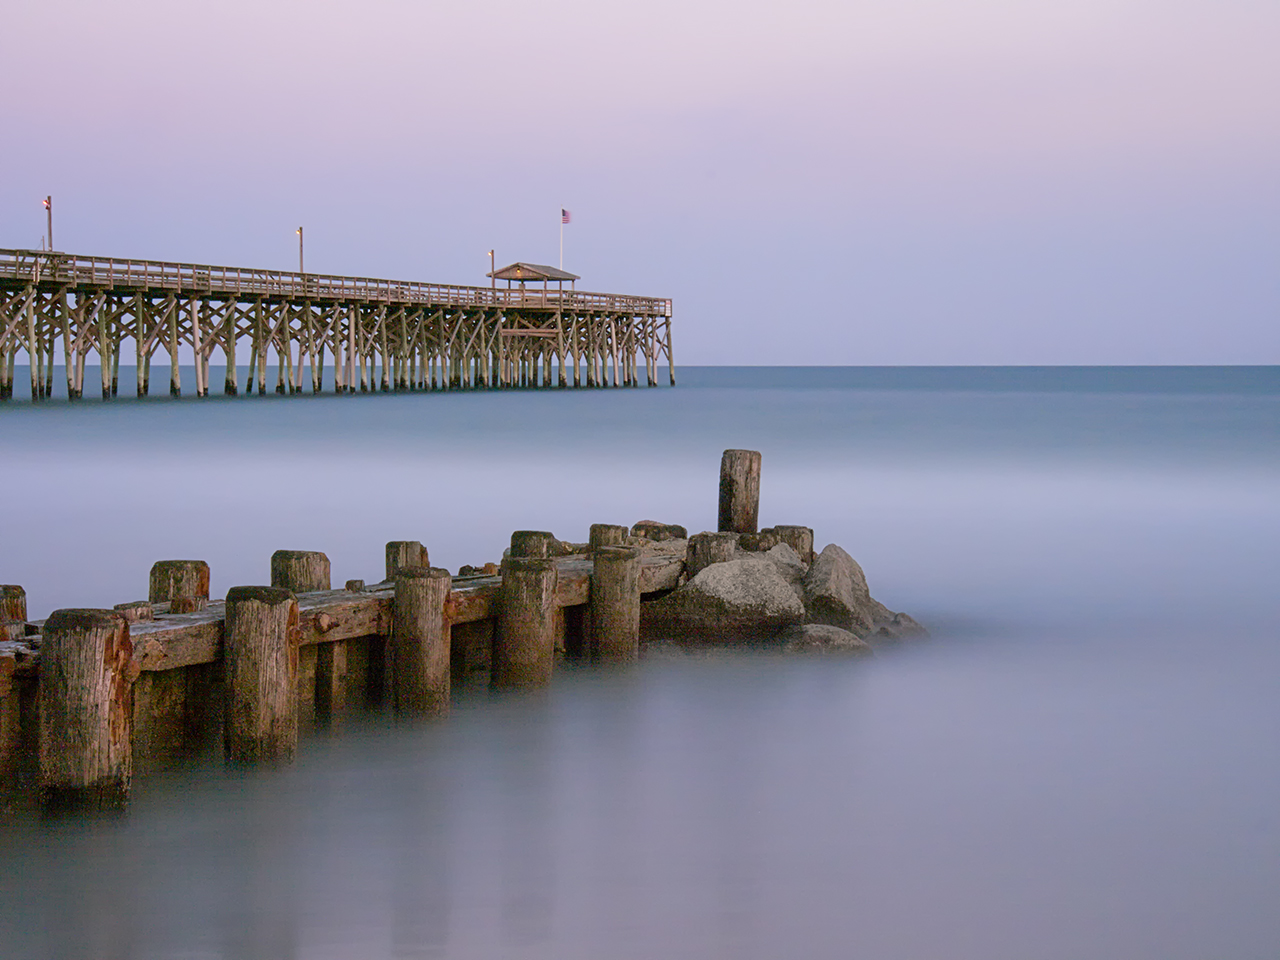
Pawleys Pier, Twilight. 847 Second Exposure, Olympus OMD with the 12-60mm lens. Iso 200, f/22
I know, most of my recent posts have been about the new Fuji X-E1, but tonight I decided to take out the OMD and test it out for ultra long exposures. I have the OMD as a high speed replacement for my Canon DSLR (currently a 7D) in order to reduce weight and ease of use. Overall the camera performs very well and generates impressive, sharp images up into very high ISO’s! But a friend recently purchased one to use and wanted to do some long exposures. So I got mine out, looked over the in camera options and was VERY surprised to learn of several very nice long exposure benefits built into this camera!
- Live View Bulb Mode: This is an amazing feature (are you listening Fuji?)! With this mode, you must first set the max shutter speed length, then the update times. What this means is that you can set an exact exposure or some ultra long one. Then you can let the camera time the shutter or you can use a remote shutter release to start and stop the exposure as one would normally see in a BULB mode. What the added value here is that the camera turns on the live view screen and updates the LCD panel with the image displayed with the CURRENT exposure during the BULB exposure! The timing of the update is the value you set when you set the update times! You can have up to 24 updates. In simple terms, this allows you to SEE the image developing on the LCD panel during the exposure! Way cool and very valuable. The only change I could wish for is for the histogram to also be displayed for each updated image. A remote shutter release with a lock is required for this mode.
- Live View Timer Mode: This works just the same as the BULB mode except that you press the shutter release once to start and once to end! If you forget your remote shutter release you can still get the picture!
- Onscreen Level: This allows you to get the horizon straight! Simple thing but important for any image and critical for long exposures.
- Programmable Function Keys: Makes long exposures in the dark easier but setting Function Button 1 to Manual Focus. This means that you can switch back and forth from manual to auto focus modes without having to go through the menu system.
- On Screen Focus Point Touch Select: With the camera in auto focus mode you can touch the area of the image that you wish to focus on and then do a focus. By using this in conjunction with the function key as described above you can easily change your focus. In the dark, this makes it very easy to select a point of light on a long pier and have the camera focus, then hit the function key to select the manual focus mode to lock it in! If there is not a point of light, having an ULTRA BRIGHT flashlight and lighting something in the scene to focus on works well also!
The OMD worked tonight flawlessly for these long exposures! The longest was over 14 minutes and generated a clean low noise image! But most importantly, I was able to take this image with NO metering at all. I simply chose the Live View Bulb mode and watched the image develop on the LCD screen during the exposure and when it was where I liked it I simply stopped the exposure! Understand, this is not exact as the LCD does not give an exact true image display, but it was always within 1 stop!
Here is a B&W version as well but I think you will agree that this entire outing was easy and fun and gave superb results!

The B&W version processed in Nik’s Silver EFX.

Wow that’s a fantastic feature!
Great image too
Thanks Darren! Normally I stick with my Fuji X cameras for this type of work so I was amazed at the capability of the OMD when I actually gave it a chance!
What an amazing feature! How badly does it suck up the battery juice? Great post, Mark!
Bill, yes it is very cool! I shot for about 2 hours last night on 1 battery before I changed. This was a bunch of ultra long exposures then noise reduction cycles. So a 14 min exposure becomes a 28 min one!
Reblogged this on Olympus E-M5 Resource Blog and commented:
A big thanks to Mark for a Great Article on making long exposures with the E-M5 and Live View Bulb setting.
Thanks Mark. As you know, I have the OMD, but I guess I still have to learn how to use it. Great post. How so you think this would work with star trails?
Yes, but for stars you need to keep the exposures less than 30 seconds which means high ISOs…
Acually, I’m talking about star trails, where the long trails are shown.
What is the lowest ISO the OMd has to offer? Is it possible to set the camera for ISO 100?
Hanks for another wonderful article!
The lowest iso is 200
new firmware allows iso
100
Good to know!
Great suggestions and nice photo, Mark! I have to try this some day. I’ve seen reviews that show the E-M5 meeting or surpassing the 7D in image quality, so there’s really no need to lug those humongous DSLRs around anymore.
So true!
Thanks for the nice article Mark!
I have a question though: you state that using the EM-5 for long exposures is no problem, however in this article: http://robknightphotography.com/blueridge-photo-fest-2012/ the author states he got noise quite fast using long exposures, so I’m a bit confused now.
I had an E-5 and I’m thinking of buying the EM-5 for my long exposure photography, but I would really like to know if the noise is okay in the 30-60 seconds zone. My E-5 struggled with ISO 200, but was okay with ISO 100 for long exposures, however the EM-5 only starts at ISO 200.
I found the OMD to be quite noise free! I shoot in raw and most importantly, have the “long exposure noise reduction” turned on in the menu system. This means that if you take a 2 min exposure you have another 2 min to wait while the camera cleans up the image. Look here for images taken this way: The OMD is NOT the E-5, it is newer with better noise control. You need to shoot at the base ISO (200) to keep the exposure time up. I do not know who you read this from, but I have 3 students plus mine that generate world class images with. I like the Fuji X-E1 better, but the OMD is right there….
I took some star-trail photos with the EM-5 and found that using the live view during exposure feature made the noise significantly worse than a normal bulb exposure.
It’s not a bad camera for regular star exposure, but I would say no better than my Canon 30D.
I think the live-view feature is best used in for daytime long exposures.
Interesting! Thanks for the info! Did you keep your shutter times less than 30s?
Thanks for your quick reply!
Hi Mark,
I’ve been experimenting with the om-d and the lee big stopper filter (10stops) ,…but always have problems wih ‘noise’ ,…even at long exposure times of 3 minutes in sof light conditions. What’s your advise?
Do you have the in camera long exposure noise reduction turned on? I have not had any issues.
Indeed! Noise reduction was off.
Problem solved!
Remember that there are 2 noise reduction menu items. What you want is the long exposure noise reduction. If you take a 3 min exposure then noise reduction will then take 3 min for a total of 6!
Mark, in the menu ‘G’ I set noise reduction ‘on’ and noise filter ‘high’.
Is this the correct way?
BR
Alex
No, that is for jpg noise reduction. there is another menu item for the long exposure reduction. I am at my gallery working now and do not have the camera here or I could look at it to tell you!
Ok Mark,
When you are in the possibility to check,…this would be great.
Alex
Hello Mark,
I checked again,…in the menu G there are 2 noise controlling setting options, the upper one for long exposures , I’venset now on ‘auto’ and the second one ‘noise filter’ is for jpegbI’ve set ‘off’.
I think this is the correct setting now.
BR
Alex
Yes, you fount it! It will turn on for expsoures over 30 seconds or 1 min in that mode. I forget which, but either way it will fix the issue for you!
Pingback: Olympus OMD EM5 and Ultra Long Exposures! | Oly...
Exactly what I wanted to know! Now I just have to figure where this the live view bulb setup menu is.
Read the manual and just worked it out. Now I can use my ND110 filter to full effect.
Glad that I was able to help!
Thank you so much for the informative and concise review, Mark! I’m a newly realized photographer with a fascination with light painting, long exposure, etc and am having trouble deciding between the sony nex-6 and the new omd-em5. I was curious which you’d prefer for primarily that type of photography, as the reviews seem close, but favor the nex-6 more for general photography. Thank you for your time and a very enjoyable blog!
Josiah, I simply do not care for the NEX series of cameras. It is just a personal thing. I have found that the OMD gives amazing ability for long exposures with their live view Bulb and Timer mode. Personally, I like the Fuji X series of cameras the most for long exposures and light painting. It has been a long road for me and (48 years of shooting) I think that the X series from Fuji are it for me!
Hi Mark,
Is it normal that the OMD stops the exposure automaticly after 8 min?
BR
ALEX
No it is not. What mode where you in? Live View BULB or Live View Timer?
Live View Timer
LV timer might be the issue. Switch over to LV bulb and give that a try.
Hi Mark,
Thx for your advise, I will check it.
Could you be so kind and have a look on my FlickrStream ‘Alex Flanders’.
I am curious about your opinion, knowing that you prefer Fuji cam before Oly.
Best Regards
Alex
Nice long exposure! I recently bought an omd and did some long exposures but always got significant noise. What were your settings for the shot and did you use any filters? Thanks!
Hello Mark, I have a WCO but even if the active noise reduction setting, with the use of filters and Light exposure times of 2 or 3 minutes (with active noise reduction 4 or 6 minutes) the raw file still appears with dot pix or noise. I’d be curious to see your original raw and know what kind of reduction applied and what software and in general what kind of post to treat this type of images. Your are very Interesting
After these tests, I was quite disappointed, you know, coming from a D700 ….
.. your blog is fantastic and very very interesting your own opinion or suggerineto would be greatly appreciated.
Bye
Paul
Paolo, what ISO were you shooting at? The D700 is not the best low noise camera system out there (sorry)! I shoot with a Fuji X Pro 1 at ISO 200 with various combinations of ND in RAW, in camera long exposure noise reduction (8 min exposure + 8 min of noise reduction). I use Capture 1 V7 to do the raw conversion (no adjustments except for exposure) then open in photoshop CC and run NIK Define 2.0 for basic noise reduction. Then Nik Color EFX for color and contrast adjustments and done!
Please send a reduced size image via email.
Thanks Mark,
email where you can send the photo and a 100% crop
mark@thelensworkgallery.com
Hello Mark,
I thought I would have received your comments on my previous post?
I am curious in your opinion.
BR
Alex
Alex, I did comment! Perhaps it was an email failure! You need to switch over to the live view BULB mode rather than the LV Timer. Bulb will go up to 60 min. You have to make sure that you have the exposure dead on because for LE underexposures will be very noisy.
Hello Mark,
I meant this post,..
Hi Mark,
Thx for your advise, I will check it.
Could you be so kind and have a look on my FlickrStream ‘Alex Flanders’.
I am curious about your opinion, knowing that you prefer Fuji cam before Oly.
Best Regards
Alex
Ok I will look later today!
Hi Mark,
…and please have a look on my stream …;-)
Alex
….and what do you mean with ‘you have the exposre dead on,….’
BR’
Alex
If you are doing a long exposure and you underexpose it will generate a lot of noise in the dark areas when you adjust the exposure up.
I understand,..it is more or less the ETTR principle (expose to the right principle) or histogram to the right,…isn’t it?
Imagine that I have a noise free picture at ISO 200 f 16 Exposure time 1minute, does that mean that at f 18 I have to double the exposure time to 2 minutes?
Well yes and no. With long exposures you generate dark area noise so you need to use a nd on the bright area to equalize the scene then shoot.
One stop would be f16 to f22. So 18 is about 1/2 stop so the shutter would move from 1 min to 1.5 min
Mark, I so hope that you can help my 71 yr. brain with this problem. I have been taking a light painting photo class. My settings are “bulb, iso 1600, aperture 14” I use a remote to fire the shutter & then after the painting is done, I close the shutter. NO picture of what I thought I was taking. I think that maybe, I don’t have the correct settings set. I use my OMD-5 & love it, but am frustrated as all the other students got the appropriate picture with the light painting showing. Can you tell me what settings that I need to be in to take a successful light painting? Thanks
Lorri, are you sure that the shutter is staying open? It sounds to me like it is opening then immediately closing. Do the same thing and shine the light into the lens and see if you get a white picture. I would be willing to bet that you are NOT locking the shutter open….
Mark, I think that might be the problem as I got a white picture. I will try again tonight when it is dark & I can wave the flashlight around. Thanks, this blog is just what I need………:>)
I think that that might have been the problem. I will try it again tonight after dark & see what happens. Thanks so much…………:>)
There is a lock button on the remote shutter release that locks the shutter open till you release it.
I just tried it with Bulb F14 iso 200 and the light painting stood out; when I did it with iso 1600, it worked as well,but the painting was NOT dominate with the extra light in the space where I was doing the painting. I will continue to try some different iso settings. do you have any suggestions that you have found to work best with the OMD-5???
Set f/5.6 ISO 400 and paint a LONGER time with a longer shutter speed. . How dark is it?
can you recommend a shutter speed?
Start off with 30 seconds. If the image is too dark go to bulb and paint over more with your light.
today I bought some colorful flash lights to try out. I went with your suggestion this evening, but wasn’t happy with the results, so I went to 200iso, F14, 5.6 aperture & bulb. Came out great with black background & a swirl of bright colors. Thanks for all your help. I look forward to reading more of your blogs & learning more about the use of my camera………..:>)
Well, I have a new challenge today. I am trying to set the bracketing & the guide book that I have does not show the accurate way to reach the bracketing. Can you give me the steps to follow to reach the bracing menu? Thanks
Are you able to help me with the above problem?
Yes, when I get home I will dig out my camera and talk you thru it. I am away for a while.
Lorri, I found it. Here is what you do:
I would say simple, but it is buried in the menu system. It is a VERY POWERFUL bracing option but a pain due to the way you have to turn it on and off.
Let me know how it goes!
I did it!! However, I did find that I had to have the camera in M mode to move through all of the steps successfully. Thank you sooooooo much……………:>)
You are welcome!
I have been gnashing my teeth trying to figure out what I’m doing wrong, and have had no luck finding a solution online–I reeeeaaaalllly hope you can set me straight!
I recently bought an OMD EM5, and I want to take a 30-60 minute exposure without using my timer cable. I have the camera mode set at Manual and the shutter speed set at Time. But the camera is automatically ending the exposure after a few minutes–apparently at the setting of the Bulb/Time Timer in the E Menu settings. I don’t know how to disable the Timer so that I can end the exposure when I choose, rather than at some pre-set time.
My settings:
film speed: ISO 200
aperture: f4
shutter speed: Time
Much appreciate your help!
Kay
You are welcome.
Kay,
The camera has a live view timer mode, do NOT use the the timer or bulb mode… Select it and set up the live view timer interval value. If you are looking at a 30 min exposure then set this to 2 min. Press the shutter once to start the exposure and once to stop it! Now, here is the really cool part, in the live view timer as the camera is making the exposure it evil update the back display every time the interval time is reached! This means that you can watch the image develop on the LCD as the exposure continues like watching a Polaroid develop! The camera can only update 25 times for each exposure so set the update time with this in mind. The LV timer does not require a remote shutter release and also displays the continuing exposure with a count up timer. There is also a LV bulb mode that works the same way but it requires a remote shutter cord. These live view modes are very cool but like I said require you to set up the interval times first in the menu system. The modes can be found on the shutter speed dial. Set the camera to m mode then rotate the shutter speed down PAST 60 min and you will see LV T and LV B! The interval menu is under the gear menu then under the exp menu. Go down and you will find it.
You need to invert in QUALITY ND filters for long exposures. The cheap ones will give distortions and color casts.
Kay, here are 2 posts on long exposures and the first one is the technique I sent you.
https://markhilliardatelier.wordpress.com/2013/01/27/olympus-omd-em5-and-ultra-long-exposures/
https://markhilliardatelier.wordpress.com/2013/02/12/getting-better-long-exposures-fuji-x_e1-sekonic-l758dr-a-detailed-tutorial/
Mark, I can’t seem to get the “Press the shutter once to start the exposure and once to stop it” to work for exposures longer than 30 minutes. I’m just taking (or trying to take) star trails–corny, I know–so I don’t need live view. Basically, I know I’m going to get a bunch of lines, and the only function that affects that is how long the earth has been turning.
Is it possible to take ultra-long exposures (over 60 minutes) with the OMD EM5?
Thanks again!
Kay
Kay, I am going into the hospital today for a small spine procedure. When I get home tonight I will get out my OMD and test it and get back to you!
Sorry to hear that–I hope all goes well!
Hi, I am amazed by your image. I was wondering if you could help me out. I am just getting started into Long Exposures, but having a problem, when watching the Exposure is just blowing out right before my eyes. I need to know exactly what settings you have programmed under the Live Time/Bulb menu! – I’ve tried a few ways of getting help, via Olympus Worldwide Users on Facebook, but everyone is giving me different answers. Can you help~!
Nikki, first off, you need to have some basic idea of what your exposure should be. You can do this by taking an exposure reading of the scene by using your camera without the nd filter attached. Once done then you can calculate the new exposure by the nd power. So if you have the initial exposure value of say 1/100 at f/11 and you plan on using a 6 stop nd filter you get:
1/50 1 stop
1/25 1 stop
1/12 1 stop
1/6 1 stop
1/3 1 stop
1/1.5 1 stop
this then is 6 stops. Then you need to set the live view timer to update every 1/2 second.
Attatch the nd filter and shoot. Every 1/2 second the lcd screen will update and when you get somewhere near 1 second you are there. Now the stop values that I gave you are simplistic but will give you the idea. You could have also changed your aperture by 1 stop each to the maximum that it will go to do the same thing.
Good luck and let me know how it works out for you.
you mentioned getting updated firmware. How does one do this for the OM-D?
There is a firmware utility that you get from olympus. you connect your camera via a usb cable to the computer then run the program. It will go out and check your camera and lens and download and install for you.
thanks, I will give it a try
I just bought this camera with Olympus M.Zuiko 14-42mm 1:3.5-5.6 Micro 4/3
Olympus OM Zuiko 1:1.8 Manual Lens
Super Albinar 80-205mm 1:4.5 Manual
Vivitar 28mm Super Wide Angle 1:2.5 Manual
Adapter Fotasy OM-M/43 to allow use of manual lenses
Toyo Macro Filter Set +1/+2/+4, 49mm threads
Vivitar VMC Skylight 1A 49mm Filter,
How can I set up my camera with long exposure/shutter to get that light waves from cars or get the smooth shots of waterfalls. Also besides these lenses would you recommend any others. Thank you and very nice work.
There are several posts here on this very subject! Why don’t you take a look. One thing that you will need are several ND filters, a 3 stop and a 10 stop!
ok thanks but can you help me with the other ? that was not answered about my lenses.
Justin, I have no experience with any of the lenses you listed. I tend to use native Olympus and Panasonic Micro 4/3 lenses plus Leica and Voigtlander manual focus lenses with adapters. I rarely even get out the Olympus camera any more as I shoot the Leica body 90% of the time and the rest I use my Fuji body with Fuji lenses and Leica lenses now. My current Fuji body is the XT-1 and it is an amazing body.
As far as conversion to macro with your +1,2,3 set search out the Canon 500d Closeup lens on Ebay and get it in the size you mostly use. It is way above anything else out there as it is dual element and fully coated. It is a +2. You can also not buy (Ebay and Amazon) extension tubes for your system now as well!
Hi Mark
Why do you prefer the Fuji and not the Oly?
Regards
Alex
The Fuji has a much better and more advanced sensor at 6×6 random placement sensor well whereas ALL of the micro 4/3’s have a non random 3×3 cell pattern. Micro 4/3 is much smaller than APS C so the Fuji gives much better bokah control as well. The Fuji Bodies are much more advanced. But the biggest plus for me is that I just plane like them better! 🙂
that is definitely something most people would say about the M4/3 and ASPC sensor. I do certainly agree about everything they said on the sensor fact sheet. It is bigger and that is that. Sadly, I don’t see differences in the dynamic range and bokeh. For the ergonomic perspective, that is a personal opinion. I do like the lay out on the EM5. It looks good enough for me. :-)) For the Fuji camera, it has no IBS, Auto focus is OK, and the colours are somewhat problematic for the post processing . Fuji also has good variety lenses but there is nothing comparing to the M4/3 system. Use the zoom kit lens on Fuji comparing the quality of the pro kit lens with the IBS. That is like bring the knife in the gun fight. I do stop thinking or caring about the sensor size for a year now. Afterall it is you who making the photo not the camera. I certainly learn about disadvantages and advantages about my camera and I embrace it. :-)) . No one really complaint about bokeh though. Afterall it is all about the technique pre processing and post processing.
Ambient temperature is an important factor. Semiconductors have thermal noise, random movement of the “carriers” (electrons or holes depending on the exact nature of your sensor). For long exposures, a cold day will work much better, or even cooling the back of your camera with a frozen gel-pack, but watch out for internal condensation so don’t go below the dew point. Also, I think that the sensor actually “sees itself”, its own infrared glow!
“This camera represents the pinnacle of modified DSLR cameras. Deep cooled to 80°C below the the sensor’s normal operating temperature. This camera is 4x more sensitive than a regular DSLR and is capable of exposures of one hour in length without breaking a sweat.”
http://www.jtwastronomy.com/products/ultimate.html
Some theory:
http://theory.uchicago.edu/~ejm/pix/20d/tests/noise/#thermalnoise