Another Film Dynamic Range Adjustment Post!


A Quick Dynamic Range Followup and Example

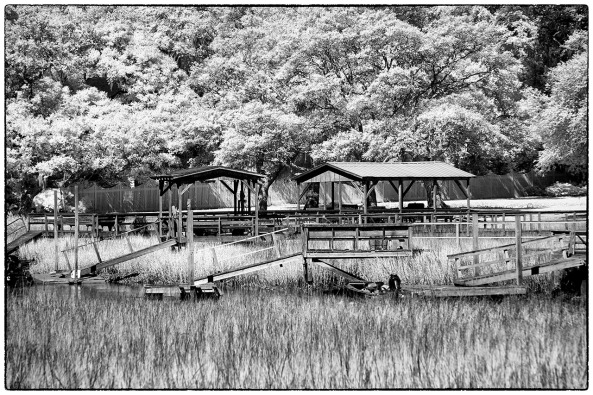
Hurricane Florence is coming… Spent all day today starting to get ready. But yesterday I stopped by the causeway bridge to Litchfield beach and shot 1 roll of FP4+ film on my Fuji GA645zi changing between the red R24 and R25 filter. I was looking to the North from the bridge. It is a very beautiful spot and scene.
This is one of my go to spots when I am looking for inspiration and it did not fail to deliver for me. I was heading home but decided to stop at the studio and put the film into the processor, wait the 20 min then hang it in the dryer overnight.
 

But…

When standing there looking at the clouds I realized that the whites were going to be blown so I subtracted 30 seconds from the development time to compress them down towards Zone 8 so that I could capture the entire dynamic range, then in scanning moved them back up a bit to place them closer to my memory of them and bring the blacks up a bit! I love the effect the deep red filter gives to the blue sky.

How did I do this you ask?  I am glad you asked!

With a hand held spot meter I measure the brightest white I desire texture in, then measured the darkest black for texture.  Pushed the average button on the meter and got the zone 5 reading along with a chart showing max and min.  This tells me that the whites will be blown out on the negative.  SO I adjusted my exposure to give texture (Zone 3) in the blacks I wanted and let the whites fall where they will.   In the processing knowing how far over exposed the whites are I can now adjust the developing time (-1N in this case) to compress the whites down to zone 8 (-30 seconds).  Easy!
In the scanning software (VueScan) you have the opportunity in the extended menus to again shift the black and white points up or down.  I simply adjusted both to expand the dynamic range back out to the range of the Gicle’e (RIP) printing system I use in my studio yet keep the whites from being blown out!
  1. Measure the range of the scene and determine if the film can capture it all
  2. Expose to move the blacks with texture to zone 3.
  3. Pick a -N developing time according to where the whites fell in the negative (1 stop for this one)
  4. Scan to keep the textured blacks at zone 3 and move the compressed whites back up where they belong in VueScan)


The Results:


The Causeway going to Litchfield Beach, SC

It was a pleasant and very satisfying endeavor and made me very happy today when I scanned this image on my way home from preparations.
 
Data: GW645zi – 55mm – Roll 95 – Fr 8 – Red 25 +3 Filter – f8 – 1_60 – FP4+ – Xtol Stock -30s – Wet Scan – T CI 50 – Litchfield Marsh- 2018-09-09
I know, this was a really short post, but I was really pleased with the image results and the entire process was one of those “By the seat of the pants” type of evolution.  I wanted to share again, now simple the process is for adjusting the range on film in development and scanning.  There will be yet another one of these in the future but it will be VERY detailed and perhaps even with a video!

As always please let me know what you think!

Full Eclipse at Pawleys Island, SC


Never 2nd guess yourself on the worthiness of an image…

Full Eclipse, Pawleys Island, SC . 2017

 
Honestly, I was NOT inspired to photograph this event in the least…
 

Jordan, my 8 year old grandson

There were going to be MILLIONS of photographers out there shooting the same thing or at least trying. So I asked myself why bother to get the same shot everyone else would have?  But my 8 year old photographer grandson came over with viewing glasses so we sat out in chairs in the front of our house (100% eclipse) and watched it happen

The longer it went on the more excited I got, then when the light started fading I decided to fire off a few shots when it reached 100%.
 

Canon 70-300L

I had a Sony A6500 with a Canon 70-300L nearby so I got up and got the camera from my truck and shot handheld at ISO  4000, f/8 and 1/1000s to keep a sharp handheld shot. There was no time to setup a tripod!  I Put the camera in high speed mode and fired off about 30 images then put the camera down and forgot about it till last night. On viewing the images is was stunned by the sharpness of them all and while I had several of the diamond ring I decided upon this one for one reason:

 
Look closely on the right side of the sun/moon and you can see a solar flare jetting out to the right. It has an orange color…

So, there is a lesson to be learned here (or re-learned in my case…), do not take the desire/inspiration or lack there of for granted, take the time and get the shot and later on decide upon whether or not it was worth your time.  It is always best to have it in the can rather than not.
I am glad that I even took the minimal effort to do this.  Imagine what I could have done had I setup properly with a 600mm lens ahead of time?

How many of you have made this same mistake?  Take my example to heart and always have a camera nearby when you are viewing something that might be worth capturing whether or not you have a desire to do so… One day you might be grateful for doing so!

Testing the New Kolari Vision AR 720nm Screw On Filter


720nm Medium Format Film Photography with Rollei IR400 Film


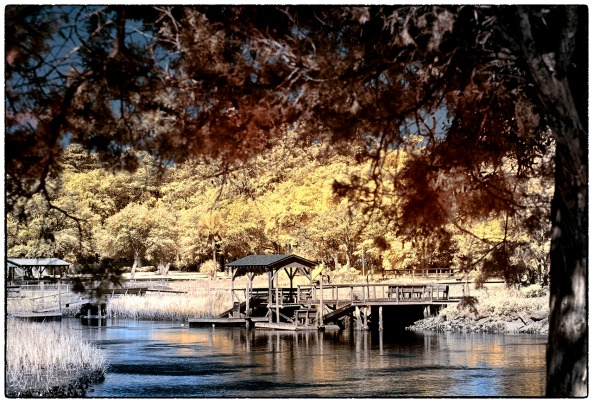
Tomotley Plantation in 720nm Infrared with Rollei IR400 film and the Kolari Vision 720nm Filter

Infrared FILM photography has always been on the difficult side, but not because of lack for film because there are several films on the market.  Rather it is due to the poor quality of the available 720nm filters on the market.   

Kolari 720nm FIlter

Recently Kolari Vision www.kolarivision.com has come out with a new series of infrared filters with their AR (anti reflection) that stop or greatly reduce hot spots in the center of your film or digital sensor.  These hot spots are due to the various coatings, paint and other reflective coatings on the glass elements and coatings on inside of your lenses causing the light to bounce back and forth several times then hit the film dead center causing the hot spot.    

The main filter on the market has been the Hoya R72 filter which works but gives a low contrast washed out image.   Along come the new Kolari filter and now I am getting more contrast and even images with greatly reduced hot spots.  AMAZING!


So lets take a look at the image above.  This is the Tomotley Plantation about 20 min west of Beaufort, SC and  was taken with the Rollei IR400 film rated at 720nm.  Without a IR filter the ISO is 400 and the emulsion generates a very good likeness of Kodak TriX 400 film.  If you add the 720nm filter the ISO drops down to 12 or 6  but you get the amazing whites on the grass and leaves.  You even get the Wood Effect where the green items BLOOM  out with an etherial soft white energy on the image!

Few things beat a beautiful sunrise photographed in color when you want to create a dramatic image. The same scene photographed in infrared may be disappointing unless there’s some  IR reflective subject matter (we’re talking about deciduous trees here) to add interest. That’s because of the “Wood Effect,” which is the bright, white reproduction of the chlorophyll layer of deciduous plants. The effect is named after infrared photography pioneer Robert W. Wood (1868-1955) and not after the material wood which does not strongly reflect infrared.

Normally the Wood Effect is difficult to achieve at 720nm and is better seen at 800nm and and above.  I have been very happy with this new filter from Kolari in combination with the Rollei IR400 film because I am constantly getting the effect plus deep contrasty images.  It simply works as expected which is way more than I can say for others on the market!


Technical Data:

  • Fuji GF 670 Medium Format (120) folding Rangefinder with a Voigtlander 85mm Color Scopar lens.  
  • Kolari 720nm AR filter
  • ISO at 12 and 6, both are close to perfect because they are only 1 stop apart.
  • Aperture: f/32
  • Tripod mounted

Development:

  • Ilford Perceptol Stock mixture 1:0, 20c, 14 min with 5 seconds of agitation every min.
  • Water Rinse
  • Stop Bath
  • Ilford Quick Fix for 5 min with 5 seconds of agitation every min.
  • Water Rinse
  • Clearing Wash
  • Water rinse for 10 min
  • Distilled Water rinse with 3 drops of wetting solution
  • Dried overnight in filtered Mistral Drying Cabinet.
  • Wet mount scanned on a Epson 850 pro at 6400dpi.

If you are considering working in 720nm whether in film or digital I highly recommend this new filter from Kolari!


Learning to work the scene!


Have a plan to work different compositions with in your scene!

Stormy Seas Side Shot

Stormy Seas Side Shot  Sony A7rii with the Sony/Zeiss 24-70 f/4 lens and polarizer.

You know how it is when you walk up to a scene and notice it for the very first time?  Usually we are amazed at what we have discovered!  We setup take the image and walk away congratulating   ourselves as to the amazing luck at finding such a perfect subject!

But wait!  You have all heard that you should work a scene, right?  Just look at all of the cool parts that make up the whole.  I am also sure that you have heard the phrase, “WORK THE SCENE”!  Well that actually means what it says.  Start wide and work in and around getting closer and more details!   When you are as close as you can stand, then work your way back out again!

This is powerful advice…

This is also the secret of all those world class images you see posted or published around the world.  Do you actually think that the professional photographer working and Nat Geo only took the one image?  Really???  They are just like the rest of us, a 30% keep rate and a 90% garbage rate!

So, knowing that it only make sense to take the time to work the scene.  Looking at the top image you see that I could the shrimp boat Stormy Seas with a long liner Charlotte Marie under the strong clouds of tropical storm Bonnie.  The scene is full of mood, color and contrasts.  I was specifically looking to work the shrimper so I did not pay any attention the the long liner.   Here they are a dime a dozen but there are likely a lot of detail shots there also…

Stormy Seas

Stormy Seas, from the bow, Sony A7rii with the Sony/Zeiss 24-70 f/4 lens and polarizer.

So as you can see, I have now walked around to the dock the shrimper is on and take a bow shot composing to keep the other boats, docks and other muck out of the image.  I still set it up to get the great storm clouds.  A much better shot than the first, no?

Stormy Seas

Stormy Seas, closer but  from the bow, Sony A7rii with the Sony/Zeiss 24-70 f/4 lens and polarizer.

Next I move further in, closer to the bow, looking at the painted boat name and the great structure and contrasts hidden the the hull of the boat.  As I stand here I think to myself that having the anchor cut off is a bit distracting but then decide that it adds a hint, or suggesting more out of scene that adds a bit is mystery to the image.  Again, in post, I have added a bit of mood to the clouds also!

Stormy Seas Side Detail

Stormy Seas Side Detail, Sony A7rii with the Sony/Zeiss 24-70 f/4 lens and polarizer.

Now I am walking down the boats side, paying attention to the colors and patterns around the wheel house.  There is a lot here and the images continue to improve. Having the walkway moving up and away from me give a sense of infinity and curiosity as to what is at the bow above!

Stormy Seas Life Ring

Stormy Seas Life Ring, Sony A7rii with the Sony/Zeiss 24-70 f/4 lens and polarizer.

Moving further back towards the boat’s stern (back for you folks who live in Idaho!) I come upon the life ring with assorted fishing accessories hanging from it.  This scene is the most promising so far.  Look at the textures in the wall of the wheel house, the deep rich red tones and the crisp writing of the boats name!  It gives me shivers overtime I look at it!

Stormy Seas Line

Stormy Seas Line, Sony A7rii with the Sony/Zeiss 24-70 f/4 lens and polarizer.

But wait!  Just below the life ring hanging on the gunnels of the boat is a coil of heavily textured rope.  The rusty bold and chipped and rotting rail add so much texture, mood and stories that I am drawn to create an image just of this one detail!

This is exactly what will happen if you take the time to explore your scene totally working inwards getting more and more details as you go!  If the scene is worthy of taking, it demands that you explore it in great depth and detail.  Give it the time to do a good job and document all of it’s glory!

Stormy Seas, side detail, B&W

Stormy Seas, side detail, B&W, Sony A7rii with the Sony/Zeiss 24-70 f/4 lens and polarizer.

Do not forget to work in B&W as well, each and every image you take might have magic wonder hidden within its detail if you look at in in monochrome!  Look closely at the image above.  The hull has MUCH MORE DETAIL in its structure than the one in color did yet they are the same exposure!  The clouds have more depth.   Monochrome images discard the distractions caused by color… But that is the subject for another post….

Remember, this has NOTHING to do with the type of scene you shoot, nature, landscape or shrimpers, it is all the same!

What do you think?


The Purity Of B&W


Going Home To Momma…

Don’t you have the feeling sometimes of not reaching that creative high so that when you return home you are almost like an empty husk?

Well me too, and sometimes I really need to stretch my artistic legs.  Going out with a Color Camera will just not get the job done and leaves me feeling empty.  Working in Film is a lot better and scratches an itch that I just cannot reach otherwise… But when I am really feeling creatively down and mentally cramped I usually turn to my Leica M Monochrom system.

Duggars Creek Falls, Boone, NC.  Leica M Monochrome

Duggars Creek Falls, Boone, NC. Leica M Monochrome

Working directly in B&W is a soul expanding exercise that will re-inflate my creative side quickly and effectively.  I am the type of photographer who can actually think and see in B&W. Actually generating those images in the field with a capable B&W rangefinder system really is like going home to Momma.  It leaves me with that ohhhh feeling, or is it OHHHHH… Yep, that is the feeling that I am talking about!

First, I LOVE shooting with a rangefinder camera system.   ALL of my cameras are rangefinders except for one little Fuji XT1 that sits in my camera bag rarely used unless I take it out for lightning shots.  I just love the feeling of using a rangefinder!  I am not kidding about the feeling of going home to momma!  They take me back to my early days of photography when a rangefinder was all that I had and used.  They were and still are a nitch camera system.  You generally will not find someone out shooting birds in flight images with one, but that is OK  with me because after 50 years of shooting, I am soooo TIRED OF BIRDS (well except for hummingbirds but I can do those just fine with a rangefinder).

Outer Banks Fishing Pier, 250 second Exposure Leica M Monochrom

Outer Banks Fishing Pier, 250 second Exposure Leica M Monochrom

So what makes me smile about the M Monochrom?  The ease of use, the CRISP release of the shutter, the incredible functionality of the camera and its wide dynamic range!  I love the way it feels in my hands and responds to my control!  I even love the sound of it. It is almost sensual in nature!  Now, couple that with the amazing images that a pure B&W 18 mega pixel sensor with NO Brayer filter and no anti-aliasing filter can create you will be left breathless with the results.  

So for this simple and short post about achieving emotional nirvana, I will keep it to just 2 images that make me feel good. Now that I am creatively re-inspired I can go out again with my color camera (rangefinder of course) and while looking at my scenes in B&W create color images again!

Thank you for stopping by for a visit to the blog…

Van Dyke Brown Paper Experiments…


Fixing Paper Problems For Van Dyke Brown Printing


Van Dyke Brown, Dinghys, Rising Stonehenge Paper

Van Dyke Brown, Dinghys, Rising Stonehenge Paper

VDB, Revere Platinum Paper & Spots

VDB, Revere Platinum Paper & Spots

In my recent printing of the 1840 Van Dyke Brown prints, I have experienced a lot of dark spots on my prints.  I ordered several types of papers to try to see if it was a paper problem… I have been using Revere Platinum paper which is easy to coat (provided you use Tween 20 in the emulsion) and gives great tonality but seems to ALWAYS have dark spots all through the print!

Look closely at the image to the right. You will notice dark spots (look above the light) that go completely through the paper!  This has been driving me nuts and nothing that I did to try and fix the issue ever helped.

I ordered several new papers plus tried several others that I had on hand:

  • Arches Platine (on hand) I have issues coating this paper even with Tween added to the mixture.  It tends to sit on the surface with no absorption into the fibers which causes it to wash off instantly in in the first water bath in long stringy tendrils of emulsion.  Very little is left on the paper so it has a light chalky appearance.  This paper just does not work for me in Van Dyke Brown.  I keep hearing online about how much other Van Dyke Brown printers like this paper but I just do not see it…
  • Cot 320 (on hand) This paper is a little better than the Arches paper in that it holds the emulsion a little better but is still washes off the surface in the 1st water bath!  It is usable for Van Dyke Brown printing though…  It has been recently suggested to me that I soak this paper in a 10% citric acid bath, wash it and dry it in order to get better surface adhesion and a higher Dmax.  I will try this in a week or two.
  • Heavy Kozo 90 gsm (on hand) Bostick & Sullivan states that this paper will work great with Van Dyke Brown.  The paper is made from 50% kozo and 50% abaca. Kozo is the inner bark of mulberry tree seedlings, producing a naturally white paper fiber which is very strong and long lasting. The paper looks very promising and fun to work with especially the ultra thin version that I chose to NOT work  with due to it being extremely thin and the requirement of special tools to handle it.  I have seen videos of artists using it which is why I decided to purchase a few sheets to experiment with.  But I have not had time to work with it yet.  So look for a post specific to this wonderous paper in the future!
  • Revere Platinum (on hand).  This paper coats wonderfully with the addition of Tween and the emulsion does NOT wash off in the first water bath!  It gives wonderful deep tones and color.  The only (MAJOR ISSUE) problem with it is that it gets white and brown spots all over the paper that goes completely through the paper from front to back.  These spots can totally ruin the print…  I have tried everything that I can think of to fix this issue as I really like the paper but I am at a total loss.
  • Rising Stonehenge (new)  This paper coats great with Tween and does not wash off.  There are no spots and the adjustment curve matches the one for Revere!  It is a thinner paper and seems easy to damage during coating.  It takes less emulsion to coat the same size as the other papers.  I did find that the emulsion migrates from the coated areas to the white around the edges.  I have no idea as to why but I think that if I lower the number of drops that I use for coating that it might take care of the problem.  It generates a fantastic deep brown warm tone across the image and I love the final prints on it. This paper is readily available on Amazon as well as many other locations.
  • Lana Aquarelle (new) All that I can say about this paper is WOW!  It coats and prints the Van Dyke Brown images with amazing density and tone.  It coats easily with Tween and is a heavy paper with not spotting or migration issues.  This is going to be my main paper as long as I can get it.  So far the only place that I have found it is at Bostic & Sullivan. The curves for the Revere paper work perfectly with the Lana!


Lana Aquarelle Paper Notes

Lets first talk about the Lana Aquarelle paper.  This paper is simply amazing!  It coats very well with both the brush and a glass rod as long as you add a little Tween at 25%

For a 8×12 print:

  • Using a glass coating rod for a 8×12 print it takes 36 drops of VDB and 2 drops of Tween 25%.
  • Using a Synthetic Sable brush it takes 72 doors of VDB and 2 drops of Tween 25%.

Once coated, I let it AIR DRY for 30 min then expose in a 12 bulb UV box in a vacuum frame for 2 to 4 min depending on the paper and negative.  Usually the base exposure time is 3 min.

Van Dyke Brown, Berry Mill, Lana Aquarelle Paper

Van Dyke Brown, Berry Mill, Lana Aquarelle Paper brush coated

As I said the results from this paper is a nice warm print with great density in the black areas and the edges.

I coated four pieces of paper yesterday, two with a glass coating rod and two with a synthetic Sable brush.  Both methods worked very well and gave nice even coatings. The image above was a applied with the Sable brush  and the one below was coated with a glass rod.

Van Dyke Brown, Lana Aquarelle Paper Glass coated

Van Dyke Brown, Lana Aquarelle Paper Glass coated

Notice in the image above if the lone dinghy  that there are NO spots at all.  The paper was clean on the front and back and gave a nice density in the dark areas!  This paper is very heavy and after coating it will want to curl a little but will flatten in about 5 min. Let it dry for the full 30 min in the air and do not use a hair drier.


Rising Stonehenge Paper

For a 8×12 print:

  • Using a glass coating rod for a 8×12 print it takes 26 drops of VDB and 2 drops of Tween 25%.
  • Using a Synthetic Sable brush it takes 65 doors of VDB and 2 drops of Tween 25%.


Rising Stonehenge Paper is another good paper for the Van Dyke Brown process.  It is a MUCH lighter weight paper than the Lana paper but it really does not cost any less!  You can find it on Amazon which means free shipping.  The shipping charges from B&S are going to kill me, with the average cost for paper being around $20 per order!  This is what makes Amazon so great, but they just don’t carry all of the papers that I like to keep on hand…

Van Dyke Brown, The Old Truck, Rising Stonehenge Paper

Van Dyke Brown, The Old Truck, Rising Stonehenge Paper

So far, my work with Rising Stonehenge has been very good.  It coats evenly and the emulsion soaks into the paper fibers nicely. The print is very dense and nice dark areas.   The paper is quite thin and I discovered that the surface is easily damaged during coating.  Since the surface requires much less VDB emulsion I will reduce it the next time I coat (I used 36 drops of VDB and 2 drops of Tween for this test coating) and the surface damage will likely go away due to the glass rod not going across the paper surface  more than 4 times ( for 36 drops the coating rod required 8 trips across the paper surface) thus reducing working the papers surface too much and causing damage.  

One small problem with the paper that I discovered was that the emulsion has a tendency to migrate from the coated areas to the uncoated areas giving a grey shadow around the image.  If you look closely you can see actual small spots of it surrounding the coating.  This is really no big deal but I am unsure as to why this is happening.  

I will continue to use this paper because it generates VERY WARM BROWN in the print and I just love the look of it!

Now, it has been suggested that I soak or pre coat the paper with an acid bath of 10% citric acid for a 1 or 2 min, then wash the paper and allow it to dry before coating.  I am told that this will vastly increase the papers Dmax!  I am going to test this next time I print!

 The image at the top of this post was also printed on Rising Stonehenge paper!

 Bergger Cot 320 Paper

 The Cot 320 paper is a very nice, smooth paper.  I love the look and feel of it.  BUT, for Van Dyke Brown it has a problem in that it will not readily absorb the VDB emulsion into the paper fibers.  Even with Tween added to the emulsion, it is not enough.  What happens is that in the first water bath after exposure the majority of the emulsion washes off in thick tendrils of brown goo.  Unlike the Arches paper, enough is left on the paper to still make for a good (not great) image.  

Van Dyke Brown, Das Boots, Cot 320 Paper

Van Dyke Brown, Das Boots, Cot 320 Paper

There is enough promise from this paper that I am going to experiment further with this paper by washing the paper with an acidic solution of citric acid and distilled water, brushing it on and letting it soak in for a few seconds then washing the paper again with distilled water.  Once it dries and I will flatten it in a low temp heat press and coat the VDB on it.  I think that this will break down the surface coatings enough for it to accept the emulsion better and increase the papers Dmax.

Van Dyke Brown, Stormy Sky, Cot 320 Paper

Van Dyke Brown, Stormy Sky, Cot 320 Paper

I will report on this more in the future.  

OK that is all for this post. I am not going to report on the Arches and Revere papers as I have discussed them in the previous two posts.

I hope that you got something out of the info here!  Let me know…


More Leica M Monochrome Magic!


Creating World Class B&W Images With Leica Monochrome

Bodie Island Light, M Monochrome

Bodie Island Light, M Monochrome

In my continuing love affair with the Leica M Monochrome camera system I have learned more each day towards creating amazing etherial B&W art…  Keep in mind that I have been shooting B&W film (35mm, 6×7 and 4×5) for several decades and know and understand the process very well. But using the Monochrome is such an easy progression that it seams as though the camera is leading me down this path on its own. Yes there is some small post processing to be done using Nik Filters Silver EFX and once in a while I will add some Viveza as well, but for the most part it is almost perfect out of the camera as long as you get the exposure correct in the shooting!

Leica Tri-Elmar 16 - 18 - 21 mm Lens

Leica Tri-Elmar 16 – 18 – 21 mm Lens

In the image below of the shrimper Stormy Seas, I used the Leica Tri-Elmar set in 16mm.  There is no image distortion from such a wide angle and it is sharp with good depth of field.  When using this lens on the Monochrome you are forced to use the frankenstein viewfinder that you purchase with the lens but that is a small price to pay for such a useful lens.  I also have a Voigtlander Hellar 12mm lens in the camera bag and it works very well on the Monochrome and uses an external 12mm viewfinder, but it does distort the image slightly due it its wideness but you can correct for that in Photoshop.  The thing about the Tri-Elmar is that it replaced 3 separate lenses that were stolen with one small lens!

Stormy Seas Shrimper, M Monochrome with Tri-Elmar at 16mm

Stormy Seas Shrimper, M Monochrome with Tri-Elmar at 16mm


Using a fast lens like the 50mm Summilux ASPH for the image below of the Roanoke River Lighthouse allows you to hand hold on dark or stormy days and still get crisp images that jump out at you! For this image I also had a yellow filter attached to bring out the structure of the clouds.  This is one of the HUGE pluses of the Monochrome in that it reacts to the standard B&W filters the same way as film does!

Roanoke River Lighthouse, M Monochrome

Roanoke River Lighthouse, M Monochrom

But as always my main use for the camera is long exposures which is where my true love lives!  Being able to take ocean shots and smooth out the waves is exciting beyond words and the Monochrome does a great job of it with its 4 min bulb limit.  Look at the image below of the (another version) Roanoke Marshes Light House.  I was there when the light was on and each time it circled  it created another slightly offset star effect.  It allows me to create images full of wonder and depth!

Roanoke Marshes Lighthouse with operating Light, 16 second exposure, M Monochrome

Roanoke Marshes Lighthouse with operating Light, 16 second exposure, M Monochrome

The implied stillness of the water with the graduated reflections create an image full of mood and depth.  This is one of my favorite images of this Light House and the fact that during the 16 second exposure the light revolved around 3 times to generate 3 slightly offset star patterns just add more mood to it.  This particular shot was done with a B+W 103 3 stop ND filter to allow the longer shutter speed at f/8 for sharpness with the 50mm Summilux ASPH lens!

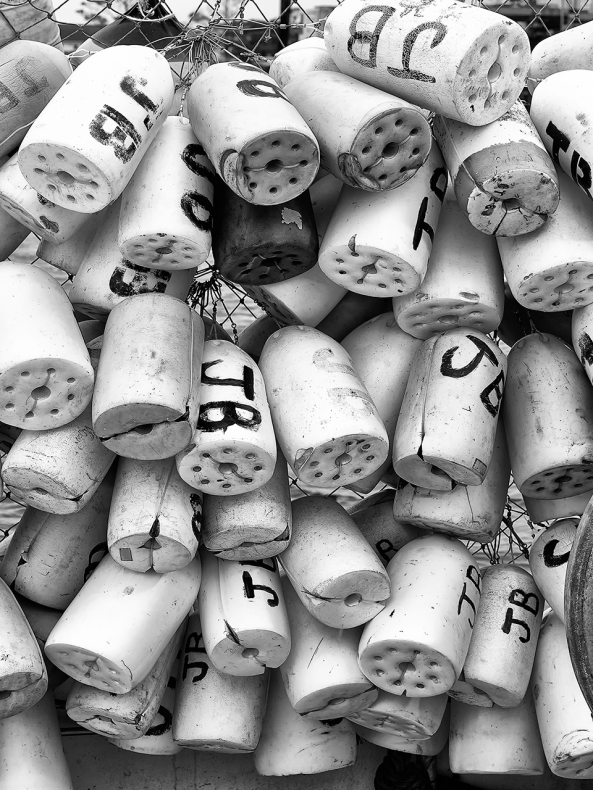
Now let me share a detail shot of a fishing boat just up the island from the Light House.  It is simple yet tells a complex story of the boat and job.  

Fishing Float, M Monochrome

Fishing Float, M Monochrome

I love the textures of the image and the sharpness. The texture on the surface of the individual floats are great and perhaps would have been better served by a closer shot. It was taken with the Macro Elmar 90mm lens (a great lens to invest in) and was done on the tripod!

Mushroom, Macro, M Monochrome with Macro Elmar 90mm plus macro adapter

Mushroom, Macro, M Monochrome with Macro Elmar 90mm plus macro adapter

Really Right Stuff TF-01 and Ball Head

Really Right Stuff TF-01 and Ball Head

Continuing with the 90mm Macro Elmar I give you a closeup image taken just as I left the Outer Banks.  This mushroom is only about 2 inches tall and I had to lay down under a log to get it.  Yes a tripod was used but it was the Really Right Stuff table pod which is an amazing tool to have in your kit for just this sort of work  Look at the textures on the bottom and stalk of the mushroom.  This 90mm lens is the only 90 that I will ever buy for my Leica cameras!

Really Right Stuff TF-01

Really Right Stuff TF-01

I hope that you enjoyed this last dedicated post on the Leica M Monochrome camera.  I will have many more images to share from it in the future but I think that you are likely getting tired of dedicated posts!

Thanks for taking the time to view these!!

How to get the BEST B&W images out of your Infrared camera!


How to get the BEST B&W images out of your Infrared camera!

Final B&W Version!

Final B&W Version!

I am VERY particular in how I process my images, either color or IR it doesn’t make any difference!  This comes from years of visualization,   photography, a career at Eastman Kodak, endless hours of post processing and just plain being old and cranky!  I look for specific compositional elements in each and every image I create then look to create a stepped series of varying  contrast levels to draw the viewer into the image.  This is important in my color work, but CRITICAL in my B&W images.

This post though, is specifically about B&W IR post processing.   But before we actually get to that point I wish to share with you my workflow that I go through up to the point of processing it for B&W.

Assuming that our images have been edited for choice and artistic content and been processed from RAW to 16 bit TIFF…

  1. I evaluate each image to see if it is viable as a processed RAW image.  This means that it has been converted to TIFF, then evaluated as is.  If it looks good (nice bronze skies and monochromatic leaves), I will then post process it according to the the same workflow below that I use for B&W and save it.  Then…
  2. Convert the image to Faux Color IR but running the Faux Process (channels swap and color saturation & hue adjustments) and save.
Step 1  Evaluate the RAW image to see it it stands on its own!

Step 1 Evaluate the RAW image to see it it stands on its own!

Step 2 Process the RAW image into Faux Color.

Step 2 Process the RAW image into Faux Color.

Only when these steps are completed do I start my B&W conversion and processing.  The reason for this is that the best B&W conversions are generated when we have gotten the best possible color adjustments done!  The better the colors the better the B&W!  This is true of both color camera or an IR camera.

As you can see from the B&W image above of the bone yard at Cape Romain here in South Carolina, the image is full of alternating contrast areas that draw the viewers eyes into the image from the bottom left corner up to the center.  This was a choice made in post processing.  

So remember, you will get a much better B&W image if you first post process the color version!  This will give the software (Nik’s Silver EFX Pro) a greater latitude of colors and contrasts to work from rather than just converting the RAW version directly into B&W.

Compositional Elements

In Infrared photography, there are 3 main elements that we need to get an emotionally charged image:

  1. Sky with moody cloud structure.
  2. Water
  3. Green plants.

If you can get all 3 you will get a much more powerful image, but as long as you can get at least 1 you will have more to work with to get a good image. If you find yourself in a location where none of the 3 desired elements can be found then look for repeating patterns! Look at the example below.  This image is of old Rt. 66 through the west taken at the height of a world class snow storm a few years ago in 720nm IR.  There is no water, clouds or plants to work with.  But we have a vanishing perspective due to the repeating telephone poles plus great structure in the snow cover scrub!  There is also just a hint of the sun behind the top of the first telephone pole which adds interest and change of contrast.

Old Rt. 66.  A hint of sun behind the top of the first telephone pole.  720nm IR

Old Rt. 66. A hint of sun behind the top of the first telephone pole. 720nm IR

Now, as easy as all of this sounds, it really does take some planning and simple photoshop skills.  Plus the more you practice it the better and faster you will get!

So lets take a look at our sample B&W converted per post processed B&W image below.  To get to this point, you take your color image and open it in Niks Silver EFX software filter.  You would then choose the recipe that you like the best from the left hand menu watching the effect on the preview image on the screen.  When you find the version you like the best  you would then adjust the contrast, structure and highlights/shadows to get your starting image, then accept it and drop it back into Photoshop!  

This then is the results of what we just did:

Adams Mill Bridge, IN, B&W Converted NO Post Processing!

Adams Mill Bridge, IN, B&W Converted NO Post Processing!

This is a very nice image to be sure!  But, it can be drastically improved with very little work.  By selecting areas of alternating contrasts we can enhance the emotional impact of this image and draw the viewers eyes into the image giving it an almost 3 dimensional feel!  Lets take a look at these areas!

Take a close look at the image.  Look for ways to give alternating areas of light and dark, low contrast and high contrast.  Use these areas to create steps into your image.  For the image above of the Adams Mill un processed this is how I approach it:

Visualizing areas of light/dark, low/high contrasts to step your viewer through the image!

Visualizing areas of light/dark, low/high contrasts to step your viewer through the image!

Looks like a puzzle doesn’t it!  But is is really easy once you decide HOW you want to approach the image.  We are going to use the Nik plugin filter called Viveza to accomplish all of these changes.  Simply start on one edge of the image and work your way across. Nik gives you a very powerful selection and masking tool call selection points.  These points pick out areas of similar color or shading.  

So here is how it all works:

  1. Start Nik Viveza in your editor.
  2. Start from one edge and work across the image.
  3. Using a selection point, place it on the first area to be edited.
  4. Adjust the size if the selection point as necessary.
  5. Adjust the brightness slider to set the light/black point you desire.
  6. Adjust the structure (sharpness) with the structure slider.
  7. Adjust the contrast with the contrast slider.
  8. If you find that your edits affect areas outside of your desired area simply add another (or several) adjustment points with no editing in those affected areas to bring them back to where they were. This is called an anchor point. You will find that you will add anchor points all over your image to bring areas back to their un edited version.  
  9. Simply work your way across the image editing as you go.  Create areas of alternating contrasts and you will generate a powerful B&W image in very little time!  

Here is the finished version of the image above!

Adams Mill Bridge, IN, B&W Converted Post Processed

Adams Mill Bridge, IN, B&W Converted Post Processed

Go back and forth, look at the differences between the 2 images.  In the 2nd image, there is a tonal range of complete black to complete white. The un-edited version has a little contrast but lacks punch and it does NOT have a complete tonal range!

This looks very simple doesn’t it!  Well it is!!  It just requires that you pre visualize what you desire in your finished image then simply make it so.

I hope that you enjoyed this simple tutorial.  If you would like an enhanced version with complete step by step instructions and screen captures please visit my BLOG at:

http://www.markhilliardatelier.wordpress.com

and look at the post on my Color & Infrared Video Post Processing Tutorial on a 2 DVD set.  

Please let me know what you think of all this!!

Fuji X-E2 Long Exposures and Wild Sunsets!


Every Time I take the X-E2 out I am amazed…

Fire In The Sky, X-E2 w/ 18-55 and 3 stop soft grad ND on the sky.

Fire In The Sky, X-E2 w/ 18-55 and 3 stop soft grad ND on the sky.

We have been having amazingly turbulent weather here in Pawleys Island for the last week or so.  The sky has been moody and dark.  Mornings filled with dense fog and the ocean surf rough…   Perfect for long exposures and wild sunsets

What better excuse then to take the Fuji X-E2 out and capture these wild and moody scenes?  With my full kit of the Lee Seven 5 filters and B+W ND filters in hand I grabbed the X-E2 and the XF 55-200mm F3.5-4.8 Zoom Lens (which has kind of turned into my main carry around lens) and headed out to the beach.  

The X-E2 (in fact, the entire line of Fuji X cameras) is exceptionally adept at long exposure photography.  It generates low noise exposures and has NEVER let me down.  I usually shoot in the 2 to 4 minute range but once in a while will go up to 10 to 15 minutes depending upon the subject.  

In todays post I am shooting between 30 seconds and 4 minutes and one of the sunset images was just a short exposure (1/13).  

The setup for all of the long exposure water images was either a 6 or 10 stop B+W ND filter and the sunset had an added 3 stop soft graduated Lee filter (Seven 5 system).  The sky was just too bright with the wild colors to give anything but a black foreground otherwise! I also used the Fuji RR-90 remote shutter release (but you can also use a mechanical release or a Canon RS60 E3 release).

One of the big benefits of the Fuji X system is the fact that when in the  BULB mode Fuji gives you a count up timer on the LCD screen so that you can easily time your exposure.  This doesn’t sound like much but when you are out in the cold and dark shooting it is a BIG DEAL!  Try doing this with a Nikon 300 and you will understand!

Now, lets talk a little about your exposure metering.  

  • You can (and I sometimes do) use the cameras metering system, but I do find that when metering through the 10 stop ND that it will sometimes confuse the meter.  
  • You can also meter without the ND attached then attach it and adjust the exposure for whatever value the ND is but there is NO guarantee that the filter is actually what it is advertised to be!  
  • What I like to do is to use the Seikonic  758DR spot meter which can factor in the ND filter automatically for you and give you an accurate exposure.  You can also meter through the filter with the 758 to see what the real value of the filter is!.
  • You can also just get close with your first exposure then evaluate your histogram and adjust the exposure as desired.

Which ever way you choose you will be surprised how quickly you can get “on target” by taking just 1 exposure then adjusting! But remember. when we are spot metering either in camera or in an external meter whatever spot you  are metering on will give an exposure for Zone 5 or 18% grey. It is up to you to adjust the exposure up or down to place it into the proper Zone!  What I like to meter on is the sky just above the horizon then adjust it up about 1 stop (move from Zone 5 to Zone 6).  

I ALWAYS have the Long Exposure Noise Reduction turned on in my cameras.  This means that you will double your exposure time.  After you take your image, the camera will close the shutter and take a 2nd one with the same shutter speed.  This is called Dark Frame Noise Reduction and the camera will look for bright pixels in the 2nd shot and subtract them from the first.  This is very worthwhile and will allow you to create much better output images but cut down the amount of time you have to stand there and shoot!

As I said earlier, the mornings have been very foggy so lets start off with several examples of this type of photography.  Of course, you must remember to increase the exposure so that the fog is not a DARK GREY, these have been adjusted from Zone 5 to Zone 6.5 or 1 1/2 stops!

Salt Marsh in the morning fog...

Salt Marsh in the morning fog…

Pawleys Island Pier, Foggy Morning.  X-E2 with 10 stops of ND, 30 seconds.

Pawleys Island Pier, Foggy Morning. X-E2 with 10 stops of ND, 30 seconds.

Foggy Feast, X-E2. Sometimes simple is best!

Foggy Feast, X-E2. Sometimes simple is best!

Ok, lets move on to the evening.  The intent here was simple long exposures to smooth out the surf and remove the surfers (yes I hate surfers as they are always in your shot and don’t care!).  For these type of images you really need to start at 30 seconds and move up.  If the sky is within 3 stops of the foreground then you do not need to add a graduated ND on the sky.

Fire In The Sky,  90 second exposure with 3 stops of grad ND on the sky and 6 stops of ND overall.  X-E2

Fire In The Sky, 90 second exposure with 3 stops of grad ND on the sky and 6 stops of ND overall. X-E2. Notice the cloud movement in the sky and the smooth surf!

X-E2-240s BW LE Pawleys Pier-0255-2013

B&W Pier & Groin, Pawleys Island, SC 240 second exposure, 10 stop ND X-E2

X-E2-240s LE Pawleys Pier-0255-2013

Color version of above image. Notice how the sky and water are close to the same density? 240 seconds.

X-E2-BW LE Pawleys Pier-0246-2013

B&W version of “Fire in the sky”. Yes you should evaluate ALL of your images for B&W.

There is something very soothing about well done long exposures of the ocean.  They really are not difficult to do and the results are worth the investment in time and discomfort (did I mention that it is winter here and I was standing on the beach in the wind?).

As you can see, the Fuji X-E2 excels in all areas of photography.  It has proven itself to be a serious tool to photographers who understand its capabilities and master it functionality!

I hope that you enjoyed this post. Please let me know what you think!

Fuji X100s: Oh Yea…


You know the feeling, and usually need tissues to clean up afterwords!

A little background is in order…

Fuji X100s

Fuji X100s

Fuji X, what can you say except “Yes Please!”.  I am a LONG time X shooter.  I started out several years ago with the Fuji X100 and loved every moment of it.  I likened shooting with it to going home to Mama…  If you know what I mean then you understand.   I did decide that I really desired to have a camera with interchangeable lenses and when the Fuji X Pro 1 came out I jumped on it and all of the FX lenses that have since arrived plus several CV lenses as well.   The X Pro 1 has become may main goto camera system.  I Then purchased the X-E1 due to its electronic shutter release, thus its ability to connect to my lightning trigger and water drop computer system!  The X-E1 only lives for such things…  When I get it out to play with lightning it is like coming home to a doggy after a long day! I then decided to get another X Pro 1 and have it converted to 720nm Infrared.  This system (my 16th IR conversion) is the BEST IR camera that I have ever used and that is a big statement!

Passion Flower Macro, Fuji X100s hand held in bright sunlight.

Passion Flower Macro, Fuji X100s hand held in bright sunlight.

So, along comes the X100s, and I look it over and think on it for months.  I though that gee, what a neat system to add to my bag.   Finally I decided to get one but let me tell you that they are HARD TO FIND!  I found on at a little online camera store in Oregon and had them ship it to me last month.  I am very glad I made  this decision!  To say that the X100S is a world class camera is really short selling its capability!   I find that I carry it EVERYWHERE I go now.  I still use the X Pro 1 for most of my work but the X100s really gives stunning results and the new XTran 2 sensor is amazing.  I love the split image manual focus system and wish the other Fuji cameras offered it as well.

Adams Mill Wheel, Lafayette, IN, Fuji X100s

Adams Mill Wheel, Lafayette, IN, Fuji X100s

The X100s works very well in macro mode and the sharpness, colors and texture are simply breathtaking!  You could not ask more of a walk around camera than the Fuji delivers.  Even without image stabilization the camera is flawless due to its ability to shoot cleanly at high ISOs!

Abstract, Glass Block Floral, Fuji X100s

Abstract, Glass Block Floral, Fuji X100s

I am going to share a few of the images generated so far with this incredible camera and you be the judge!

The Dingy, Fuji X100s

The Dingy, Fuji X100s

Adams Mill, Lafayette IN, Fuji X100s

Adams Mill, Lafayette IN, Fuji X100s

McHargue Mill, Fuji X100s

McHargue Mill, Fuji X100s

Old Truck, Fuji X100s

Old Truck, Fuji X100s

A Face in the trees, Fuji X100s, you have to figure this one out!

A Face in the trees, Fuji X100s, you have to figure this one out!

Ok thats it for today!  What do you think?

Fuji 55-200 mm on a 720nm IR converted X Pro 1


Finally, a LONG X Lens for the Fuji Family!

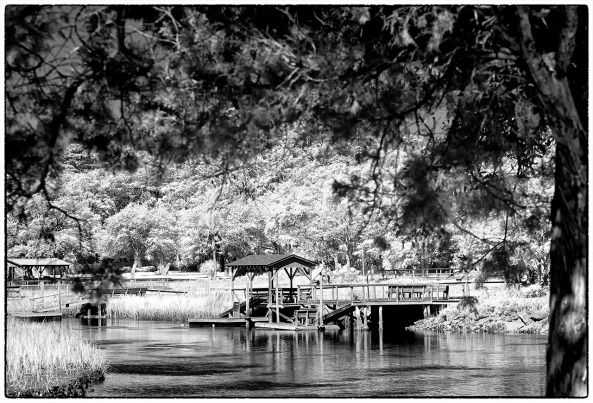
Pawleys Marsh, Fuji X Pro 1 720nm IR conversion w/ the new 55-200mm lens.

Pawleys Marsh, Fuji X Pro 1 720nm IR conversion w/ the new 55-200mm lens.

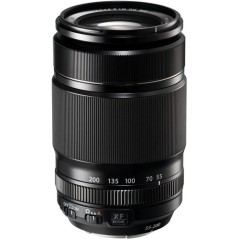
Fuji X 55-200mm

Fuji X 55-200mm

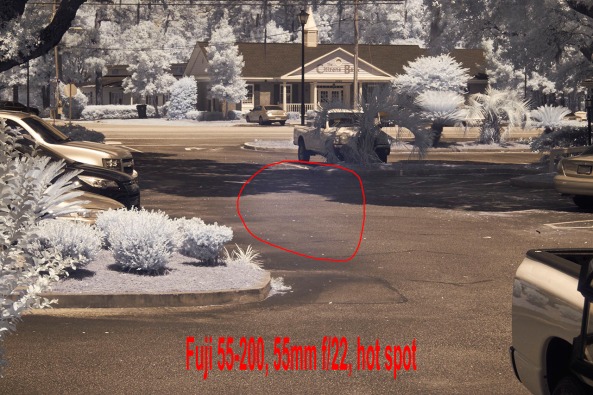
Yes, the new Fuji 55-200mm lens arrived for my fuji camera systems!  I am currently shooting with a color X-E1, a color X Pro 1 and a IR converted (720nm) X Pro 1.   I know how well the 55-200 works on the color bodies but what I really needed to know how did it work with the IR system!  Would it give hot spots as so many of the Fuji lenses do?  This post is the report of my findings.  The final verdict is that it works very well and as long as you do not go higher than f/16 there are no hot spots to worry about at any zoom range! To me this is a really big deal.  

So far only the 14mm and 35mm Fuji lenses are usable in infrared. So the addition of another lens really helps.  

I am going to give you some examples of how this lens actually does at both the wide and long ends of the zoom range wide open and closed down so that you can get a feel of the usable Infrared range that you can use.  Next week I will do a posting using the lens for color work only.

Pawleys Marsh, Fuji X Pro 1 720nm IR conversion w/ the new 55-200mm lens.

Pawleys Marsh, Fuji X Pro 1 720nm IR conversion w/ the new 55-200mm lens.

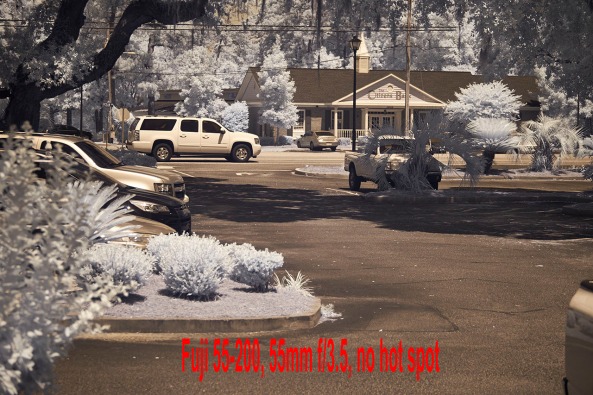
OK, let’s take a look at the good and bad of the 55-200 in IR, the Wide end:

55-200mm @ 55mm, f/23.5 No hot spot

55-200mm @ 55mm, f/23.5 No hot spot

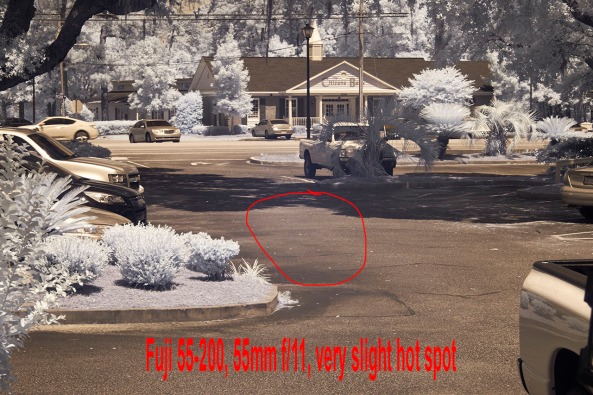
55-200mm @ 55mm, f/11  Small hot spot

55-200mm @ 55mm, f/11 Small hot spot

55-200mm @ 55mm, f/22 Bad hot spot

55-200mm @ 55mm, f/22 Bad hot spot

As you can see as you get to f/11 we start to develop a small hot spot, but nothing that cannot be fixed.  Above f/11 the lens becomes unusable at the wide end.


Now, let’s take a look at the long end of the zoom range:


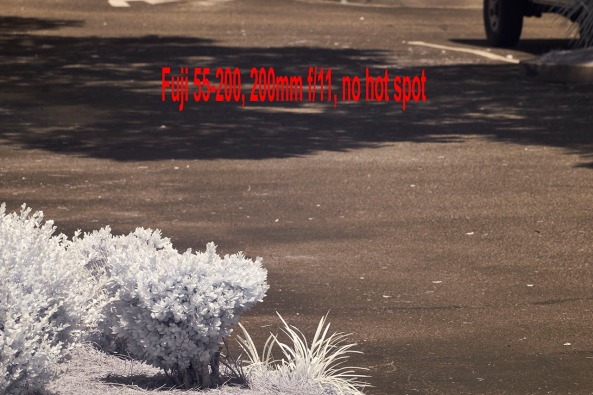
55-200mm @ 200mm, f/11 Bad hot spot, NO HOT SPOT

55-200mm @ 200mm, f/11 Bad hot spot, NO HOT SPOT

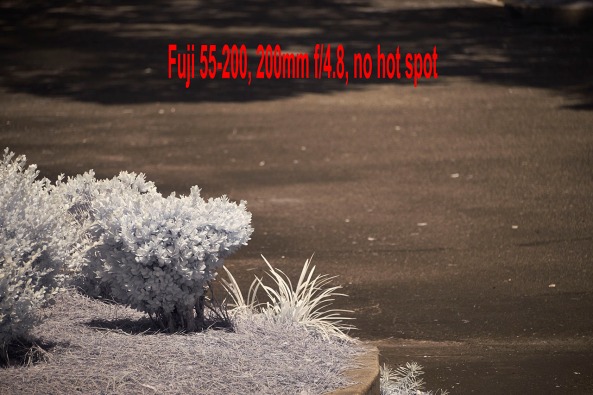
55-200mm @ 200mm, f/4.8 Bad hot spot, NO HOT SPOT

55-200mm @ 200mm, f/4.8 Bad hot spot, NO HOT SPOT

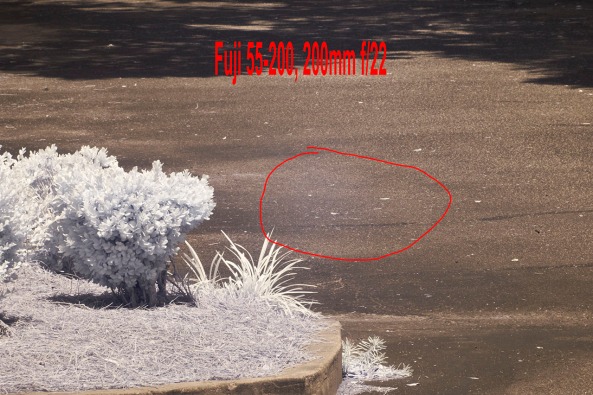
55-200mm @ 200mm, f/22 Bad hot spot, SMALL HOT SPOT

55-200mm @ 200mm, f/22 Bad hot spot, SMALL HOT SPOT

The difference at the long end of the zoom is amazing and is usable over the entire range of the aperture!  This is great news for us IR shooters.

Pawleys Island Marsh, 200mm B&W Post Processing

Pawleys Island Marsh, 200mm B&W Post Processing


There is starting to be a large number of IR photographers out there who are using converted Fuji X Pro 1 camera systems.  There are currently 2 conversion companies out there who can do the conversion.  I HIGHLY recommend the X Pro 1 as an Infrared platform and with the addition of the 55-200mm lens to our shooting arsenal we are way ahead of the game!


Moody Images in Infrared & Color! Fuji X Pro 1 and X-E1


Grabbing your viewers by the throat and not letting go…

A dark and stormy night

A dark and stormy night, Fuji X Pro 1 w/ 14mm fuji lens at 720nm Infrared.

Images that are dark and moody tend to grab our attention.  It is as though there is something hidden and dark that demands our attention.  We stare at them and analyze the image for a deeper hidden meaning.  This creates emotional impact that allows our viewers to share what we felt as we created the images!

Look for dark, stormy skies, moody clouds, dark trees or water.  Work in Infrared and you will find that you have a much better chance to capture these kinds of images more often than when working in color.  It is still possible to do so in color but you have to work harder at it!

Paradise Island Light, Nassau

Paradise Island Light, Nassau


As you can see in the image above, it is moody and draws the viewer into the scene, but it does not have that “dark and stormy” look and feel!  As I stated before, it is much easier to capture these types of image when working in Infrared!

A dark and stormy night

A dark and stormy night

Work in both Faux Color and B&W.  You never really know what you are going to get unless you take the time to post process both ways.  You should even look seriously at the properly white balanced raw image right out of the camera!  Sometime you can get a really stunning image there.

Lady Katheran

Lady Katheran, 720nm Infrared, Fuji X Pro 1 with Fuji 14mm lens.

Here is the same image processed in B&W.

Lady Katheran

Lady Katheran


The workflow to getting great images in post processing is to ALWAYS process in the 3 main ways:

  • RAW:  Check how the images looks right out of the camera.  In 720nm and 590nm you can get some stunning images with beautiful bronze skies!
  • Faux Color:  If your camera captures any color data at all (720nm and lower) then you should ALWAYS take the time to process in this mode.
  • B&W: You just done know what you are going to get unless you try!


Try adding a lens vignette to your images to darken the corners.  This will give more mood!

Here are some examples of RAW and B&W post processing!

McClellanville Shrimper

McClellanville Shrimper, RAW right out of the camera!


McClellanville Shrimper

McClellanville Shrimper, B&W


As you can see both versions give stunning results.  The most important thing for you to remember is that to get the best results from all of your images it is necessary to take the time to post process in all three modes.  Do not short change yourself by cutting corners.  Take the time to give each image your best try!  


You will be rewarded for you work!


Wabi/Sabi: Exploring decay in man made objects


All things Old are Beautiful again..

This morning at 9:30 at Georgetown, SC. I decided to get out my cameras and shoot some Shrimp Boat images before I had to open a Co-Op gallery that I am a partial owner of.  The Shrimp  Boats are a subject that are very dear to me and I visit them every chance that I have.

They are for the most part all falling into decay.  The market for local salt water shrimp is almost not enough to support the boats.  With the import of fresh water farm shrimp the local fisherman are being forced out of business and the result is the condition of the boat and companies… A very sad state of affairs.

The Boat Graveyard and the 3 Wheel Houses...

The Boat Graveyard and the 3 Wheel Houses…

The image above illustrates the wabi-sabi concept:  There is beauty in decay  It sounds very counter to the way we think as artists, but with a little thought I think that you will be able to agree with the concept.

Wabi-Sabi

The Japanese concept of Wabi-Sabi, as described in Brainpickings, “connotes a way of living that finds beauty in imperfection and accepts the natural cycle of growth and decay.”

Characteristics of the wabi-sabi aesthetic include asymmetry, asperity (roughness or irregularity), simplicity, economy, austerity, modesty, intimacy and appreciation of the ingenuous integrity of natural objects and processes.
From an engineering or design point of view, “wabi” may be interpreted as the imperfect quality of any object, due to inevitable limitations in design and construction/manufacture especially with respect to unpredictable or changing usage conditions; then “sabi” could be interpreted as the aspect of imperfect reliability, or limited mortality of any object, hence the etymological connection with the Japanese word sabi, to rust.[citation needed]The Japanese kanji characters:


(sabi, meaning rust)

and


(sabi, as above)

are different, as are their applied meanings, yet the original word (pre-kanji, yamato-kotoba) is believed to be one and the same.
“Wabi-sabi is the most conspicuous and characteristic feature of traditional Japanese beauty and it occupies roughly the same position in the Japanese pantheon of aesthetic values as do the Greek ideals of beauty and perfection in the West.”  “if an object or expression can bring about, within us, a sense of serene melancholy and a spiritual longing, then that object could be said to be wabi-sabi.” “[Wabi-sabi] nurtures all that is authentic by acknowledging three simple realities: nothing lasts, nothing is finished, and nothing is perfect.”
The words wabi and sabi do not translate easily. Wabi originally referred to the loneliness of living in nature, remote from society; sabi meant “chill”, “lean” or “withered”. Around the 14th century these meanings began to change, taking on more positive connotations.[1] Wabi now connotes rustic simplicity, freshness or quietness, and can be applied to both natural and human-made objects, or understated elegance. It can also refer to quirks and anomalies arising from the process of construction, which add uniqueness and elegance to the object. Sabi is beauty or serenity that comes with age, when the life of the object and its impermanence are evidenced in its patina and wear, or in any visible repairs.

For me and what I consider to be “Fine Art Photography”, the concept of Wabi-Sabi fits like a glove in regards to the shrimp fleets.  I watch them over the span of time, capturing them again and again.  The one thing that stands out above all is the fact that they like everything else will fall into decay… both physically and financially, but faster.

The 3 Wheel Houses in B&W. Stepping back into an older time of photography, fitting don't you think?

The 3 Wheel Houses in B&W. Stepping back into an older time of photography, fitting don’t you think?

I am going to dedicate a photography project to this concept.  I would think that it will take me several years to finish or perhaps unto my death which in a strange twist of logic fits into the project/concept quite well.

So I hope that you enjoy these images and that you intellectually chew on the concept of Wabi-Sabi and to how it will fit into your own artistic visions….

Normally, detailed closeups would be better suited for wabi/sabi studies, but look at these following 2 images and notice how the rust and corrosion feed into the concept.  Do you see the detail in the flat areas of the boat and how it is rolling and pitted?  These imperfections take on an artistic perfection on their own!

Stormy Seas, Georgetown, SC.

Stormy Seas, Georgetown, SC.

B&W, stepping back into an "older" time and place.

B&W, stepping back into an “older” time and place.

The Wheel House Door

The Wheel House Door

The Working Boat, 630nm Infrared

The Working Boat, 630nm Infrared

The Battered Bow...

The Battered Bow…

I hope that you enjoyed the image and the concept…

Getting Better Long Exposures: Fuji X-E1 & Sekonic L758DR, A Detailed Tutorial


All things are fair in Love and War…

and we need every advantage we can get as photographers in long exposure!

Long Exposure Sunrise Abstract

Long Exposure Twilight Abstract with a 3 stop graduated soft ND filter to darken the sky.

The long exposure game, is one of compromises: fighting too little light, balancing the moon and its reflections, cameras and lenses, camera meter or external meter! Long exposures are one of the more difficult photographic styles and one that takes experience and patience to master.  As such, the photographer needs every helpful trick that they can gather into their bag of tricks in order to generate, stunning etherial images!

Equipment tailored to Long Exposures that I like and use:

  • Fuji X-E1 Camera.  Provides both electronic and mechanical remote shutter releasees, Bulb mode with back panel displayed timer, ultra clean low noise long exposure images!
  • Olympus OMD with the Panasonic 14-140mm lens.  Great built in long exposure modes like the Live View Bulb mode where the camera will display an updating image on the LCD panel as the exposure continues to be made.  This gives you a very clear indication of the exposure as it is happening and is like watching a Polaroid develop!  The ISO noise performance is not as good as the Fuji but is indeed acceptable.  I use both camera systems but like the Fuji better!
  • Fuji XF 18-55mm zoom lens.  Sharp images with good range of wide angle to standard lengths!  58mm filter size. ZERO lens flair.
  • Voigtlander Heliar 75mm f/1.8 Lens. Coupled with the Fuji M to X adapter provides an easy to focus sharp image with a 52mm  filter with a f/1.8 to f/16 aperture.
  • Voigtlander Ultra Wide-Heliar 12mm f/5.6 Aspherical M Mount Lens. Ultra wide super sharp and a depth of field that just goes on forever!  This lens takes a 67mm filter and can only take advantage of screw on filters due to its built lens hood.
  • Gitzo & Feisol Carbon Fibre Tripods with Really Right Stuff BH55 Ball head. This is a light weight combination gives solid steady support with ZERO camera creep from the ball head!
  • B+W ND filters, 3, 6 & 10 Stop.  These filters use Schott glass and are the best ND filters out there.  I much prefer fixed ND filters to variable because I KNOW what the filter factor always is for exposure settings and lack of guess work.
  • Lee Seven 5 Micro Filter System.  Simply stated, the Lee series of rectangular ND filters is the best in the world.  The Seven 5 system was designed for small camera systems like the range finder styled Fuji X-E1 camera system.  This provides the ability to use a set ND in the 2, 3 and 10 stop range in conjunction with a graduated ND filter in Hard or Soft edges from 1, 2 & 3 stop ranges to darken the sky for further control!  While expensive (what isn’t?) this system gives the photographer the best opportunity to capture PERFECT long exposures in any situation!
  • Sekonic L758DR Light Meter.  This is my main tool aside from the camera, for long exposures!  It is a 1 degree spot meter that can be calibrated to your camera and gives PERFECT exposures while accounting for what ever ND filter you have installed.  It gives you a choice of where you meter in the scene and then using the ZONE SYSTEM allows you to shift your exposure up or down in order to give you the image you envision!  For me, this is my MUST HAVE MAIN TOOL for exposure control.  It goes way beyond the capability of your in camera metering system.

Must Have Thought Processes to Master Long Exposure Photography

  • You must MASTER the physics of exposure!  But relax, this can be accomplished in about 1/2 hour then a few outing to experiment with your new knowledge set!
  • You must MASTER the ZONE SYSTEM of exposure control. This is simply a different way at looking at exposure where you divide what the camera can see and record into 10 distinct zones from black to white with each zone assigned to a specific stop that can be adjusted with either shutter speed or aperture.  This will make your in head exposure calculations easy and automatic.  When you couple this with the fact that ALL metering systems force the measurement area into the 18% gray area (ZONE 5) then you can see how easy it is to force the camera exposure to give you the envisioned image the first time!  There are several books and videos on Amazon that will be good to read. Here is a nice book on the overall zone system, and here is one dealing with it for digital systems.
  • The ability do look at a scene before you ever pick up a camera and envision what you want to capture and how you want it to look!  Remember, the camera is a tool, you master your tool and make it create your envisioned image!
  • The drive to suffer through long hours in the dark and cold just to capture 3 or 4 images!  Know this, the exposure, say 15 minutes is only 1/2 the time needed by the camera to save the image onto your memory card.  The camera will run a noise reduction cycle the same length as the exposure before you can move onto the next exposure.  So if you take a 15 minute shot your camera will be tied up for 30 minutes!  This then, is why you need to get the exposure dead on each and every time!  You only can get so many shots when it takes 1/2 hour for each 15 minute shot.
  • The ability to post process (I use Photoshop CS6 and the Nik Software filter set) in both Color and B&W.
The Pawleys Island Pier, Fuji X-E1 with the 18-55mm lens, 3 stop Lee Graduated ND for the sky and a 3 stop ND overall.

The Pawleys Island Pier, Fuji X-E1 with the 18-55mm lens, 3 stop Lee Graduated ND for the sky and a 3 stop ND overall.

So let’s put all of this together in a process or recipe (if you will) that will lead us to success in the Long Exposure game (NOT Star Trails which is a slightly different game!

My favorite time to setup and start taking my long exposures is from 1/2 hour before sunset to about 2 hours after (depending upon the moon).

I will usually go to the beach and look for something in the foreground like some rocks, groin, dead trees, pilings or a pier.

680 second exposure, Pawleys Island Pier and Groin.  Fuji X-E1, at the end of twilight going into full darkness

680 second exposure, Pawleys Island Pier and Groin. Fuji X-E1, at the end of twilight going into full darkness


The ocean state only make a difference in that if the waves are large then you will need a much longer exposure to flatten them out. So many of the long exposures you see with bands of dark and light in the ocean are caused by your exposure being too short to totally flatten the surface.  A single band of white in the foreground is caused by the surf crashing down onto the sand and that can also be overcome by extending your exposure past 10 minutes!

  • 1/2 hour prior to sunset: For this time period you will need a 6 to 10 stop ND filter (depending upon the light in the sky) to darken the scene enough to slow the water and clouds down.  By adding a graduated ND filter to cover the sky you can further even the scene and give a moody sky especially if there are colds!

    1/2 hour before Sunset, Fuji X-E1 250 seconds with 10 stop ND, extremely cloudy!

    1/2 hour before Sunset, Fuji X-E1 250 seconds with 10 stop ND, extremely cloudy!

  • Sunset/Sunrise:  keeping the same filters in place you are now getting exposures in the 6 minute range.  The water is very smooth and milky.  Start show up in the sky and leave curved trails. Sky colors explode and you will get your best color saturation.

    Sunrise, Outer Banks Fishing Pier, Fuji X-Pro 156 seconds, 3 stop ND.

    Sunrise, Outer Banks Fishing Pier, Fuji X-Pro 156 seconds, 3 stop ND.

  • Twilight:  The sun is down, and the sky is turning dark blue. The stars are bright.  It is time to remove the fixed ND filter but perhaps leave on the graduated ND for the sky.  Your exposure times should drop down into the 1 to 3 minute range providing the moon is not full.  At this point a full moon will provide way too much light and turn the sky white.  A 1/4 moon will give nice even lighting and a much better image.

    The 2-fer, The pier & groin, Pawleys Island Twilight

    The 2-fer, The pier & groin, Pawleys Island Twilight

  • The DARK:  Ok, there is no light in the sky other than the moon, stars and pollution. Sometimes though, the light pollution from buildings and towns can add a dramatic component to your images like the one shown below!  This is the time now when you are looking at exposure times from 4 to 20 minutes depending upon the light conditions.  I will now remove all filters unless there is a very bright moon.
Full Dark!  Fuji X-E1 with a 3 stop Lee graduated ND filter  covering the sky to the horizon. 125 seconds at f/11. Light pollution from the hotels and pier behind me.

Full Dark! Fuji X-E1 with a 3 stop Lee graduated ND filter covering the sky to the horizon. 125 seconds at f/11. Light pollution from the hotels and pier behind me.

Of all of the times in the list above I like the Sunset and Twilight times for my best images!

Metering:

Metering of all the aspects of long exposures is your most difficult hurdle.  The in camera meters when set to spot, are indeed capable, but they are not totally accurate and more importantly, they are large spots, in the 5 degree  range rather than the 1 degree of the hand held meters.  Yes you can use them but be prepared to have to adjust your exposure for a second shot… And this is WHILE the ambient light is rapidly changing as the sun continues to set!

Time for a talk on exposure..

We have the 3 basic exposure settings to work with, ISO (which should be set on your cameras lowest or native setting), APERTURE, which for a sharp image with proper DOF should be set for f/8 to f/16 and Shutter speed which should be set at least at 30 seconds and around 2 minutes for good smoothing of the ocean surface and clouds. You will lock the ISO and APERTURE while looking for a good shutter value to be generated by the metering system.  So as you can see, you can set the camera in Aperture Priority mode to shoot here.  I find though that I like full manual mode better.

Here is what you can expect for various shutter speeds:

  1. 30 seconds, start to have good smoothing of the waves with some of the bigger waves still showing above the water surface.  Alternating dark and light bands in the waters surface.
  2. 60 seconds, a more profound smoothing in the waters surface, more even lighting and coloring, still with some bands…
  3. 120 seconds, total smoothing of the water, no banding and great even coloring of the water.
  4. 480 seconds and up, totally smooth water, even color and shading, almost a glass like surface of with milk.  Very pleasing and soothing…

Keeping the Depth Of Field (DOF) in mind, you can see that the shutter speeds are the key to your images.

Now, how best to determine your exposure?

Time for the meat of this post, metering…

As discussed earlier, the internal meter of digital camera systems is not the best meter out there.  In the spot mode they provide a very large spot (5 degrees) when what we really need is a 1 degree spot.  The smaller spot gives us a more accurate and isolated reading which can be vital in determining the overall exposure.  If you use this in conjunction with the ZONE system developed by Ansel Adams then we have a really powerful system.  Lets take a look.

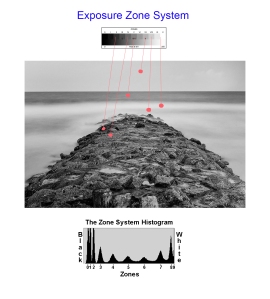
Zones

Zones

The ZONE system is very simple.  It divided your total exposure into 10 equal parts or zones.  Each zone is a specific “stop” and the center (zone 5) where where ALL METERS place the exposure of anything it sees!

As you can see from the chart on the left of the zones, they start at black for zone 0 and move to white at zone 10.  Zone 5 being the 18% gray is what the meter sees and will adjust the exposure of the spot metered to be there in the 18% gray!  This explains why so  many photographers snow images come out as gray!  Knowing that the meter will automatically place the measured spot into the gray area it is a simple matter for the photographer to mentally move the zone up or down in adjustment in order to place the metered spot into the desired zone!

It is easy to understand and implement!
Looking at Zones

Looking at Zones

  1. So, let’s take a look at a sample image, not as a photograph but what we would see with our eyes. If you were to look at the top meter spot in the sky you would see that it falls into zone 7!  But if we were to meter on this spot, the meter/camera would move it to zone 5 which would be just too dark for the overall picture.  The fix is to take the meter reading then mentally move it into zone 7 by adding 2 stops of exposure.  Here is what the meter system suggested for this measurement:  Spot reading on the overcast sky at f/8, ISO 200 gives a shutter speed of 15 seconds, but we KNOW that it is in zone 5.  We simply add 2 stops to place it into zone 7 by increasing exposure to 60 seconds, or 2 stops.  The sky now brightens into zone 7.
  2. Lets do another and meter on the horizon water.  The spot meter reads this as f/8, ISO 200 and the shutter speed of 60 seconds which it sees in zone 5 and since it is actually in zone 5 we can just go with the suggested exposure!

See?  Easy to do.

So, hopefully the camera meter has a small enough spot to read these small areas and give you an accurate exposure suggestion.  But, what happens when you add a 3, 6 or 10 stop ND filter into the mix?  Well 3 stops will not affect the meter, but 6 and 10 will destroy any accuracy and your exposures will be all over the place.  We just cannot have that happens so this is where a hand held spot meter comes into play!

There are 3 things that you must keep in mind when you are thinking about hand held meters.

  1. They are more accurate than camera meters
  2. They have a true 1 degree spot
  3. They allow you to tell them of any ND filters installed on the camera and automatically compensate for them!

I suggest 2 meters from Sekonic for you to consider, the L508 and L758DR.

  • The 508 has an adjustable spot from 1 to 5 degrees and allows you to account for an installed ND filter .  It is no longer produced but readily available for around $300.00.
  • The L758DR has a fixed 1 degree spot, allows for filter compensation up to 10 stops and can be calibrated to your camera.  It also has a viewfinder display and much greater functionality than the 508.  It can be found for about $650.oo.

Sekonic L758DR Spot Meter

Sekonic L758DR Spot Meter

Here is the L758DR which is what I am using and will show in the following examples. The meter has 2 modes of measuring light, the lumasphere and the spot which is simply an eye piece that you look thru and shows a target you place on the area of the scene you wish to measure!

How to use the Sekonic L758DR Spot Meter:

  1. You need to use the custom functions on the meter to set WHOLE stops for the shutter speed.  This will simplify you life in a major way!
  2. Set the meter MODE to SPOT with the APERTURE selected which enables you to lock in a specific Aperture.  This will have the F surrounded by a BOX. Then when you take a measurement, the Shutter Speed will be displayed for Zone 5.
  3. You need to set your natural ISO into the meter.  Press and hold the ISO 1 button and simply turn the round dial to select that ISO you desire to work in!
  4. Decide on which ND filter (if any) you are going to use for this shot!  Then hold down BOTH the ISO 1 and ISO 1 buttons while turning the round dial to select between +/- 0 to 9.9 stops.
  5. Then you just press the measure button under  the spot viewfinder  to measure your selected area of the scene and adjust the Zone up or down as in the zone examples above!  It is that simple!

Set Mode to SPOT

Set SPOT Mode

Set SPOT Mode

Setting the ISO

ISO Set

ISO Set

Setting the Filter compensation

Filter Compensation

Filter Compensation

Taking the Measurement

Meter Viewfinder showing the target and measured values. The meter button is just below this.

Meter Viewfinder showing the target and measured values. The meter button is just below this.

That is all of the necessary steps to use this meter. It really is very easy! There are several videos on the Sekonic web site as well as on Utube.  

Understanding ND Filters:

The B+W, well most others as well can be tough to understand!  Here is a break down of all of the filters and how to read the codes!

B+W ND INFO

B+W ND INFO

Knowing how to read the filters is important but understanding how to use them even more so.  Lucky for us in long exposures we are interested in the shutter speed.  If we get a shutter speed of 1/15 second with no ND installed we know that it is simply too fast to slow the water down!  So we realize that a ND filter is needed.

Standard ND Filters effect on a 1/15 second shutter speed with a fixed ISO and Aperture:

  • No filter            1/15 second
  • 1 Stop                1/8 second
  • 2 Stops             1/4 second
  • 3 Stops             1/2 second
  • 6 stops             4 seconds
  • 1o Stops           1 minute

These are the standard ND filters from B+W, other companies offer the same and other values.  Lee offers in the Seven 5 system, 1, 2, 3 and 10 stop values as well.

So now, you take your meter reading and look at the suggested shutter speed, install a ND filter and then tell the meter which one chosen and it will give you the corrected shutter speed. Remember, all camera meters will fail at 6 stops on!

Graduated ND Filters:

Lee Hard Graduated ND

Lee Hard Graduated ND

Lee Soft Graduated ND

Lee Soft Graduated ND

These are filters from Lee (some round ones from B+W but they divide directly in the center) that come in 1, 2 and 3 stops.  They are either a hard transition between dark and clear or a soft transition covering a larger area of the filter.  I use these filters to darken part of the image, usually the sky.  If you have a firmly visible seperation between the sky and water at the horizon, you can use a hard graduated filter.  Otherwise you will use the soft which is the normally used choice. Take a look at the images here of both and you can see their usefulness.

Deciding on which value to choose, 1, 2 or 3 stops is simple.  You simply use your meter to spot read the sky and then again the ocean.  Look at the difference between the shutter speeds given with a fixed Aperture and ISO.  The difference will tell you how much graduated ND you need to use.

These filters are also handy for other landscapes as well.  How often are we plagued with waterfalls or landscapes where the sky is just too bright?  Apply the same metering difference to those images as well for a vastly improved result.

Last minute considerations as you venture out to practice your Long Exposures!

  1. Keep your lens clean, salt spray can and will sneak up on you and spit all over your glass!
  2. Push your tripod legs slightly into the sand for increased stability.
  3. Keep aware of the surf!  Do not let it over take your tripod. it will cause your camera to drop a little lower and ruin a shot.
  4. Keep the Horizon STRAIGHT!!  If you have an in camera level use it!  If not, purchase and attach an external level onto your flash hot shoe and use it!
  5. Use your in camera long exposure noise reduction setting in the custom settings!  This will not only reduce noise in camera (yes photoshop can do this) but it will remove all sensor hot pixels and dark pixels which photoshop will NOT DO!  I understand that your exposure time will double due to this but isn’t the final image quality worth the extra wait?
  6. Take a light weight chair.
  7. Have a light to see the camera setups or a ultra bright light to lighten a subject for focus!  I like a lighted hat for this and a Sure Fire LED 500 Lumen light to reach out and light a subject for focus (not to mention light painting!)
  8. Gloves?
  9. Warm Coat?
480 second exposure, Fuji X-E1 Late Twilight! Metering of the cloud base just above the horizon then moved to Zone 7!

480 second exposure, Fuji X-E1 Late Twilight! Metering of the cloud base just above the horizon then moved to Zone 7!

OK all done, I hope that you both enjoyed and learned from this post!  Please let me know.

Twilights Bitter End…


No Words, just images…


The Bigger End, Olympus OMD.

The Bigger End, Olympus OMD.


The 2-fer, The pier & groin, Pawleys Island Twilight

The 2-fer, The pier & groin, Pawleys Island Twilight

The 2-fer, The pier & groin, Pawleys Island Twilight

The B&W 2-fer, The pier & groin, Pawleys Island Twilight


Olympus OMD EM5 and Ultra Long Exposures!


And now for something different!

Pawleys Pier, Twilight. 847 Second Exposure, Olympus OMD with the 12-60mm lens.  Iso 200, f/22

Pawleys Pier, Twilight. 847 Second Exposure, Olympus OMD with the 12-60mm lens. Iso 200, f/22

I know, most of my recent posts have been about the new Fuji X-E1, but tonight I decided to take out the OMD and test it out for ultra long exposures.  I have the OMD as a high speed replacement for my Canon DSLR (currently a 7D) in order to reduce weight and ease of use.  Overall the camera performs very well and generates impressive, sharp images up into very high ISO’s! But a friend recently purchased one to use and wanted to do some long exposures.  So I got mine out, looked over the in camera options and was VERY surprised to learn of several very nice long exposure benefits built into this camera!

  • Live View Bulb Mode: This is an amazing feature (are you listening Fuji?)!  With this mode, you must first set the max shutter speed length, then the update times.  What this means is that you can set an exact exposure or some ultra long one.  Then you can let the camera time the shutter or you can use a remote shutter release to start and stop the exposure as one would normally see in a BULB mode.  What the added value here is that the camera turns on the live view screen and updates the LCD panel with the  image displayed with the CURRENT exposure during the BULB exposure!  The timing of the update is the value you set when you set the update times!  You can have up to 24 updates.  In simple terms, this allows you to SEE the image developing on the LCD panel during the exposure!  Way cool and very valuable.  The only change I could wish for is for the histogram to also be displayed for each updated image.  A remote shutter release with a lock is required for this mode.
  • Live View Timer Mode:  This works just the same as the BULB mode except that you press the shutter release once to start and once to end!  If you forget your remote shutter release you can still get the picture!
  • Onscreen Level:  This allows you to get the horizon straight!  Simple thing but important for any image and critical for long exposures.
  • Programmable Function Keys:  Makes long exposures in the dark easier but setting Function Button 1 to Manual Focus.  This means that you can switch back and forth from manual to auto focus modes without having to go through the menu system.
  • On Screen Focus Point Touch Select: With the camera in auto focus mode you can touch the area of the image that you wish to focus on and then do a focus.  By using this in conjunction with the function key as described above you can easily change your focus. In the dark, this makes it very easy to select a point of light on a long pier and have the camera focus, then hit the function key to select the manual focus mode to lock it in! If there is not a point of light, having an ULTRA BRIGHT flashlight and lighting something in the scene to focus on works well also!

The OMD worked tonight flawlessly for these long exposures!  The longest was over 14 minutes and generated a clean low noise image!  But most importantly, I was able to take this image with NO metering at all. I simply chose the Live View Bulb mode and watched the image develop on the LCD screen during the exposure and when it was where I liked it I simply stopped the exposure!  Understand, this is not exact as the LCD does not give an exact true image display, but it was always within 1 stop!

Here is a B&W version as well but I think you will agree that this entire outing was easy and fun and gave superb results!

The B&W version processed in Nik's Silver EFX.

The B&W version processed in Nik’s Silver EFX.

Death by neglect….


Lila Lee, in the boat grave yard…

There is something about Shrimpers… I cannot get enough of them and find myself visiting them again and again.  I love the dilapidated nature of them and even though they are in such rough condition they seem to venture out into the deep time after time.  Perhaps they are a reflection of the men who sail them, rough hewn, salty men, eking out a living from the sea.  Regardless, they are things of photographic beauty and deserve to be documented for history. You see, they are vanishing from sight.  Shrimp seems to mainly come for fresh water farm ponds in the lower americas and soon these beautiful boats will be a thing of the past.

The Japanese concept of Wabi-Sabi:  “connotes a way of living that finds beauty in imperfection and accepts the natural cycle of growth and decay. Characteristics of the wabi-sabi aesthetic include asymmetry, asperity (roughness or irregularity), simplicity, economy, austerity, modesty, intimacy and appreciation of the ingenuous integrity of natural objects and processes.

Thus begins my exploration of Sabi

You had better get out and enjoy them while you are able too..

Here captured in Black and White, is a detail shot of the shrimper Lila Lee.  She is resting in the boat grave yard in Georgetown, SC. The older shrimpers seem to be abandoned along the shore here in Georteown till they sink.  We have some sitting on the bottom growing trees and weeds from their decks.

This image was captured on the Fuji X-E1  with a MC Soligor 70-300mm C/D manual focus macro lens, another relic of the past…

Lila Lee

Lila Lee

Further X-E1 Long Exposure Work


Fuji X-E1 280 second exposure at f/8

Fuji X-E1 280 second exposure at f/8


Or, if your are thrown off the horse, climb back on!


I went out tonight at sunset to the Pawleys Island Pier to try some more very long exposures with the Fuji X-E1.  I used the new 18-55mm lens with a B+W 6 stop ND filter until it got really dark then I shifted to just the lens.

It was just perfect out tonight.  A few clouds in the sky, medium wind and very little blowing sand in the air.  I setup with an angle on the pier with the moon behind my back.  I got there early enough to setup and pre-focus.

I used my Sekonic L758DR light meter with 6 stops of exposure compensation dialed in for the ND filter and started shooting.  In failing light, the hand held spot meter makes exposures easy, fast and perfect!  I simply aimed the 1 degree spot at the gray/purple band of clouds right next to the horizon and took my meter reading from that. Then I moved it from Zone 5 to Zone 6 or 1 stop brighter.  The meter gave me 15 seconds of shutter speed and f/22 so I simply added 1 more stop by changing the shutter speed to 30 seconds!  Very easy and by using the Zone system when thinking about exposure it can fast become second nature.

Fuji X-E1 30 second exposure at f/22

Fuji X-E1 30 second exposure at f/22

The first 10 min or so I was only able to get 30 second exposures but only at f/22.  I did have a 10 stop ND filter in the bag but I decided to just stay with the 6 stop. Even at 30 seconds, they were still quite pleasing!  I really like the Time mode on the X-E1 as it makes setup easy, but the Bulb mode is very well thought out. It gives a nice count up timer on the LCD screen and makes for perfect exposure!

Even checking the focus after it gets too dark to see is easy with the X-E1. Place the camera into manual focus mode place one of the pier lights into the middle of the focus square and push the jog dial straight in. This will cause the camera to magnify what is inside of the cameras focus box. You then go back and forth with the lens focus ring till you get the smallest sharpest light!  All done.

As it got darker I was forced to re meter the scene again and again. For this next shot the light had faded another entire stop and forced me to again double the shutter speed to compensate for the changing conditions and still allow me to capture the clouds on the horizon at Zone 6!

60 second shutter speed at f/8

60 second shutter speed at f/8


Things start to get very complicated and fast as the sun falls below the horizon.  The next image was metered at 140 seconds but during that exposure, the light dropped another 2 stops!  so I split the difference and increased the exposure by keeping the shutter open another stop or 280 seconds.  this worked quite well and gave a very pleasing exposure!  Please keep in mind that this image was taken after the sun was totally gone and it was quite dark out but with enough light left to give a good exposure of the clouds and pier. You can tell that this image was taken in very low light because the pier lamp reflections are prominent in the picture.  Here is that image:

280 second exposure, f/8

280 second exposure, f/8

Remember, for every minute of exposure the camera requires a minute of noise reduction. So for the above exposure the total time of forced waiting was 560 seconds!  So for this last image a lot of time passed while I waited and it was TOTALLY dark out now.  The moon gave very little light but the lights on the pier worked very well and put some interesting colors on the waters surface!

Ok for this last image there is ZERO light left in the sky.  The stars are very bright and fill the sky with a wonderful pattern.  But, the pier lights are so bright that they pollute the image and wash out the sky blocking the stars in the image.  Another complication is that it is just too dark out now to need the ND filter.  So I removed it and adjusted the meter so that the compensation is now set to zero.  The reading suggested was 425 seconds at f/8.  Why f/8?  Well I desired the sharpest image possible so I locked the meter to that.  I still needed to move the lower sky 1 stop brighter, you know from Zone 5 to Zone 6.  This made it necessary to move the shutter speed from 425 seconds to 850 seconds (14 minutes) and now I am ready to shoot.  So lets look at this last shot, 850 seconds of exposure then 850 seconds of in camera noise reduction.  So I have to wait for 28 minutes from the start of the exposure until the image popped up on the LCD panel!

Here is the final image of the evening, a 14 minute exposure at f/8.  Yes the pier light reflections close to the pier/water intersection is a little harsh but still, this demonstrates exactly what you can achieve by thing long exposure, but more importantly, it shows what the Fuji X-E1 is capable of capturing with a little bit of creative thinking!

850 second (14 min) exposure at f/8

850 second (14 min) exposure at f/8

Did you find any of this post helpful?  Please let me know!

Voigtlander Heliar Ultra Wide-Angle 12mm f/5.6 Lens and the Fuji X Pro 1


Good things that come in small packages!

Voigtlander Heliar Ultra Wide-Angle 12mm f/5.6 Lens

Fuji M Mount Adapter

I have been testing the Voigtlander Heliar Ultra Wide-Angle 12mm f/5.6 Lens with the Fuji M mount adapter on the X Pro 1 for the last week or so and have to admit that I am both impressed and love use and feel of this lens! It is well made and smoooooth to operate!

 I have tested it both on the Kipon adapter and the new Fuji M mount adapter and have to say that the differences between the two are major due to the fuji’s ability to adjust corner color and darkened corners live with version 1.11 firmware!  Pincoushion adjustments still require you to shoot and adjust.

I adjusted the pincushion by taking a picture of the pattern of 2×4’s on the surface of a deck. This allows you to maintain straight lines. I found for the 12mm that an adjustment of +4 was perfect.

I took the  12mm out to two locations for testing, Shem Creek in the Charleston, SC area and the waterfront in Georgetown SC.  Both locations provides nice vistas and shrimp boats full of color and character.

Stormy Seas at the dock. Voigtlander Heliar Ultra Wide-Angle 12mm f/5.6 Lens. Notice the focus from about 3 inches to infinity.

As you can see, the DOF of the 12mm is simply amazing.  The cleat was about 3 inches from the camera.

Here is a monochrome of the same image.

Shem Creek with approaching storm, Voigtlander Heliar Ultra Wide-Angle 12mm f/5.6 Lens

Shem Creek Shrimpers, Voigtlander Heliar Ultra Wide-Angle 12mm f/5.6 Lens

Notice the light rays coming down from right to left thru the clouds!  The lens is VERY sharp and a real pleasure to use!

Let me know what you think!

Updated Grist Mill & Covered Bridge Gallery…


Major Image Gallery Update

I have just updated the images in my Grist Mill & Covered Bridge gallery in the menu on the top of the page under galleries!  I added about 25 new mills and bridges plus provided name and state data under each image!  I hope that you enjoy them as much as I did in creating them!

There is something especially pleasing about mills and bridges that can transport me back to a different time and age!  I will literally  travel hundreds of miles out of my way to visit them!  In 2011 I spent 3 weeks visiting 19 states on the eastern seaboard doing just so, plus this year in May, I spent several days exploring the mills and bridges of south central Georgia!

You can visit the updated gallery by clicking on the drop down under Galleries in the top menu or if visiting from off site click on the link below:

https://markhilliardatelier.wordpress.com/gallery/color-infrared-grist-mills/