The New CLiR Infrared Processing System and Photoshop panel!

Download Here: https://f64elite.com/hilliard20


Download Here: https://f64elite.com/hilliard20
I am VERY particular in how I process my images, either color or IR it doesn’t make any difference! This comes from years of visualization, photography, a career at Eastman Kodak, endless hours of post processing and just plain being old and cranky! I look for specific compositional elements in each and every image I create then look to create a stepped series of varying contrast levels to draw the viewer into the image. This is important in my color work, but CRITICAL in my B&W images.
This post though, is specifically about B&W IR post processing. But before we actually get to that point I wish to share with you my workflow that I go through up to the point of processing it for B&W.
Assuming that our images have been edited for choice and artistic content and been processed from RAW to 16 bit TIFF…

Step 1 Evaluate the RAW image to see it it stands on its own!

Step 2 Process the RAW image into Faux Color.
Only when these steps are completed do I start my B&W conversion and processing. The reason for this is that the best B&W conversions are generated when we have gotten the best possible color adjustments done! The better the colors the better the B&W! This is true of both color camera or an IR camera.
As you can see from the B&W image above of the bone yard at Cape Romain here in South Carolina, the image is full of alternating contrast areas that draw the viewers eyes into the image from the bottom left corner up to the center. This was a choice made in post processing.
So remember, you will get a much better B&W image if you first post process the color version! This will give the software (Nik’s Silver EFX Pro) a greater latitude of colors and contrasts to work from rather than just converting the RAW version directly into B&W.
In Infrared photography, there are 3 main elements that we need to get an emotionally charged image:
If you can get all 3 you will get a much more powerful image, but as long as you can get at least 1 you will have more to work with to get a good image. If you find yourself in a location where none of the 3 desired elements can be found then look for repeating patterns! Look at the example below. This image is of old Rt. 66 through the west taken at the height of a world class snow storm a few years ago in 720nm IR. There is no water, clouds or plants to work with. But we have a vanishing perspective due to the repeating telephone poles plus great structure in the snow cover scrub! There is also just a hint of the sun behind the top of the first telephone pole which adds interest and change of contrast.
Now, as easy as all of this sounds, it really does take some planning and simple photoshop skills. Plus the more you practice it the better and faster you will get!
So lets take a look at our sample B&W converted per post processed B&W image below. To get to this point, you take your color image and open it in Niks Silver EFX software filter. You would then choose the recipe that you like the best from the left hand menu watching the effect on the preview image on the screen. When you find the version you like the best you would then adjust the contrast, structure and highlights/shadows to get your starting image, then accept it and drop it back into Photoshop!
This is a very nice image to be sure! But, it can be drastically improved with very little work. By selecting areas of alternating contrasts we can enhance the emotional impact of this image and draw the viewers eyes into the image giving it an almost 3 dimensional feel! Lets take a look at these areas!
Take a close look at the image. Look for ways to give alternating areas of light and dark, low contrast and high contrast. Use these areas to create steps into your image. For the image above of the Adams Mill un processed this is how I approach it:
Looks like a puzzle doesn’t it! But is is really easy once you decide HOW you want to approach the image. We are going to use the Nik plugin filter called Viveza to accomplish all of these changes. Simply start on one edge of the image and work your way across. Nik gives you a very powerful selection and masking tool call selection points. These points pick out areas of similar color or shading.
Go back and forth, look at the differences between the 2 images. In the 2nd image, there is a tonal range of complete black to complete white. The un-edited version has a little contrast but lacks punch and it does NOT have a complete tonal range!
This looks very simple doesn’t it! Well it is!! It just requires that you pre visualize what you desire in your finished image then simply make it so.
I hope that you enjoyed this simple tutorial. If you would like an enhanced version with complete step by step instructions and screen captures please visit my BLOG at:
We have been having amazingly turbulent weather here in Pawleys Island for the last week or so. The sky has been moody and dark. Mornings filled with dense fog and the ocean surf rough… Perfect for long exposures and wild sunsets!
What better excuse then to take the Fuji X-E2 out and capture these wild and moody scenes? With my full kit of the Lee Seven 5 filters and B+W ND filters in hand I grabbed the X-E2 and the XF 55-200mm F3.5-4.8 Zoom Lens (which has kind of turned into my main carry around lens) and headed out to the beach.
The X-E2 (in fact, the entire line of Fuji X cameras) is exceptionally adept at long exposure photography. It generates low noise exposures and has NEVER let me down. I usually shoot in the 2 to 4 minute range but once in a while will go up to 10 to 15 minutes depending upon the subject.
In todays post I am shooting between 30 seconds and 4 minutes and one of the sunset images was just a short exposure (1/13).
The setup for all of the long exposure water images was either a 6 or 10 stop B+W ND filter and the sunset had an added 3 stop soft graduated Lee filter (Seven 5 system). The sky was just too bright with the wild colors to give anything but a black foreground otherwise! I also used the Fuji RR-90 remote shutter release (but you can also use a mechanical release or a Canon RS60 E3 release).
One of the big benefits of the Fuji X system is the fact that when in the BULB mode Fuji gives you a count up timer on the LCD screen so that you can easily time your exposure. This doesn’t sound like much but when you are out in the cold and dark shooting it is a BIG DEAL! Try doing this with a Nikon 300 and you will understand!
Now, lets talk a little about your exposure metering.
Which ever way you choose you will be surprised how quickly you can get “on target” by taking just 1 exposure then adjusting! But remember. when we are spot metering either in camera or in an external meter whatever spot you are metering on will give an exposure for Zone 5 or 18% grey. It is up to you to adjust the exposure up or down to place it into the proper Zone! What I like to meter on is the sky just above the horizon then adjust it up about 1 stop (move from Zone 5 to Zone 6).
I ALWAYS have the Long Exposure Noise Reduction turned on in my cameras. This means that you will double your exposure time. After you take your image, the camera will close the shutter and take a 2nd one with the same shutter speed. This is called Dark Frame Noise Reduction and the camera will look for bright pixels in the 2nd shot and subtract them from the first. This is very worthwhile and will allow you to create much better output images but cut down the amount of time you have to stand there and shoot!
As I said earlier, the mornings have been very foggy so lets start off with several examples of this type of photography. Of course, you must remember to increase the exposure so that the fog is not a DARK GREY, these have been adjusted from Zone 5 to Zone 6.5 or 1 1/2 stops!
Ok, lets move on to the evening. The intent here was simple long exposures to smooth out the surf and remove the surfers (yes I hate surfers as they are always in your shot and don’t care!). For these type of images you really need to start at 30 seconds and move up. If the sky is within 3 stops of the foreground then you do not need to add a graduated ND on the sky.

Fire In The Sky, 90 second exposure with 3 stops of grad ND on the sky and 6 stops of ND overall. X-E2. Notice the cloud movement in the sky and the smooth surf!

Color version of above image. Notice how the sky and water are close to the same density? 240 seconds.
There is something very soothing about well done long exposures of the ocean. They really are not difficult to do and the results are worth the investment in time and discomfort (did I mention that it is winter here and I was standing on the beach in the wind?).
As you can see, the Fuji X-E2 excels in all areas of photography. It has proven itself to be a serious tool to photographers who understand its capabilities and master it functionality!
I have to tell you that I am REALLY a Fuji fan. I have the following Fuji bodies:
I also have ALL of the lenses but 2!
I moved to Fuji after a long search for a small light weight camera system after loosing 80% use of both hands and arms. I went through ALL of the micro 4/3 systems (and even kept 2!). I sold $40,000 in Canon bodies and L glass and have NEVER looked back!
In the Fuji, not only have I found perfections but being a range finder styled system it is like going home to mom!
I have a X100s that I use for most of my walk around work, it is just so tiny and generates amazing images. So when Fuji announced the X-E2 with the same sensor and with even more upgrades I ordered one from Amazon. Much to my amazement it shipped a week later! I have had it in hand now for about 2 weeks and just yesterday took it out to a local fishing port for a bit of creative work. I love the upgrades and how fast this camera is. It even passes the X100s in ability. I originally purchased the X-E1 in order to take advantage of its electronic remote shutter release. It enables me to hook it up to devices like a lightning trigger and my water drop collision system. The X-E1 did a great job with these devices and I expect no less with the X-E2 but that is for another day.
Yesterday I took it out to shoot shrimp boats in North Carolina and have to tell you that the camera just blew me away. It is such a major upgrade over the X-E1 that I cannot believe that they came from the same company! The controls are CRISP, the knobs just snap from position to position with no play and they stay where you put them. The larger LCD is nice but the faster EVF is a sight to behold. I dressed the camera in a RRS L bracket with grip and put on a nice soft release. Physically except for new buttons and placement the camera is identical to the X-E1. One MAJOR improvement is the addition of 3 stops of EV adjustment instead of the normal 2 that Fuji has provided in the past.
All in all I am really happy with this upgrade. I will keep the X-E1 and convert it to 800nm IR in the near future. There is no sense in letting that viable and great camera go to waste!
Next I put the camera into the JPG mode and shot color & B&W images in camera. The results speak for them selves!
This posting was never meant to be a review, rather a statement of its impact upon me with sample images!
I have started getting feedback and comments on the new IR/Color Video Tutorial. As they arrive I will share them here in this post with you. I am very excited over these. So far there are about 100 shipped videos out there!
The cost is $29.95 plus shipping which will automatically be added when you order.
___________________________________________
All prices are in USD
___________________________________________
________________________________________________________
________________________________________________________
________________________________________________________
________________________________________________________
________________________________________________________
________________________________________________________
________________________________________________________
I would like to thank those who have taken the time to send feedback and comments! It means a lot to me and will help improve on the next Video Tutorial that I put together!
The majority of the video is screen capture taking you through the post processing workflow button by button, click by click. All of the major RAW converters have their own separate video and you will learn about all 3 which will enable you to make intelligent decisions on which one is for you then be able to run it!
This is an in-depth tutorial and will give you the knowledge and recipe to take your own images from one end of the process to the other without pulling your hair out in frustration!
The cost of the video for US customers is $29.95 plus $5.95 shipping which will be automatically added when you order.
___________________________________________
All Prices are USD
___________________________________________
Fuji X, what can you say except “Yes Please!”. I am a LONG time X shooter. I started out several years ago with the Fuji X100 and loved every moment of it. I likened shooting with it to going home to Mama… If you know what I mean then you understand. I did decide that I really desired to have a camera with interchangeable lenses and when the Fuji X Pro 1 came out I jumped on it and all of the FX lenses that have since arrived plus several CV lenses as well. The X Pro 1 has become may main goto camera system. I Then purchased the X-E1 due to its electronic shutter release, thus its ability to connect to my lightning trigger and water drop computer system! The X-E1 only lives for such things… When I get it out to play with lightning it is like coming home to a doggy after a long day! I then decided to get another X Pro 1 and have it converted to 720nm Infrared. This system (my 16th IR conversion) is the BEST IR camera that I have ever used and that is a big statement!
So, along comes the X100s, and I look it over and think on it for months. I though that gee, what a neat system to add to my bag. Finally I decided to get one but let me tell you that they are HARD TO FIND! I found on at a little online camera store in Oregon and had them ship it to me last month. I am very glad I made this decision! To say that the X100S is a world class camera is really short selling its capability! I find that I carry it EVERYWHERE I go now. I still use the X Pro 1 for most of my work but the X100s really gives stunning results and the new XTran 2 sensor is amazing. I love the split image manual focus system and wish the other Fuji cameras offered it as well.
The X100s works very well in macro mode and the sharpness, colors and texture are simply breathtaking! You could not ask more of a walk around camera than the Fuji delivers. Even without image stabilization the camera is flawless due to its ability to shoot cleanly at high ISOs!
I am going to share a few of the images generated so far with this incredible camera and you be the judge!
I was invited to visit Moore Farms in Lake City South Carolina last week to evaluate them as a workshop location for future workshops. They have developed a great botanical garden destination that has more plant potential than most other places that I have visited!
For the visit I decided to take along my Fuji X Pro 1, Fuji X100s, Fuji 18-55 and the Fuji 55-200mm lens. I also picked up the new Photoasy Extension Tube Set which has a 10mm tube and a 16mm tube with the communications connections so that the camera can still talk to the lens! This was ONLY available on Ebay but recently Amazon Prime has started offering this great set!
The ENTIRE time I was shooting the X Pro 1 it had the Fuji 55-200mm lens installed with the 16mm extension tube. I shot on the tripod the entire time with a remote shutter release. A lot of my shooting with in high sunlight (sometime you cannot help this) and I forgot to bring along a translucent panel to modify the light to a more gentle form. All of these things aside the camera/lens/tube combination worked great! I am VERY pleased with the results (please view the Passion Flower above!). I used an aperture of f/5.6 or f/8 (subject dependent) the entire time and usually had the lens set between 180mm to 200mm.
Because the 55-200mm lens is so long and does NOT offer a lens foot to better balance the camera/lens on the tripod you need a really stable tripod/ball head to keep the entire system stable. I am using a large carbon fibre Feisol tripod with the Really Right Stuff BH-55 ball head which is as steady as you can get!
The images generated are very pleasing and sharp all the way out to the edges. The colors are very well saturated and there is no smearing at all!
The extension tubes are made of plastic with metal mounting rings and the connections match up perfectly. I found that the 16mm tube was enough for the style of shooting that I was doing on this day (1:2 to 1:4 image ratio closeups) but I did purchase 2 complete sets of tubes to get closer if necessary.
Here are some of the images generated. All of the EXIF and GPS data are included.
This is a great rig for shooting macro/closeup. The addition of the extension tube set is really a God send!

Pawleys Marsh, Fuji X Pro 1 720nm IR conversion w/ the new 55-200mm lens.
Yes, the new Fuji 55-200mm lens arrived for my fuji camera systems! I am currently shooting with a color X-E1, a color X Pro 1 and a IR converted (720nm) X Pro 1. I know how well the 55-200 works on the color bodies but what I really needed to know how did it work with the IR system! Would it give hot spots as so many of the Fuji lenses do? This post is the report of my findings. The final verdict is that it works very well and as long as you do not go higher than f/16 there are no hot spots to worry about at any zoom range! To me this is a really big deal.
So far only the 14mm and 35mm Fuji lenses are usable in infrared. So the addition of another lens really helps.
I am going to give you some examples of how this lens actually does at both the wide and long ends of the zoom range wide open and closed down so that you can get a feel of the usable Infrared range that you can use. Next week I will do a posting using the lens for color work only.

Pawleys Marsh, Fuji X Pro 1 720nm IR conversion w/ the new 55-200mm lens.

55-200mm @ 55mm, f/23.5 No hot spot

55-200mm @ 55mm, f/11 Small hot spot

55-200mm @ 55mm, f/22 Bad hot spot
As you can see as you get to f/11 we start to develop a small hot spot, but nothing that cannot be fixed. Above f/11 the lens becomes unusable at the wide end.
The difference at the long end of the zoom is amazing and is usable over the entire range of the aperture! This is great news for us IR shooters.
There is starting to be a large number of IR photographers out there who are using converted Fuji X Pro 1 camera systems. There are currently 2 conversion companies out there who can do the conversion. I HIGHLY recommend the X Pro 1 as an Infrared platform and with the addition of the 55-200mm lens to our shooting arsenal we are way ahead of the game!

A dark and stormy night, Fuji X Pro 1 w/ 14mm fuji lens at 720nm Infrared.
Images that are dark and moody tend to grab our attention. It is as though there is something hidden and dark that demands our attention. We stare at them and analyze the image for a deeper hidden meaning. This creates emotional impact that allows our viewers to share what we felt as we created the images!
Look for dark, stormy skies, moody clouds, dark trees or water. Work in Infrared and you will find that you have a much better chance to capture these kinds of images more often than when working in color. It is still possible to do so in color but you have to work harder at it!

Paradise Island Light, Nassau
As you can see in the image above, it is moody and draws the viewer into the scene, but it does not have that “dark and stormy” look and feel! As I stated before, it is much easier to capture these types of image when working in Infrared!

A dark and stormy night
Work in both Faux Color and B&W. You never really know what you are going to get unless you take the time to post process both ways. You should even look seriously at the properly white balanced raw image right out of the camera! Sometime you can get a really stunning image there.

Lady Katheran, 720nm Infrared, Fuji X Pro 1 with Fuji 14mm lens.
Here is the same image processed in B&W.

Lady Katheran
Try adding a lens vignette to your images to darken the corners. This will give more mood!
Here are some examples of RAW and B&W post processing!

McClellanville Shrimper, RAW right out of the camera!

McClellanville Shrimper, B&W
As you can see both versions give stunning results. The most important thing for you to remember is that to get the best results from all of your images it is necessary to take the time to post process in all three modes. Do not short change yourself by cutting corners. Take the time to give each image your best try!
The Fuji X Pro 1 has turned out to be one of the best Infrared camera systems that I have ever used… period! The only good Fuji lenses for Infrared have proved to be the 35mm f/1.4, the 18mm f/2 and the new 14mm. The Viogtlander 75mm f/1.8 has also proved to be a STUNNING lens also! So, the camera has proven its infrared capability, now it is time to discuss in detail the recipe for post processing! It is all quite simple but there are a few requirements that you must understand in order to follow my workflow with understanding.
Needed:
As you move your RAW (shoot only RAW for IR because of the ability to shift the white balance easily) onto your computer you should automatically tell yourself that you are going to process each selected image in Faux color and B&W. Sometimes you will notice that the un processed image looks great also (wonderful bronze tones) and decide to do a version like this as well!
Lets talk about the RAW conversion process a little bit. Photoshops ACR built in RAW converter will NOT apply the white balance correctly and your images will appear deep red. For this reason I use Capture One version 7 from Phase One. It is simply the BEST RAW converter that I have ever used. You can download a trial version and decide for yourself if what I am telling you is true!
My Initial Editing Steps:
Save your image again with a NEW file name that reflects the difference in your master image library tree!

Murrells Inlet Salt Marsh, X Pro 1 720nm IR
Remember: Process ALL IMAGES as both Faux Color and B&W. You really do not know what you are going to get till you do so.
All of this really is VERY SIMPLE and once you have done it a few times it will become second nature to you. Soon you will be a post processing Infrared God or Goddess! Congratulations
No, let’s take a look at the image below. Notice the areas that I have circled as places where I desire to change the colors, contrasts and saturations (both plus and minus). Also consider that this is a 720nm converted camera and as such has a very limited color range (light pinks and warm tones and blues).

Annotated Faux Color, X Pro 1 720nm IR
It is in this area and others like them (similar color values that are the same) that we are going to place control points on and change these values! If you notice that the areas around them also change a little you can place what we call anchor points which are simply control points with no adjustments to bring those areas back to where you wanted them!
You will find this ENTIRE process from the initial loading into photoshop to finish will just take 4 or 5 minutes or less as you become more practiced!

Stormy Seas Faux Color, X Pro 1 720nm IR

Stormy Seas B&W, X Pro 1 720nm IR
Sometimes Faux Color images simply do not work, then you still have the great B&W ones to work with!

SC School Bus Boat, X Pro 1 720nm IR

SC School Bus Boat, X Pro 1 720nm IR
 Well, it arrived! After months of consideration after I got my X-E1 I finally decided to send off the X Pro 1 for Infrared conversion. It went to Dan at LDP (maxmax.com) and the cost was $500.00. YIKES! yes I said $500.00! Dan explains that the X Pro 1 is the most difficult conversion that he does! It required him 1.5 days to do the conversion and lots unsoldering/soldering to get to the sensor. Still, better than sitting on the shelf or an attempted sale on Ebay, plus I really like the camera and the hybrid viewfinder is just perfect for IR.
I had to decide between 720nm and 850nm so decided to go for the 720 in order to have a little color ( I really like the bronze tones right out of the camera at 720nm). The total time for shipping – conversion – shipping was 8 days, door to door. Very fast!
Importantly, the Fuji X Pro 1 camera White Balances perfectly. For these tests I white balanced on a green shrub in front of my gallery. The process to do so on the camera is simple and fast!
The scope of THIS post is to talk about the conversion itself and to give you some sample images testing each of my normal Fuji and Voigtlander lens set that I use.
My first image out of the camera was with the Fujifilm XF 35mm F1.4 Lens. It is stunningly sharp with great contrasts and tones without any processing at all! This is simply a perfect IR image right out of the camera.
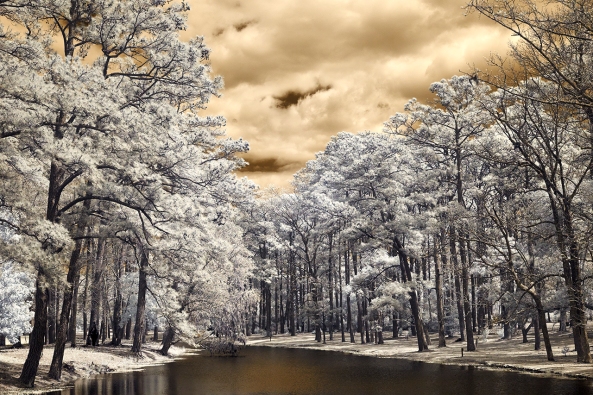
Fuji X Pro 1, Brookgreen Gardens, 720nm RAW un-processed. Fuji X 35mm lens.
OK, the original hot mirror can tell us a lot about the capability of the Fuji body to take IR with no conversion. The strength of the internal filter from the X Pro 1 is quite strong! It is actually 2 filters sandwiched together. They are very much like the B+W 486 IR blocking filter and the LDP CC1 IR blocking filter back to back. The 486 is a pink/gold filter that extends a little further into the visible light spectrum before falling off and allows a little less IR to pass through. The CC1 filter is wider at the UV end. The two filters together will pass light to the sensor from about 300nm to 700nm. You can see this in the image below. This is the same filter arrangement (hot mirror) that we normally see in the Canon DSLR line and on the Panasonic Micro 4/3 camera line.
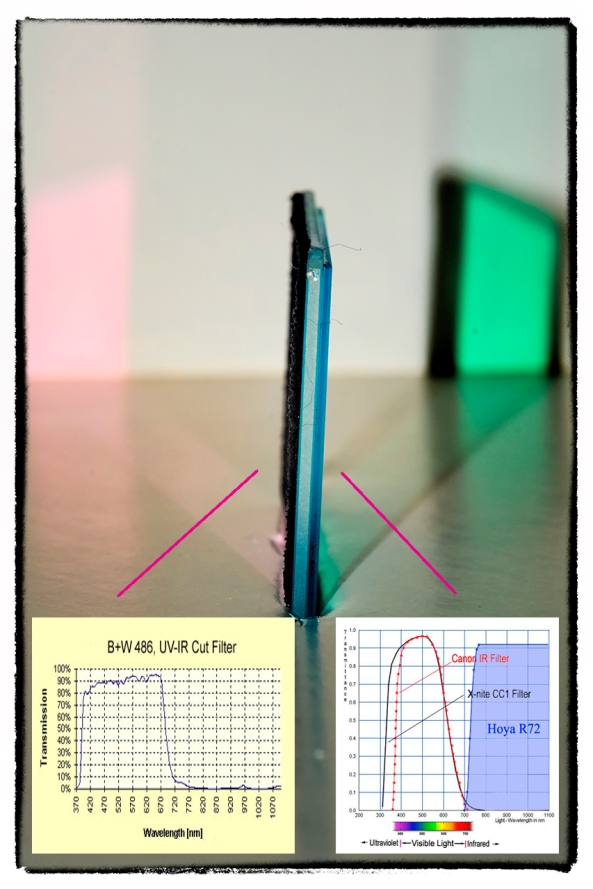
X Pro 1 Hot Mirror showing both Wide bandpass side (gold tint) and the Lower UV side (Aqua)
X Pro 1 Hot Mirror showing the Wider bandpass side (gold tint)
X Pro 1 Hot Mirror showing the Lower UV side (Aqua) similar to the CC1 filter from LDP
If you were to look at the 486 and CC1 filters they are the same general colors and pass band to what we actually see here! So , what does this all mean to you? If you decide (and convince Dan) to have a full spectrum conversion done on your X Pro 1, you can convert it back to a normal color camera by stacking both of these filters (B+W486 and the LDP CC1) on the end of your lens. The full spectrum Infrared conversion is one where the hot mirror (IR blocking filter) is removed from in front of the sensor and replaced with a piece of clear glass. Then, the camera is programmed to the specific UV or IR band with the addition of the appropriate filter on the end of the lens.
Normally, the hot mirror can bee seen as the colored layer of glass under the lens as shown here where you can now see the 720nm filter installed.
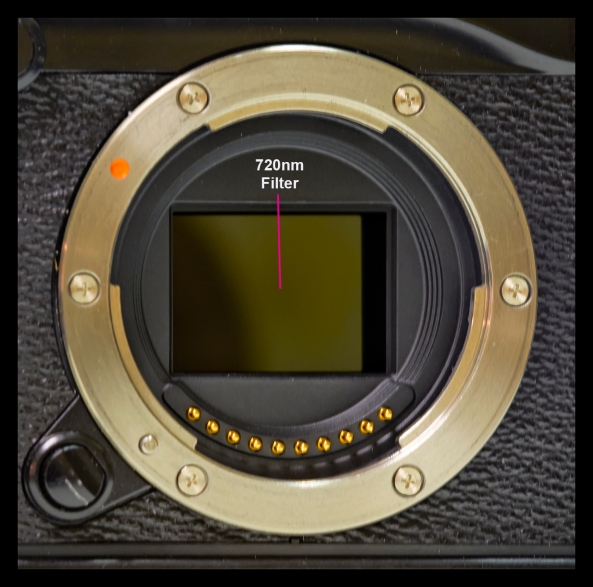
Inside the X Pro 1 showing the 720nm filter.
Lens Hot Spots
As you may know (or guessed), not all lenses work well in the Infrared spectrum. This is due to many things, but most commonly, the coatings on the lens elements and the coatings on the internal lens barrel and how they reflect IR light energy. The common failure then is in the form of HOT SPOTS in the center of the image captured by the camera. These are always dead center in the middle of the image and present as large round white areas. Sometimes, they can be overcome by using a wider aperture, but not always…
Lets talk about the lenses that I tested that work (or in 1 case mostly work)…
Fuji X 35mm Lens
WOW, what can I say? This lens works perfectly in the 720nm spectrum at all apertures! The camera auto focuses perfectly and fast, the images are sharp and there are no hot spots at any aperture! Lets take a look. This first image is raw out of the camera. I have done not post processing for B&W or Faux Color but there is enough color in the 720nm spectrum to have some interesting Faux Color results. These types of images will be covered in another post next week and we will spend a lot of time and effort teaching and going through each step in the recipe used to create them in Photoshop CS6 and the Nik filter set.

Fuji X Pro 1, Brookgreen Gardens, 720nm RAW un-processed. Fuji X 35mm lens f/8
Next, is the same image post processed using CS6 and Nik’s Silver EFX Pro for B&W…
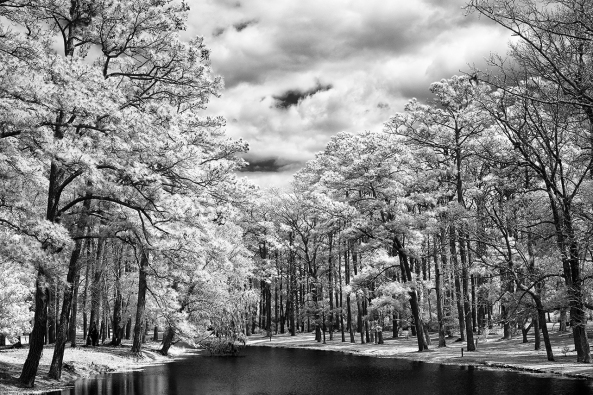
Fuji X Pro 1, Brookgreen Gardens, 720nm B&W processed. Fuji X 35mm lens f/8
 This lens from Voigtlander is one of the sharpest, easy to use lenses that I own. The fit and finish on this lens is something to behold. The lens has an included clamp on lens hood that works very well. The focusing is so smooth that it is scary… It is a PERFECT match for the Fuji X system (X Pro 1 and the X-E1) and works just as well here in Infrared! I was very happy to discover this in my tests at 720nm! There are no hot spots at any aperture. It takes Take a look:
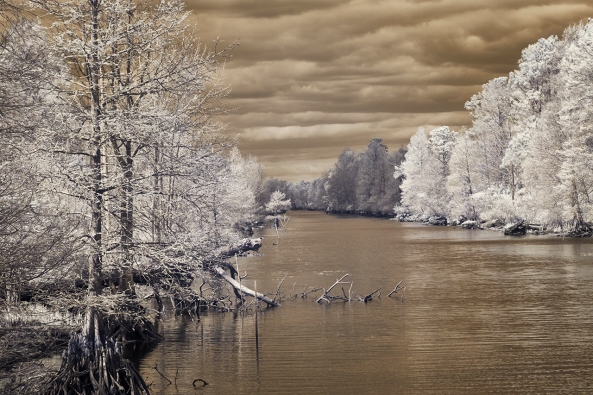
Voigtlander Heliar 75mm f/1.8 Lens at f/11. Raw (notice the nice bronze coloring)
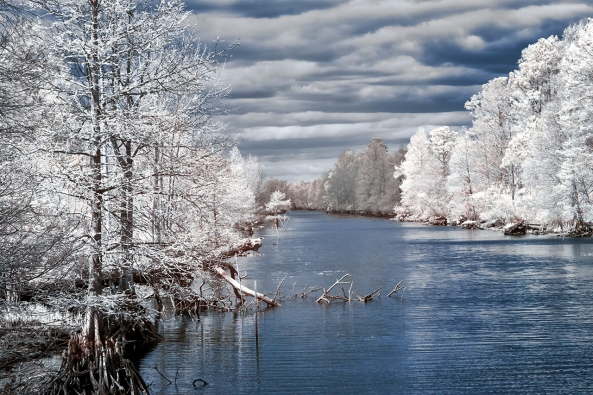
Voigtlander Heliar 75mm f/1.8 Lens, f/8 Faux Color Post Processing
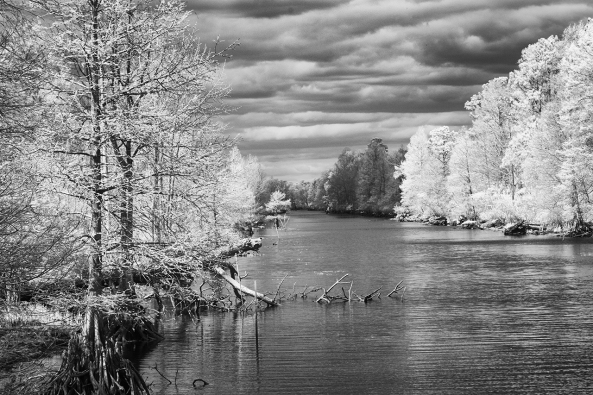
Voigtlander Heliar 75mm f/1.8 Lens, f/8 B&W Post Processing
Fuji X 18mm lens.
This lens works well as long as you do not go beyond f/8. Past that it generates very discinct hot spot in the center of the image. While this can be overcome in post processing with Nik’s Viveza, it is still slightly disappointing… Still, when used at f/8 or wider the lens generates pleasing sharp images that make it worthwhile to carry in your camera bag! Here are the RAW test samples for you to consider.

Fujifilm XF 18mm F2.0 Lens at f/2
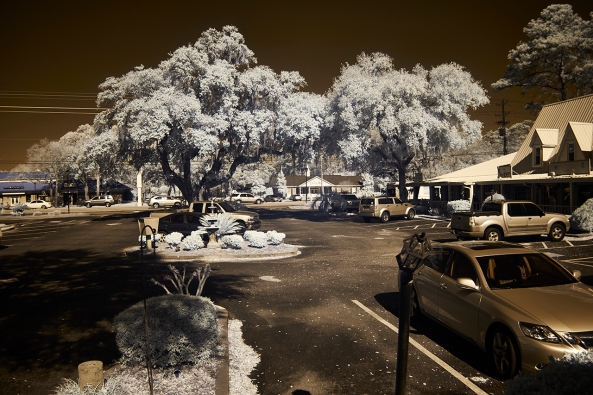
Fujifilm XF 18mm F2.0 Lens at f/4
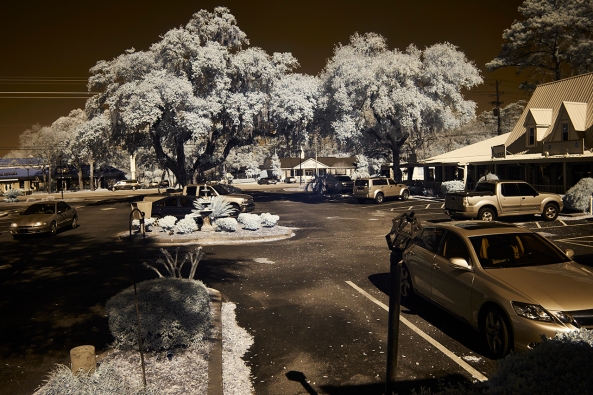
Fujifilm XF 18mm F2.0 Lens at f/5.6
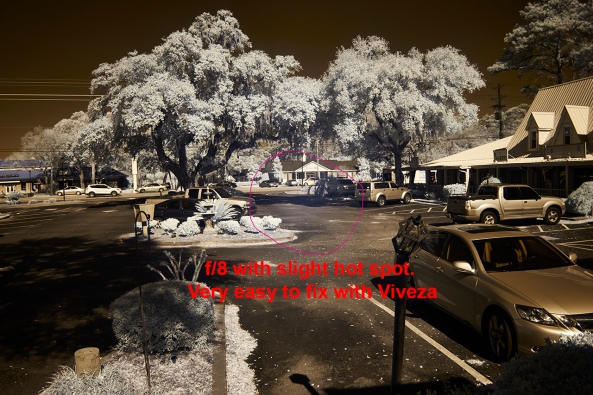
Fujifilm XF 18mm F2.0 Lens at f/8
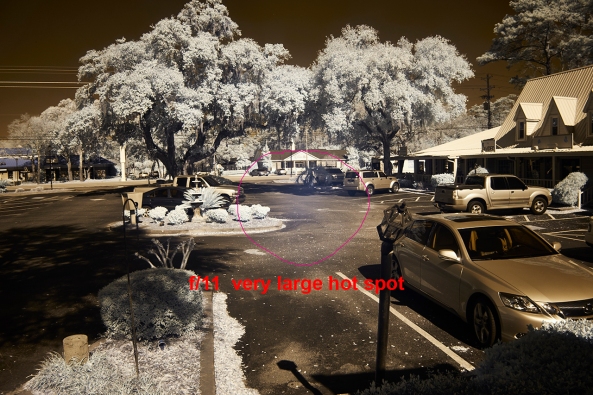
Fujifilm XF 18mm F2.0 Lens at f/11
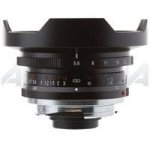
Voitlander 12mm
Another great lens from Voigtlander. This one has a built in lens hood and while it will take screw in filters they need to be wide angle versions. It also has that super smooth focusing feel but since it is so ultra wide at 12mm you can focus it pretty much at infinity and it will always be in focus. I love this lens on the X Pro 1 and X-E1. For 720nm Infrared, it works great until you hit f/22 then it gives a faint hot spot. This is just fine with me as I rarely go beyond f/11 or f/16.
Take a look at the samples:
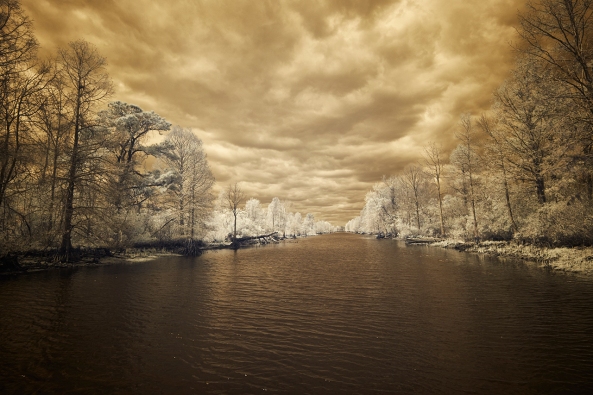
Voigtlander Ultra Wide-Heliar 12mm f/5.6 at f/8 RAW
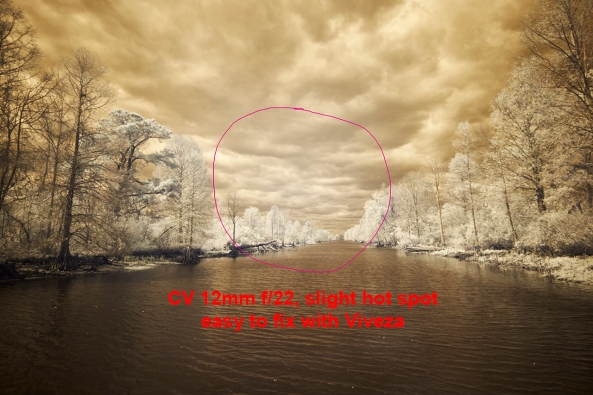
Voigtlander Ultra Wide-Heliar 12mm f/5.6 at f/22 RAW with hot spot
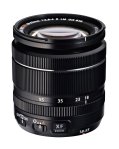
Fuji 18-55
This lens is such a disappointment to me… It is without a doubt my favorite walk around Fuji lens on the X-E1 camera. I hardly ever take it off. Sharp and clear with great contrast. That being said it is all but USELESS for Infrared! There is a major hot spot problem at ALL focal lengths at ANY aperture past f/4. At f/4 it did take nice images but as you understand, useless for landscapes. Bummer….. I am beyond disappointed over this one.
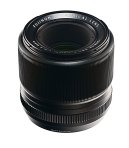
Fuji 60mm
I am going to initially tell you to simply forget this lens for Infrared. It has a seriously bad hot spot at all apertures. I will also share with you that I might actually have a bad copy of it. It gives a terrible hot spot on my X-E1 when shooting in color as well, especially when using a flash. I think that I am going to send it back to Fuji for repair and see what they think. Depending upon that I might re-evaluate it for Infrared later on!
The next post will focus on post procseeing and what can be acheived artistically with this new Infrared Fuji X Pro 1!
Please let me know what you think!
This morning at 9:30 at Georgetown, SC. I decided to get out my cameras and shoot some Shrimp Boat images before I had to open a Co-Op gallery that I am a partial owner of. The Shrimp Boats are a subject that are very dear to me and I visit them every chance that I have.
They are for the most part all falling into decay. The market for local salt water shrimp is almost not enough to support the boats. With the import of fresh water farm shrimp the local fisherman are being forced out of business and the result is the condition of the boat and companies… A very sad state of affairs.
The image above illustrates the wabi-sabi concept: There is beauty in decay It sounds very counter to the way we think as artists, but with a little thought I think that you will be able to agree with the concept.
The Japanese concept of Wabi-Sabi, as described in Brainpickings, “connotes a way of living that finds beauty in imperfection and accepts the natural cycle of growth and decay.”
For me and what I consider to be “Fine Art Photography”, the concept of Wabi-Sabi fits like a glove in regards to the shrimp fleets. I watch them over the span of time, capturing them again and again. The one thing that stands out above all is the fact that they like everything else will fall into decay… both physically and financially, but faster.

The 3 Wheel Houses in B&W. Stepping back into an older time of photography, fitting don’t you think?
I am going to dedicate a photography project to this concept. I would think that it will take me several years to finish or perhaps unto my death which in a strange twist of logic fits into the project/concept quite well.
So I hope that you enjoy these images and that you intellectually chew on the concept of Wabi-Sabi and to how it will fit into your own artistic visions….
Normally, detailed closeups would be better suited for wabi/sabi studies, but look at these following 2 images and notice how the rust and corrosion feed into the concept. Do you see the detail in the flat areas of the boat and how it is rolling and pitted? These imperfections take on an artistic perfection on their own!
This past weekend was my grandson’s 4th birthday party. His mother and grandmother decided to do it up big time and invited a ton of people and had one of those big jumpy things in the back yard as well as a clown come by to entertain the kids.
So with all of these folks in attendance you can imagine the pile of presants right? He had a ball opening them until he got to a set of boxes from a relative that had a pack of socks then a nice sweater. As he tore open the socks and realized what they were he exclaimed in a loud and clear voice for all to hear: “This is just wrong!” Silence swept across the room then the entire assembly burst out laughing! Now from a newly minted 4 year olds point of view it was just wasn’t right! But it didn’t matter a bit that the same person had also given him a GIANT BALL that he could get inside of and roll around. We all had to agree and laugh along!
I too feel this way from time to time so I have decided to share these experiences (as they pertain to photography) as they happen with you. I am also going to add this to my growing list of quotes for photography!
I think next year at his 5th I will give him a digital camera and see it it is wrong!
Recently I had a series of conversations here with a reader who wanted to pick up a Fuji X-E1 camera and have it deliver Velvia results out of the camera. This conversation did not start well, but moved into meaningful dialog very fast. I thought that I would share my thoughts as I gave them to him with you as it is important to understand what a digital camera can really deliver…
As a new convert to digital from film you need to understand one MAJOR difference between the two. Images generated from film are/were dependent upon the film emulsion, exposure, chemistry and glass quality/coatings for colors, saturation and white temperature which in combination gave each film its own distinctive look.
Now, along comes digital, where the only real move into the film Look/Feel is with a built in simulation or the proper selection of White Balance and the filters/coatings on the sensor plus the lens glass and its coatings. Some digitals give a more saturated look, some less. Some pump up the reds to the point of problems.
The Fuji’s typically give a more saturated image with a slight bluish feel. But, knowing photographers with experience who understand these issues and the capability of shooting in RAW understand that ALL of the films/sensor character is really defined in post processing! Looking for a Velvia look and feel out of the camera is foolishness and very short sited. You take your pictures, making sure that the WB is correct for the scene and day, you shoot in RAW, you get your exposure correct then when you get home you do your color/saturation/tint adjustments in the RAW conversion. Then in Photoshop you do your real work where you can move your image into the film looks as you like with simple adjustments like, saturation, levels, color shifts and so on. With the addition of the NIK filter set you then get total control over these adjustments in an easy and fast way.
If you are looking for Fuji (or any camera) to give you a film look right out of the camera then you should just quit now before you have a nervous break down.
My Fuji’s are an incredible tool. But they are just tools, the creative work happens on the computer in post processing. I have used dozens of cameras from simple point and shoots, micro 4/3s, fuji X systems, Canon’s, Leica’s, Nikons and many many others including lots of film systems including (and still in use) a very nice 4×5. NONE of the digitals will give an accurate film simulation, period. Don’t look to them for that or simply stay with film.
Go out and try different cameras yourself. When with friends try a memory card in their camera. Take the images home and work them over on the computer. Make your own decision and move forward.
My own decision path was simple…
You can read about ALL of these things here on the blog. You can ask questions on the various forums on the net but they are generally filled with camera lover/haters/bashers rather than people who are trying to learn and improve with their equipment (even though they are there but due to the noise of the others are just un-heard!).
Good luck in your search. Please keep in touch and let me know how it goes as you progress!
OK, you get one Fuji X System image!
I spent last Sunday in Georgetown, SC. I had a gallery change out in a gallery that I am a member of (Co-Op). The change out only took about an hour so I decided to take the rest of the day to scout new locations and just shoot!
There are several places there that I love to visit. As you drive North on Front Street out of the Down Town area you start passing several side streets on the right. Each of these leads to a marina with several Shrimp Boats (and in 1 case many!). I like walking around the docks and working each group of boats then moving in closer and doing detail images. These vessels are not long to be with us so if you have the chance to visit and photograph them you should youmake it a priority to do so!
The choice between Color and B&W is a tough one for most photographers. For me, I like B&W much better but I will porcess both for each and every image that I take. So I will have the choice as to what I eventually use readily on hand!
I do not normally shoot intentional lens flair but for this image I composed the image with it in mind! This generated such a perfect series of light beams that they were visible in front of the boats cabin door! Again, the choice between Color and B&W was a no brainer for me!
In the end I will still offer you a Color Shrimp Boat selection. These boats are old, and full of color! Rust, bright paints, bottom paint, lines and life rings can make for a bright and eye catching display if you present it properly with a composition that is pleasing.
At the very end of Front Street you will find several parks along the edge of Winyah Bay with pilings in the fore ground which make idle compositions for long exposures. Plus there is a boat launch that you should walk out on and look north across a long line of pilings!
What fun I had! I found some really great Shrimp Boat compositions and did some long exposures with the Fuji and the Voigtlander Heliar 75mm f/1.8 Lens with the new Lee Seven 5 filter system! Consider, that the Lee system is a bulky but light system (look at the image to the left), when you add in the camera and lens the entire combination can become bulky and heavy making it difficult to use. I also used the Voigtlander Ultra Wide-Heliar 12mm f/5.6 Aspherical and the Fuji M to X adapter for several of these Shrimp Boat images.
This is the main reason that I switched to the Fuji X system (aside from the fact that it generates stunning images!
Ok, as the day go away from me I went further North to the parks looking at long exposure locations for sunset. After looking at all of the locations there I decided to set up at the boat launch and setup looking to the North across the pilings there. The sun was setting fast and I setup using the 75mm f/1.8 and the Lee Seven 5 system with a solid 3 stop ND and a soft Graduated ND to darken the sky. The result was this 90 second exposure:
With the sun totally gone and deep into twilight, I simply turned the camera 90 degrees to the right and looked at the industrial complex across the bay with great columns of smoke spewing into the sky! I removed the 3 stop solid ND and kept the soft Graduated ND in place to further darken the sky. So the resulting image was a 240 second exposure and full of color, smooth water and blowing smoke:
Do you see how a light weight high quality camera/lens system like the Fuji works to our benefit when traveling and needing the ability to shoot in all conditions? With the X-E1 system there is no limit to my shooting styles including Lightning, Water Drops and Long Exposures.
and we need every advantage we can get as photographers in long exposure!
The long exposure game, is one of compromises: fighting too little light, balancing the moon and its reflections, cameras and lenses, camera meter or external meter! Long exposures are one of the more difficult photographic styles and one that takes experience and patience to master. As such, the photographer needs every helpful trick that they can gather into their bag of tricks in order to generate, stunning etherial images!

The Pawleys Island Pier, Fuji X-E1 with the 18-55mm lens, 3 stop Lee Graduated ND for the sky and a 3 stop ND overall.
So let’s put all of this together in a process or recipe (if you will) that will lead us to success in the Long Exposure game (NOT Star Trails which is a slightly different game!
My favorite time to setup and start taking my long exposures is from 1/2 hour before sunset to about 2 hours after (depending upon the moon).
I will usually go to the beach and look for something in the foreground like some rocks, groin, dead trees, pilings or a pier.

680 second exposure, Pawleys Island Pier and Groin. Fuji X-E1, at the end of twilight going into full darkness
The ocean state only make a difference in that if the waves are large then you will need a much longer exposure to flatten them out. So many of the long exposures you see with bands of dark and light in the ocean are caused by your exposure being too short to totally flatten the surface. A single band of white in the foreground is caused by the surf crashing down onto the sand and that can also be overcome by extending your exposure past 10 minutes!

Full Dark! Fuji X-E1 with a 3 stop Lee graduated ND filter covering the sky to the horizon. 125 seconds at f/11. Light pollution from the hotels and pier behind me.
Metering of all the aspects of long exposures is your most difficult hurdle. The in camera meters when set to spot, are indeed capable, but they are not totally accurate and more importantly, they are large spots, in the 5 degree range rather than the 1 degree of the hand held meters. Yes you can use them but be prepared to have to adjust your exposure for a second shot… And this is WHILE the ambient light is rapidly changing as the sun continues to set!
Time for a talk on exposure..
We have the 3 basic exposure settings to work with, ISO (which should be set on your cameras lowest or native setting), APERTURE, which for a sharp image with proper DOF should be set for f/8 to f/16 and Shutter speed which should be set at least at 30 seconds and around 2 minutes for good smoothing of the ocean surface and clouds. You will lock the ISO and APERTURE while looking for a good shutter value to be generated by the metering system. So as you can see, you can set the camera in Aperture Priority mode to shoot here. I find though that I like full manual mode better.
Here is what you can expect for various shutter speeds:
Keeping the Depth Of Field (DOF) in mind, you can see that the shutter speeds are the key to your images.
As discussed earlier, the internal meter of digital camera systems is not the best meter out there. In the spot mode they provide a very large spot (5 degrees) when what we really need is a 1 degree spot. The smaller spot gives us a more accurate and isolated reading which can be vital in determining the overall exposure. If you use this in conjunction with the ZONE system developed by Ansel Adams then we have a really powerful system. Lets take a look.
The ZONE system is very simple. It divided your total exposure into 10 equal parts or zones. Each zone is a specific “stop” and the center (zone 5) where where ALL METERS place the exposure of anything it sees!
As you can see from the chart on the left of the zones, they start at black for zone 0 and move to white at zone 10. Zone 5 being the 18% gray is what the meter sees and will adjust the exposure of the spot metered to be there in the 18% gray! This explains why so many photographers snow images come out as gray! Knowing that the meter will automatically place the measured spot into the gray area it is a simple matter for the photographer to mentally move the zone up or down in adjustment in order to place the metered spot into the desired zone!
It is easy to understand and implement!
See? Easy to do.
So, hopefully the camera meter has a small enough spot to read these small areas and give you an accurate exposure suggestion. But, what happens when you add a 3, 6 or 10 stop ND filter into the mix? Well 3 stops will not affect the meter, but 6 and 10 will destroy any accuracy and your exposures will be all over the place. We just cannot have that happens so this is where a hand held spot meter comes into play!
There are 3 things that you must keep in mind when you are thinking about hand held meters.
I suggest 2 meters from Sekonic for you to consider, the L508 and L758DR.
Here is the L758DR which is what I am using and will show in the following examples. The meter has 2 modes of measuring light, the lumasphere and the spot which is simply an eye piece that you look thru and shows a target you place on the area of the scene you wish to measure!
That is all of the necessary steps to use this meter. It really is very easy! There are several videos on the Sekonic web site as well as on Utube.
The B+W, well most others as well can be tough to understand! Here is a break down of all of the filters and how to read the codes!
Knowing how to read the filters is important but understanding how to use them even more so. Lucky for us in long exposures we are interested in the shutter speed. If we get a shutter speed of 1/15 second with no ND installed we know that it is simply too fast to slow the water down! So we realize that a ND filter is needed.
Standard ND Filters effect on a 1/15 second shutter speed with a fixed ISO and Aperture:
These are the standard ND filters from B+W, other companies offer the same and other values. Lee offers in the Seven 5 system, 1, 2, 3 and 10 stop values as well.
So now, you take your meter reading and look at the suggested shutter speed, install a ND filter and then tell the meter which one chosen and it will give you the corrected shutter speed. Remember, all camera meters will fail at 6 stops on!
These are filters from Lee (some round ones from B+W but they divide directly in the center) that come in 1, 2 and 3 stops. They are either a hard transition between dark and clear or a soft transition covering a larger area of the filter. I use these filters to darken part of the image, usually the sky. If you have a firmly visible seperation between the sky and water at the horizon, you can use a hard graduated filter. Otherwise you will use the soft which is the normally used choice. Take a look at the images here of both and you can see their usefulness.
Deciding on which value to choose, 1, 2 or 3 stops is simple. You simply use your meter to spot read the sky and then again the ocean. Look at the difference between the shutter speeds given with a fixed Aperture and ISO. The difference will tell you how much graduated ND you need to use.
These filters are also handy for other landscapes as well. How often are we plagued with waterfalls or landscapes where the sky is just too bright? Apply the same metering difference to those images as well for a vastly improved result.

480 second exposure, Fuji X-E1 Late Twilight! Metering of the cloud base just above the horizon then moved to Zone 7!
I know, most of my recent posts have been about the new Fuji X-E1, but tonight I decided to take out the OMD and test it out for ultra long exposures. I have the OMD as a high speed replacement for my Canon DSLR (currently a 7D) in order to reduce weight and ease of use. Overall the camera performs very well and generates impressive, sharp images up into very high ISO’s! But a friend recently purchased one to use and wanted to do some long exposures. So I got mine out, looked over the in camera options and was VERY surprised to learn of several very nice long exposure benefits built into this camera!
The OMD worked tonight flawlessly for these long exposures! The longest was over 14 minutes and generated a clean low noise image! But most importantly, I was able to take this image with NO metering at all. I simply chose the Live View Bulb mode and watched the image develop on the LCD screen during the exposure and when it was where I liked it I simply stopped the exposure! Understand, this is not exact as the LCD does not give an exact true image display, but it was always within 1 stop!
Here is a B&W version as well but I think you will agree that this entire outing was easy and fun and gave superb results!
There is something about Shrimpers… I cannot get enough of them and find myself visiting them again and again. I love the dilapidated nature of them and even though they are in such rough condition they seem to venture out into the deep time after time. Perhaps they are a reflection of the men who sail them, rough hewn, salty men, eking out a living from the sea. Regardless, they are things of photographic beauty and deserve to be documented for history. You see, they are vanishing from sight. Shrimp seems to mainly come for fresh water farm ponds in the lower americas and soon these beautiful boats will be a thing of the past.
The Japanese concept of Wabi-Sabi: “connotes a way of living that finds beauty in imperfection and accepts the natural cycle of growth and decay. Characteristics of the wabi-sabi aesthetic include asymmetry, asperity (roughness or irregularity), simplicity, economy, austerity, modesty, intimacy and appreciation of the ingenuous integrity of natural objects and processes.
Thus begins my exploration of Sabi…
Here captured in Black and White, is a detail shot of the shrimper Lila Lee. She is resting in the boat grave yard in Georgetown, SC. The older shrimpers seem to be abandoned along the shore here in Georteown till they sink. We have some sitting on the bottom growing trees and weeds from their decks.
This image was captured on the Fuji X-E1 with a MC Soligor 70-300mm C/D manual focus macro lens, another relic of the past…