Fuji X Pro 1 and the Soligor MC C/D 70-300mm f/3.8 FD Lens


The Need to Reach Out and Touch Something!

These three old shrimp boats were in the boat graveyard in Georgetown, SC. The trouble is that they are just too far away to capture with any of the Fuji Lenses.  I have several other 3rd party lenses like the CV 12mm and 75mm f/1.8 but even the latter is just not long enough.  A friend dropped by my gallery last month and gave me a bunch of old Canon FD/FX lenses and one of them was the Soligor MC C/D 70-300mm f/3.8 FD Lens.  This is a big lens, about 10 inches long closed and 13 inches  zoomed out to 300mm.  It is a push pull design and surprisingly, clean of dust for a lens so old!  It is an amazingly smooth and sharp lens and a real pleasure to use.

One of the problems with the Fuji is that there are currently no long lenses out there.  Normally, this doesn’t bother me too much but once in a while I need the reach!  I am always keeping my eyes open for longer lenses hence the CV 75mm f/1.8 and the Soligor 70-300.  I also have a Canon 70-200 on the way from Roberts Camera which cost me $49.00.

I had to spend the day in Georgetown today so I decided to bring this lens along and give it a try!  This lens was designed to be the Canon L glass killer back in the day of FD/FX lenses. It is amazingly sharp. Now that the  X Pro 1 2.0 firmware is here manual focusing is EASY and SHARP!  When in focus the details just jump out at you.  I had a FD/FX to Fuji adapter on hand and after fussing with it and discovering that you had to adjust the position of the aperture lever inside the lens then mount the adapter I was in business!

As I said, focus is amazingly easy.  The glass is sharp and the combo works very good.  If you can find this lens out there in net land grab it, but I have NEVER seen one and searching online does not even turn them up!

The Three Shrimpers, Fuji X Pro 1 and Soligor 70-300, F/11, 1/2500, 400 ISO


Here is the color version:

The Three Shrimpers, Fuji X Pro 1 and Soligor 70-300, F/11, 1/2500, 400 ISO


I also wished to do some detail images for an upcoming magazine article so I took this camera/lens combination over to Stormy Seas and looked for boots and/or Gloves in the rigging!  Here is what I found:

The Work Gloves… Fuji X Pro 1, Soligor 70-300mm at 200mm, f/8, 1/1000s, 400 ISO


I was quite pleased with this combination.  As stated, the lens is quite large, but that is OK as I will not use it that often.  The new/old Canon 70-200 is only about half the size and hopefully it will work quite well also!

The Olympus OMD E-M5 and Long Exposure Water Images…


Wonder of Wonders…  Emotionally Charged Slow Water Images with the E-M5!

Etymology of the word ‘photography’:


From the Greek words phos (“light”), and graphis (“stylus”, “paintbrush”) or graphí, together meaning “drawing or painting with light” – allwords.com

Painting with light… Really this is just the perfect description of what I do with my photography!  I rarely take snap shots.  I will walk up to a subject and study it, allow it to wash over me and evaluate its emotional impact upon my sense of self, then I will take my my camera and use it as the tool of creation and force it to capture the scene as I visualize it!

Such was the case during my last workshop where Jamie Davidson and I took a group of students deep into the New  River Gorge in West Virginal to photograph Grist Mills, Water Falls and Vistas.  Usually I used my Fuji X Pro 1 (my main creative tool) but at one location I was forced to use a longer lens in order to overcome intense, harsh mid day lighting on a small set of water falls.  So I choose to try my new Olympus OMD E-M5 camera system with the Panasonic 14-140mm f/4 – 5.8 lens and a 10 stop B+W ND filter (110) and of course on the tripod.

These waterfalls images were very difficult to capture in the fashion that I visualized them in my mind.  I was looking for dark, forbidding images of the water and dark rocks surrounding it with a little  highlight detail on either side on the rocks. I ended up spot metering on the water then placing its exposure into Zone 7 on the 10 zone scale (yes I DO use the Zone system for exposure as you should!  This will be the subject of a future post!).  After setting the proper exposure for the Zone 7 water and very dark rocks  I then used a 900 lumen tactical LED flashlight to light paint the rocks around the water to bring out some slight detail there.   The exposures were long, 3.5 seconds for one and 1/5 second for the larger falls. The longer exposures allowed me to repeatably repaint the rocks with the very, very bright tactical light.  Take a look at the results below and decide if the effort was worth it or not!

Water Falls, New River Gorge, 3.5 second exposure, f/22, 10 stop ND with high intensity light painting around the falls area.

As you can see in this first image, I have created an etherial image with slight edge detail which was generated by the small high power tactical flashlight.  The image worked much better in B&W so I did not really work at the color version of it at all.  My intention was to create a dark moody image that would wash over me emotionally…

Water Falls, New River Gorge, Color, .5 second exposure, f/22, 10 stop ND with high intensity light painting around the falls area.

This second image in color was my 2nd attempt on a different location at the same series of falls.  I really like this one in color.  The exposure time was much shorter due to an increased amount of ambient light falling on the water and I did not have enough time to paint both sides of the falls with the light.  Still, all in all the image is quite pleasing and the colors brought out during the long exposure are quite stunning.

Water Falls, New River Gorge, B&W, 3.5 second exposure, f/22, 10 stop ND with high intensity light painting around the falls area.

This last image I chose to process in B&W with a little darkening of the image corners to make it slightly more moody.  I think that I like the Color image a bit more than the B&W version.  What do you think?

All in all, I have to say that I am very impressed with the functionality of the OMD camera body.  It worked perfectly for these difficult images and allowed me to capture the images as I envisioned them in my mind and that is the best that one can hope for  when you are out in the world creating art…  I will also admit that if I had a longer lens for my Fuji X Pro 1 at the time that I would have used it instead, but at the time the Fuji 60mm macro was the longest I had.  I have since purchased the CV 75mm f/1.8 for the Fuji!

LED Tactical Light

Now, as to the tactical light, Surfire makes lights for the police and military but will sell to you directly or at Amazon or even in a local gun store.  They are used in 2 ways, mounted on the weapon or hand held and are used during a gunfight to see the target and half blind them.  They can be VERY powerful and VERY costly.  Being LED, they will not burn out.  All of them have multiple  output powers and the one I used here had 2, 20 lumens and 900 lumens.  You must be very careful with the high power mode as you can damage peoples eyes with it but being so bright, you can use it during a bright sunny day.  These lights use lithium batteries and they will last about 30 hours on low power and 2 hours on high power.  I keep this light in my camera kit at all times as you never know when you will need to add some detail light on a scene!

Fuji X Pro 1 and Advanced HDR Photography with NIK, Photomatix & Merge


Or, Look Mom at  what I made!

A brief overview of the  4 major HDR tools…

The Glade Creek Mill, Fuji X Pro 1 w/ 60mm lens, 10 stop ND and Nik HDR EFX Pro 2 with 3 source files

I just got back from a major workshop that Jamie Davidison and I led to the New River Gorge in West Virginia where to took our students on a hectic 4 day workshop/excursion.  We explored waterfalls, grist mills, trains and vistas while studying Infrared and Color post processing back in the classroom each night till about midnight.  This was EXHAUSTING to say the least but never the less, a great workshop full of great photographers who gave as much as they took!  My days started every morning at 5am and ended about 1am.  I am still recovering!

The Glade Creek Mill, Fuji X Pro 1 with the VC 12mm lens

While the main focus was shooting in Infrared and its associated post processing, I needed to provide loaner IR camera systems to those who did not yet own one, so even though I own three IR systems I was forced to shoot color!  The sky each day was free of clouds and very bright, so if I wished to photograph in color I was forced most of the time to shoot HDR images in order to overcome the dynamic range of the day!  A lot of the time I was able to successfully capture an image with The X Pro 1 in a single shot like the one shown here on the right of the Glade Creek Mill.  But the norm was indeed HDR. The X Pro 1 camera has an unfair advantage over most other camera systems, it has a wider dynamic range and can capture more image data!

Notice that the mill did have some running water which forced me to use very long exposures in the range of 10 to 5 seconds in order to slow the water down.  While there was not a lot of water flow there was enough to make the images very nice.  I used the 60mm lens on the camera along with a 10 stop ND filter in order to slow it down!

OK so let’s get to it!  From this point on, we are going to be working with the same three source files.  I will take you through the post processing for the following HDR tools:

  • Nik HDR EFX Pro
  • Nik HDR EFX Pro 2 (new)
  • Merge To HDR Pro (Photoshop CS6)
  • Fotomatix Pro 4.2.3

I also will be using Nik’s Color EFX Pro 4 and Viveza 2 for post processing (fine tuning) after the HDR conversions are finished!

Overview:

OK, what is HDR?  HDR stands for High Dynamic Range.  Think of it this way… You are out taking pictures during the brightest part of the day.  You can get a good image of the foreground subject, but the sky is totally blown out, you know pure white.  The total range of the light from black to white in your image exceeds what your camera is capable of recording, but our eyes can still see and understand the complete range.  So, in the world of photography, we have developed the ability to take several photographs, say three to six, each one with a different exposure from way too dark to really blown out.  With these pictures in hand you can now run one of several software programs available that will combine the best of each of these differently exposed image into one that can display the entire range of of the image from black to white!

Now this requires a image with more data than you can store in a 8 bit JPG image, and even more than your 16 bit RAW, TIFF or PSD image!  Now we move into the world of 32 bit images that can hold and display  a far greater range of black to white data.  Now, 32 bit images are all but useless to us in the real world so the HDR software will compress it down to 16 bits by removing select bits of brightness data without really negatively affecting the view of the image and making it possible to view and print the image!   Pretty neat technology don’t you think?

What I normally do when shooting HDR is to take a test image and evaluate the histogram.  I will look to see what areas are out range, or totally black or totally white.  Usually, the blacks will be fine but the whites will be blown out.  I will then retake the same image with a negative EV dialed in and re evaluate the image again looking to see if the blown out white areas of the image are now in the proper range.  This gives me an idea of just how wide the range of the image needs to be.  If the blown out areas take two or three stops of adjustment to bring them back into range then I will then  decide upon how many HDR images are needed to be taken to get the total range covered in 1/2 stop increments.  You will need to set your camera on a tripod and have it locked down to assure that you get the same exact composition in each shot.  You can either use the auto bracket mode on your camera to generate your shots or do it manually.   Weather or not you change the ISO or shutter speed is dependent upon the scene or your artistic intent.  Some cameras will bracket at most three shots, some 5 and some even 7 or more!  You can usually choose to bracket with Aperture, Shutter Speed or ISO.  It is important to keep the Aperture constant as to not change the depth of field.

For these shots, as long as I kept the shutter speed longer than 3 seconds I would not have any issues with keeping sharply defined slow moving water to generate the HDR.  So I chose a 3 stop bracket using the Shutter Speed, leaving the Aperture and ISO steady.

Here are the 3 component images that make up the final HDR image:

  • In the first, 3495, the trees and mill look good, the water is overexposed about a stop and has lost detail and the rocks are a little under exposed.
  • The second, 3496, the rocks are perfect but the water is very over exposed. There is some detail in the black area under the top of the falls.
  • The last, 3497, the water is perfect but everything else is just to dark.
  • The water was always the key to this shot, getting it so that it was not blown out is the reason to use HDR.  These three images generated by the camera without any processing other than raw conversion and bracketed .7 ev apart with -1.3 ev being one of them, -.6 ev and lastly –2 ev.  If you decide to try this, keep in mind that the closer together the exposures are, say 1/2ev the more data you will have to generate your final image.  You can also add more data with more images. Every HDR you setup and shoot will be different and you must evaluate how many shots to take at what exposure.
  • The very dark black under hang below the top of the waterfall was another consideration when deciding the exposure values of the component images.  I needed a brighter image to bring out some detail here as well.

3495, -1.3 ev, f/8 8 seconds, I chose this value to get the correct exposure on the trees
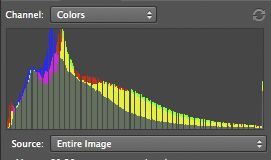
3495 Histogram, -1.3 EV

________________________________________________

3496, -.6 ev, f/8, 13 seconds. I chose this value to get the rocks and mill exposure correct knowing that the water would be blown out
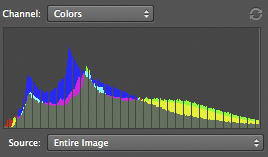
3496, -.6 ev

________________________________________________

3497, -2 ev, f/8, 5 seconds,  I chose this exposure for the correct falling water exposure
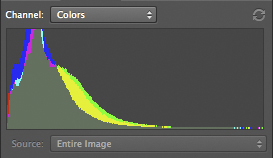
3497, -2 EV

________________________________________________

These three images are the only ones that I will use to explore the various HDR processing software.

Final considerations on component images that make up the HDR image:

  • You MUST shoot on a tripod to control camera movement (prevent ghosting) and to lock the composition.
  • Use a remote shutter release.
  • Wind will cause plant and tree movement which will cause a ghosting effect (bad).
  • Keep the aperture constant to force the depth of field the same between shots.
  • ISO bracketing is ok as long as you keep the jumps in ISO below the level where noise is introduced by your camera.
  • Exposures closer together will allow you to generate better HDR’s as long as the subject matter doesn’t move.
  • More component images mean more data to  build a better HDR image.
  • Take notes in the field as you shoot so that you can remember what your intentions were at that point in time!  This will help you when you build the HDR.

Some notes on the software:

  • HDR conversions require image editing software that can process in 32 bits.  This means that unless you purchase HDR stand alone software like Photomatrix Pro you MUST use Photoshop CS5 or CS6. Elements and Lightroom simply will not work.
  • I do not like over cooked HDR images.  I process them to a natural look and feel, close to what I can see with my eyes!
  • CS5 & CS6 both include an internal HDR conversion filter called Merge to HDR Pro for free.
  • The NIK HDR software, HDR EFX Pro and HDR EFX Pro 2 require a 64 bit operating system and the appropriate 64 bit CS5 or 6
  • Photomatix Pro is a stand alone filter that does NOT run inside of Photoshop and will allow you to save a 16 bit HDR converted image that can be opened in Elements.
  • All of the conversion software will cost between $100 and $200.
  • I am not going to take you step by step through each of the HDR conversion packages.  This is HIGHLY SUBJECTIVE and no two photographers will get to the end results via the same path!  There a quite a few good books out there on this!

Photoshop CS6 Merge To HDR Pro

This HDR program comes built into Photoshop CS6.  It is quite powerful and gives you a lot of options.  I found it very easy to use and it gives very nice results.  You will find it under the FILE > Automate menu and it  will ask you to locate and open your component images or add images already open!

Once your images have been chosen, it will open them and drop you into a full screen dialog where you can make any image adjustments.  Once done the software will drop the finished image into Photoshop where you can then do your final tuning with Nik’s Color EFX Pro 4.  I like to use the Tonal Contrast filter due to the ability to adjust color contrast in the Highlights, Midtones and Shadows separately from each other.  This one tool will really bring out the full potential of your images.

Here is my version of the three component images processed in Photoshop’s Merge To HDR Pro:

X-Pro1-3495 3496 3497 -Glade Creek Mill -2012 -M to HDR Pro

Here is my version of the three component images processed in Nik’s HDR EFX Pro:

OK, onto Nik Softwares HDR EFX Pro.  This is the first version that Nik offered earlier this spring (2012)  It has a great interface and does a pretty good job, but requires a little more fine tuning after the HDR conversion is finished.  The tuning process was again done using Color EFX Pro 4 and Viveza 2.  This is a plugin filter for the Photoshop family and requires that you run a 64 bit operating system in Windows or OSX.  It will NOT run on Elements and Lightroom.

I found that the images to be a little flat and lifeless until I applied the Color EFX Pro 4 in the after process tuning steps, then the images started looking pretty good.

X-Pro1-3495 3496 3497 -Glade Creek Mill -2012_NIK HDR EFX Pro

Here is my version of the three component images processed in Nik’s HDR EFX Pro 2:

OK, now, this is a MAJOR upgrade to Nik’s HDR software.  This one revision corrected all of my complaints about flat and lifeless images!  There is VERY LITTLE fine tuning needed at all.  I think that Nik’s HDR EFX Pro 2 is my favorite conversion tool out there.  But I will let the images speak for themselves!

X-Pro1-3495 3496 3497 -Glade Creek Mill-2012 NIK HDR Pro 2

Here is my version of the three component images processed in Photomatix Pro ver : 4.2.3

Photomatix is likely the most popular HDR conversion package on the market.  It cost around $150 and does NOT require CS5 or CS6 to run.  It is a standalone system and when it finishes it will directly save a 16 bit version of your HDR image on your computer that you can then open for further editing.  It has many recipes and adjustments and you can do great work with it. I highly recommend it even if you are already running a 64 bit operating system and CS6. You will not be sorry!

X-Pro1-3495 3496 3497 -Glade Creek Mill -2012 -Photomatix Pro HDR

As you can see, the 4 converted HDR images are not at all the same.  That would be difficult if not impossible to achieve.  Each software package has its own adjustments and none of them are exact.  I like Nik’s HDR EFX Pro 2 and Photomatix 4.2.3 the best.  They are all easy to use and as long as you properly evaluate the scene that you are trying to photograph and properly choose the exposure values of the component images you will get really nice HDR shots!

What do you think?  Please let me know!

True Macro With The X Pro 1


Being Small in a Large World..

Zebra Longwing Butterfly Caterpillar, 1/4 inch long, Fuji X Pro 1 and the 60mm f/2.4

In another creative fervor with the Fuji X Pro 1, I decided to attend a formal CNPA (Carolinas Nature Photography Assn.) outing yesterday at Cyprus Gardens in Moncks Corner, SC.  The park is full of flowers, swamp and a nice butterfly house.  I had decided to leave all of my other camera equipment at home (it seems that this is becoming the rule now with the X Pro 1!) and concentrate on macro/closeup work with the Fuji system.  In truth, I spent all day with the 60mm f/2.4 macro lens.  The lens can shoot in the macro mode at .5x which is 1:2.  The closest focus range on this lens is a little over 10 inches.  With these limitations in mind I setup on a sturdy tripod and got about the business of creating images!

This post is NOT intended as a macro or flash tutorial. I will post images that I consider are the best at macro and closeup that this camera system is capable of creating.  Anyone can create this type of macro images with just a little forethought and a full understanding of the physics of exposure and how to use your camera as a tool! I intend to show you what this camera system is capable of creating with thought out setups, exposure and lighting!  I am going to share with you my experiences in using the camera system with the following accessories, modes and shooting supports:

  • Fuji X Pro 1, aperture priority, spot metering
  • Fuji 60mm f/2.4 lens
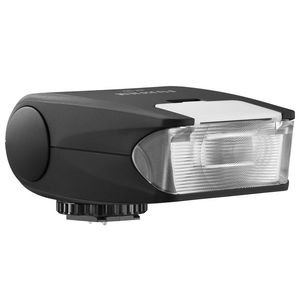
  • Fuji EF-20 flash
  • EF-X20 flash
  • Fuji EF-42 flash
  • Surefire 6PX Pro LED flashlight
  • Tripod and hand held
  • 40″ remote shutter release

Fuji EF-20 Flash

The Zebra Longwing caterpillar  above was about 1/4 inch in length and was taken with the Fuji X Pro 1 with the 60mm f/2.4 lens on a tripod.  Lighting was the Fuji EF-20 flash unit on camera but tilted down and set at -1ev.  As you can see, the overall setup gave a very nice image with reasonable lighting given only 1 flash!  The overall image ratio is about 1:3 which puts this squarely in the macro range.  I kept the aperture set to f/9 in order to get the entire insect in sharp focus and have a little bit of detail in the background.  Now, the real surprise:  the focus was auto with the selected focus point being the middle of the curve on the insect!  Normally, we expect to manually focus when working in macro, but I intended to test the focus capabilities of the system as well.

  • TIP: I added a slight lens vingyette in post processing   to darken the top and sides of the image to further accent the main subject.

Given that the flash uses two AA batteries, the re-charge time should be considered quite slow, but it was actually quite fast.  I enjoyed using this flash because the tilting head enabled me to shoot past the end of the the longer 60mm lens and keep the subject in nice light with no lens shading even with the lens hood installed at the 10 inch focus distance!  I did find that using the button on the back of the flash to set the EV value to be a bit tedious but since I usually set it to some negative value and leave it there it was not a very large negative!

Swallowtail Butterfly Caterpillar, Fuji X Pro 1, 60mm f/2.4, 10 inch focus, 1:2 ratio, Fuji EF-42 at -.5ev

Fuji EF-42 Flash

This next image of the Swallowtail butterfly caterpillar was taken using the Fuji EF-42 flash set at -.5ev and an aperture of f/8 on the tripod.  Here I intended to have more of a blurred background (remember in the macro range the DOF is very narrow and even a a mid aperture you will get a very blurry background) yet again keep the insect in sharp focus across its entire focus plain.

The EF-42 flash is a much higher power unit compared to the EF-20 and it uses four AA batteries for a faster recharge time.  The controls are easier to use BUT the flash head will NOT angle down beyond the level plain.  This can be overcome by pulling out the wide angle lens on the top and using it as s bounce surface to angle some light down.  As you can see in the image I created the exact image I envisioned.  The main subject (insect) is in perfect focus and the exposure is dead on with no blow out of the whites.  The background is nicely indistinct and blurry with only slight detail thus taking nothing away from the subject!  Focus was again in auto with the spot set on the top hump of the insect as it was getting ready to move forward up the branch.   Again, I added a slight lens vingyette in post processing to darken the top and sides of the image to further accent the main subject.  As stated, this was all pre-planned before I ever looked at the camera!

The Red Flower, Fuji X Pro 1, 60mm f/2.4 lens, 1:4 ratio, Ef-42 at -1ev.

OK this image of the small red flower (sorry, I have not yet identified it yet…) was again done with the X Pro 1 with the 60mm lens and the EF-42 flash at -1 ev.  The big difference here was that this was hand held.  I just could not get the camera into a position on the tripod in order to capture it.  Plus I was setting up to switch over to shooting butterflies on the move which you just cannot do on the tripod.  The flower was about1 inch in length so the image ratio here is about 1:4 which puts this image in the closeup range.  Depth of field is much better in this range so in order to have a un-defined background I set the aperture down to f/4 which gave me a sharp focus on the entire flower in its plain of focus yet blurred the background nicely.

  • TIP: The flash was setup using the wide angle adapter pulled partly out in order to reflect some of the light down towards the flower.

All in all  I think that this is a nicely done image considering it was hand held!

Zebra Longwing Butterfly. Fuji X Pro 1, 60mm f/2.4 lens, EF-20 flash at -1ev 1:8 range

Ok, moving up further into the closeup range, I created this image of a Zebra Longwing butterfly.  This was again handheld but using the EF-20 flash set level at -1ev.  Focus was auto with the focus point set silghtly off center to the top in the portrait mode.

  • TIP: When shooting macro/closeup, I always set the focus point for each and every shot.  This gives me far greater control during the setup and composition phase of my process.

Purple Orchid, X Pro 1, 60mm f/2.4, EF-20 at -1ev, 6PX Pro LED Tactical light.

Fuji EF-X20

OK, almost done!  This last image of a purple orchid was shot on the tripod  in shadow was one of the more difficult images of the day.  I had to use a 40 inch remote shutter release and hunch below the flower and tripod with a 5000 degree kelvin LED flashlight angled up into the flower.  I also used the EF-X20 flash set at -1ev to give the purple of the flower even lighting and a sparkle.  The EF-X20 is the easiest of all the Fuji flash units to control due to its top mounted mode dial.

Surefire 6PX Pro

The LED flashlight is a 6PX Pro Tactical light with variable output and is perfect for macro work.  Its light is bright white and since you can control the power level it makes for very easy control!  This light and many others can be found at  www.Surefire.com but be advised, they are expensive!  I keep several versions of these tactical lights on hand.  They are all useful and a positive addition to a macro kit!

OK, that is it for today.  But consider this last point, Macro work can be done with any lens, you do not need to have a dedicated macro lens.  With the simple addition of a closeup adapter (I recommend the Canon 500D series of adapters) you can convert ANY lens to macro/closeup!

What did you think of this post?  Please feel free to leave feedback and comments!  I value your input.

Ultra Long Exposures with Fuji X Pro 1 using the Zone System and a Heliopan Variable ND Filter


Interesting Things Come To Those Who Wait….

Pawleys Island Surf, X Pro 1, 2 1/2 min exposure

Heliopan Variable ND w/ Stops

This variable ND filter from Heliopan comes in a 52mm size which works on both the Fuji 35mm and 18mm lenses.  It is touted as being totally color transparent with no color shifts!  Online reviews have stated that it is by far the best variable  ND on the market.  My own testing has shown that it adds ZERO color cast to my images and that the physical stops on the filter work very well while the settings are quite repeatable.  The only negatives found are:

  • The fit of the ring components are very sloppy.  They are loose and easily moved.  I like a little tension between the moving rings on any adjustable filter and this one fails in that regard!
  • The base of the filter is wider than the top.  You cannot attach any lens hood because of this.  Since there are no filter threads on the front if the filter you cannot attach a screw on hood.  This bothers me quite a bit, but the fact that the filter adds no color shift allows me to overlook this.

Its stops on the filter that keeps you in the 2 to 6.2 stop range and generates no banding at all.  So far I have been very impressed with the images created with this filter in all way.  Yes you can do the same job with a fixed ND filter but even the high quality B+W ND filters add a slight color cast to your images!

Suggested Equipment:

  • Sturdy Tripod
  • Remote Shutter release cable ( I found a 40″ model online ) You can typically find many choices here for the X Pro 1 at Adorama, BH Photo and Amazon.  I have 2 in my kit, a 12 inch and a 40 inch model which allows me to back away from the tripod a little..
  • Bubble level. ( for some reason the internal built in level is not accurate ) You can always fix a tilted horizon in post processing, but you will loose part of your image in doing so.  As with all things photographic, the better the image created in the camera the better the final image will be!  The level really helps in this and you can find them for next to nothing on Amazon!
  • Charged camera battery ( long exposures chew up batteries), there is nothing worse than having to walk back to the truck for another battery!  Keep an extra in your pocket.
  • Lens cleaning kit ( beach shots in the wind cover everything in salt spray )
  •  ND filter (variable or fixed, Heliopan or B+W 6 or 10 stop)
  • External Spot meter like the Seikonic 508 (not necessary but make exposure a little easier!), more on this on later in the post!

Subject Considerations

  1. Foreground, Mid Ground & Background:  As with any photography, it is very important to have easily recognized areas within the images.  The best images contain three.  Foreground, mid ground and backgrounds that are clearly defined will draw you viewer into your image and make a longer lasting impression!  This is the same in long exposures.  I like to find objects in or that project into the ocean to achieve  this effect.  In the images here I have the rock groin, the ocean and the sky/horizon that cover these three areas.  You should consider these important compositional areas as you pick your image.
  2. Size and timing of the waves: When photographing the surf, and attempting to soften or smooth  the waters surface you need to consider the distance and timing of the waves.  A long period between the waves will require a longer exposure to even them out.  This is just as true with larger waves as well!  A good starting point for the normal surf is a 30 second shutter speed.  This should give you 3 or 4 waves coming ashore with which to average the waters movement.  The B&W image shown here in the post was a 2  min 30 sec exposure.  The reason for the difference is because to flatten the waters surface I needed a much longer exposure due the the size of the waves (12 feet).
  3. The Sky: The sky is a funny thing in long exposures.  Normally we hope for some structure in the sky, especially with color.  But the ultra white sky can also add a striking compositional element to our images as long as there are other darker areas within the composition to balance against.  The addition of clouds, especially clouds that are moving will add another etherial component to your long exposure image.  The clouds will be tearing across the image, trying to flatten themselves with movement.  Usually, this effect is very subdued due to the slower movement of the clouds as compared to the waves!  Some photographers make the moving clouds their main compositional components, something to think about…
  4. B&W or Color: For me this is an easy choice… I prefer B&W to almost any other type of image!  There is just something striking about a well done B&W image.  Don’t get me wrong, I do shoot in color and like it very much, but the B&W image is universal in the way it tends to draw viewers into the image.  The complexity of the colors having been removed seem to show the soul of the image in all of its splendor!  This is an area in which the Fuji X Pro 1 really shines!  The various built in art filters with their various options (red, green and so on) gives splendid B&W internal conversions within the camera.  I am always amazed by the clarity and quality of the Fuji B&W images that I get out of the camera! The B&W image shown here is one such example of an in camera conversion.  I used the B&W with Red filter choice in the Fuji X Pro 1’s film type selections!

Zone System Metering & Exposure:

Zone Exposure System
The ZONE system is an old exposure evaluation tool developed by Ansel Adams.  While old, it has a real place in modern digital photography as well.  There are many books and videos on the subject and I STRONGLY suggest that you take the time to learn about the tool.
Simply, by taking a spot meter measurement on a particular part of the subject, you can place it in the 18% gray area or Zone 5.  Then you simply adjust the exposure up or down to place it in its proper zone!
It is a very easy to understand exposure evaluation system that can save you important time and thinking when you are evaluating your exposure setup.
Here is an example on how I use the Zone System to evaluate exposure:
  • Take a SPOT meter reading on the sky.
  • The meter in the camera or hand held meter will place the tone of the spot it measured into 18% Gray or Zone 5.
  • Knowing that I wanted the sky to be in Zone 8, I will lighten it by adjusting my exposure lighter by 3 stops by opening the aperture 3 stops wider!
  • The entire image is shifted by the decision I made above.  I could have chosen ANY OTHER SPOT to measure and adjust according knowing that the camera spot meter would force that tone area under the spot meter to 18% gray!

The Zone System for exposure control in this image

So, looking at the sample image above, you can see that a spot meter reading on the sky which I want to place in Zone 8, is forced into Zone 5 by the camera metering system.  If I left it here then end sky would be a dark gray and the overall image way underexposed.  So, knowing this I simply adjust the exposure lighter by 3 stops, shifting the sky into Zone 8 and brightening the entire image properly!  Look at the image above, notice that I have shown spot meter readings for several areas of the image?  You could also choose ANY of these, knowing that the camera would force the area chosen into Zone 5 and then make adjustment up or down via the aperture to place it in the Zone that YOU wish it to be in.  Perfect control!
One last thought on this for you.  When using a fixed or variable ND filter, you simply take the meter reading through the filter then make your zone adjustments.  The LCD preview of the X Pro 1 works VERY well in low light and allows you to do so easily and accurately!
The Zone system is a very easy way to understand and control your cameras exposure for perfect pictures.

Pawleys Surf, Long Exposure, 25 seconds, Fuji X Pro 1

So, what do you think?  The Heliopan Variable ND Filter is a VERY good tool to have in the camera bag.  But, it is VERY expensive ($300/52mm).   Optically, it is pure with no color poisoning at all.  I have not check out how it works in the IR spectrum yet but I will in the future.  The only real complaint for me is the lose fitting elements!