Nik Filter Fix for Photoshop CC on Mac & Windows!


To those in the West Virginia Workshop… Here is the FIX for the install issues with the Nik Filters and Photoshop CC!

Thank you for contacting Nik by Google. Since it is a brand new host, the Nik Collection may not have detected Photoshop CC on the computer.  However, you can put it into Photoshop CC with a manual installation. Please follow the steps below to install the Nik Collection to Adobe Photoshop CC:


On a Windows:

If you own a previous version of Photoshop

If you do not have a previous version of Photoshop installed please skip to “only version of photoshop” below.

  1. Make sure all versions of Photoshop are closed.
  2. Navigate to C:\Program Files\Adobe\Adobe Photoshop xx\Plug-ins\
  3. Copy the Google folder to your Desktop.
  4. Navigate to C:\Program Files\Adobe\Adobe Photoshop CC\Plug-ins\
  5. Move the Google folder from the Desktop into the Plug-ins folder.
  6. Restart Photoshop to confirm the plug-ins are there.


If the Creative Cloud is your only version of Photoshop

  1. Make sure all versions of Photoshop are closed.
  2. Run the Nik Collection installer from the file you received via email and downloaded. If you no longer have this file, please email customer support to have the file sent to you again.
  3. During the installation process when you get to the Compatible Host Application window, you will notice a plus sign (+) to add an install location. Click that button and navigate to C:\Program Files\Adobe\Photoshop CC\Plug-Ins\. (*See attached screenshot).
  4. Complete the installation, then open Photoshop CC to ensure that the plug-ins have successfully been installed.

These steps will install to Photoshop CC 64-bit. You can check the version of Photoshop by opening Help > System info. The first line will either say x32 or x64 respectively. You can open Photoshop 64-bit directly from C:\Program Files\Adobe\Adobe Photoshop CC (64-bit)\Photoshop.exe. 


On a Macintosh:

If you own a previous version of Photoshop

If you do not have a previous version of Photoshop installed please skip to “only version of photoshop” below.

  1. Make sure all versions of Photoshop are closed.
  2. Navigate to Applications/Adobe Photoshop xx/Plug-ins/
  3. Copy the Google folder to your Desktop.
  4. Navigate to Applications/Adobe Photoshop CC/Plug-ins/
  5. Move the Google folder from the Desktop into the Plug-ins folder.
  6. Restart Photoshop to confirm the plug-ins are there.

If the Creative Cloud is your only version of Photoshop

  1. Make sure all versions of Photoshop are closed.
  2. Run the Nik Collection installer from the file you received via email and downloaded. If you no longer have this file, please email customer support to have the file sent to you again.
  3. During the installation process when you get to the Compatible Host Application window, you will notice a plus sign (+) to add an install location. Click that button and navigate to Mac HD|Applications|Adobe Photoshop CC|Plug-Ins.  (*See attached screenshot).
  4. Complete the installation, then open Photoshop CC to ensure that the plug-ins have successfully been installed.

If you have any further questions, please reply to this email or visit support.google.com/nikcollection to call our Customer Service Department Monday through Friday 8:30 am to 5:00 pm PST.


MACRO!! Fuji X Pro 1, XF 55-200mm Lens & The NEW FX Extension Tubes


Fun With Macro…

Passion Flower

Passion Flower

Photodix

Photoasy Extension Tube Set

I was invited to visit Moore Farms in Lake City South Carolina last week to evaluate them as a workshop location for future workshops.  They have developed a great botanical garden destination that has more plant potential than most other places that I have visited!

For the visit I decided to take along my Fuji X Pro 1, Fuji X100s, Fuji 18-55 and the Fuji 55-200mm lens.  I also picked up the new Photoasy Extension Tube Set which has a 10mm tube and a 16mm tube with the communications connections so that the camera can still talk to the lens!  This was ONLY available on Ebay but recently Amazon Prime has started offering this great set!

Fuji 55-200mm

Fuji 55-200mm

The ENTIRE time I was shooting the X Pro 1 it had the Fuji 55-200mm lens installed with the 16mm extension tube.  I shot on the tripod the entire time with a remote shutter release.  A lot of my shooting with in high sunlight (sometime you cannot help this) and I forgot to bring along a translucent panel to modify the light to a more gentle form.  All of these things aside the camera/lens/tube combination worked great!  I am VERY pleased with the results (please view the Passion Flower above!).  I used an aperture of f/5.6 or f/8 (subject dependent) the entire time and usually had the lens set between 180mm to 200mm.

Because the 55-200mm lens is so long and does NOT offer a lens foot to better balance the camera/lens on the tripod you need a really stable tripod/ball head to keep the entire system stable.  I am using a large carbon fibre Feisol  tripod with the Really Right Stuff BH-55 ball head which is as steady as you can get!

The images generated are very pleasing and sharp all the way out to the edges.  The colors are very well saturated and there is no smearing at all!

The extension tubes are made of plastic with metal mounting rings and the connections match up perfectly.  I found that the 16mm tube was enough for the style of shooting that I was doing on this day (1:2 to 1:4 image ratio closeups)  but I did purchase 2 complete sets of tubes to get closer if necessary.

Here are some of the images generated.  All of the EXIF and GPS data are included.

Purple Cotton Flower

Purple Cotton Flower

Trumpet Pitcher Plant (carnivorous) and Anole

Trumpet Pitcher Plant (carnivorous) and Anole

Caterpillar on Purple Cotton

Caterpillar on Purple Cotton


This is a great rig for shooting macro/closeup.  The addition of the extension tube set is really a God send!

Moody Images in Infrared & Color! Fuji X Pro 1 and X-E1


Grabbing your viewers by the throat and not letting go…

A dark and stormy night

A dark and stormy night, Fuji X Pro 1 w/ 14mm fuji lens at 720nm Infrared.

Images that are dark and moody tend to grab our attention.  It is as though there is something hidden and dark that demands our attention.  We stare at them and analyze the image for a deeper hidden meaning.  This creates emotional impact that allows our viewers to share what we felt as we created the images!

Look for dark, stormy skies, moody clouds, dark trees or water.  Work in Infrared and you will find that you have a much better chance to capture these kinds of images more often than when working in color.  It is still possible to do so in color but you have to work harder at it!

Paradise Island Light, Nassau

Paradise Island Light, Nassau


As you can see in the image above, it is moody and draws the viewer into the scene, but it does not have that “dark and stormy” look and feel!  As I stated before, it is much easier to capture these types of image when working in Infrared!

A dark and stormy night

A dark and stormy night

Work in both Faux Color and B&W.  You never really know what you are going to get unless you take the time to post process both ways.  You should even look seriously at the properly white balanced raw image right out of the camera!  Sometime you can get a really stunning image there.

Lady Katheran

Lady Katheran, 720nm Infrared, Fuji X Pro 1 with Fuji 14mm lens.

Here is the same image processed in B&W.

Lady Katheran

Lady Katheran


The workflow to getting great images in post processing is to ALWAYS process in the 3 main ways:

  • RAW:  Check how the images looks right out of the camera.  In 720nm and 590nm you can get some stunning images with beautiful bronze skies!
  • Faux Color:  If your camera captures any color data at all (720nm and lower) then you should ALWAYS take the time to process in this mode.
  • B&W: You just done know what you are going to get unless you try!


Try adding a lens vignette to your images to darken the corners.  This will give more mood!

Here are some examples of RAW and B&W post processing!

McClellanville Shrimper

McClellanville Shrimper, RAW right out of the camera!


McClellanville Shrimper

McClellanville Shrimper, B&W


As you can see both versions give stunning results.  The most important thing for you to remember is that to get the best results from all of your images it is necessary to take the time to post process in all three modes.  Do not short change yourself by cutting corners.  Take the time to give each image your best try!  


You will be rewarded for you work!


Important Difference Between Film & Digital


What NOT to expect from Digital!

Fuji X-E1 with its 18-55mm lens

Fuji X-E1 with its 18-55mm lens

Recently I had a series of conversations here with a reader who wanted to pick up a Fuji X-E1 camera and have it deliver Velvia results out of the camera.  This conversation did not start well, but moved into meaningful dialog very fast.  I thought that I would share my thoughts as I gave them to him with you as it is important to understand what a digital camera can really deliver…

As a new convert to digital from film you need to understand one MAJOR difference between the two. Images generated from film are/were dependent upon the film emulsion, exposure, chemistry and glass quality/coatings for colors, saturation and white temperature which in combination gave each film its own distinctive look.

Now, along comes digital, where the only real move into the film Look/Feel is with a built in simulation or the proper selection of White Balance and the filters/coatings on the sensor plus the lens glass and its coatings. Some digitals give a more saturated look, some less. Some pump up the reds to the point of problems.

The Fuji’s typically give a more saturated image with a slight bluish feel. But, knowing photographers with experience who understand these issues and the capability of shooting in RAW understand that ALL of the films/sensor character is really defined in post processing! Looking for a Velvia look and feel out of the camera is foolishness and very short sited. You take your pictures, making sure that the WB is correct for the scene and day, you shoot in RAW, you get your exposure correct  then when you get home you do your color/saturation/tint adjustments in the RAW conversion. Then in Photoshop you do your real work where you can move your image into the film looks as you like with simple adjustments like, saturation, levels, color shifts and so on. With the addition of the NIK filter set you then get total control over these adjustments in an easy and fast way.

If you are looking for Fuji (or any camera) to give you a film look right out of the camera then you should just quit now before you have a nervous break down.

My Fuji’s are an incredible tool. But they are just tools, the creative work happens on the computer in post processing. I have used dozens of cameras from simple point and shoots, micro 4/3s, fuji X systems, Canon’s, Leica’s, Nikons and many many others including lots of film systems including (and still in use) a very nice 4×5. NONE of the digitals will give an accurate film simulation, period. Don’t look to  them for that or simply stay with film.

Go out and try different cameras yourself. When with friends try a memory card in their camera. Take the images home and work them over on the computer. Make your own decision and move forward.

My own decision path was simple…

  1. I dumped ALL of my canon system including top pro line bodies and $30,000 in L glass due to medical problems where I lost 80% use of both arms and hands. The DSLR’s are simply too heavy for me to use now!  What was I to do?
  2. I experimented with ALL of the various Micro 4/3 systems. Kept a GH2 as an Infrared system and the OMD as a high speed replacement for my Canon 1DSMK3 and lenses in order to chase birds and other wildlife.
  3. I tried and decided against the Leica system because of lack of longer lenses and lens expense. I could easily spend another $30,000 on the needed lenses and still not have the range I desired.
  4. I Tried the Fuji X100, Cool, nice small camera with great images, but no interchangeable lenses, bummer
  5. I found out that Fuji came out with the X Pro 1, rushed out and got one with EVERY Fuji lens plus 3 Voightlander M mount lenses for the Leica. Fell in love with the camera/lenses and the images generated. But it had no electronic shutter release so it would not work with my lightning trigger and water drop system. Bummer
  6. I found out that Fuji introduced the X-E1 with this functionality built in. Purchased it and have been happy ever since. The Fuji E-X1 is an amazing system for landscapes, long exposures (REALLY GOOD), water drops and lightning photography. Does it look like velvia when that is enabled? Not really, a little close BUT WHO CARES!!!! I can make it look like ANY FILM TYPE in post processing! It creates amazing low noise images at high ISO’s but I rarely use high ISO’s. It is light, easy to use and has GREAT lenses. I love the Leica and Voightlander lenses when used with the Fuji M to X adapter with its corrections built in!

You can read about ALL of these things here on the blog. You can ask questions on the various forums on the net but they are generally filled with camera lover/haters/bashers rather than people who are trying to learn and improve with their equipment (even though they are there but due to the noise of the others are just un-heard!).

Good luck in your search. Please keep in touch and let me know how it goes as you progress!

OK, you get one Fuji X System  image!

Stormy Seas at the dock.  Voigtlander Heliar Ultra Wide-Angle 12mm f/5.6 Lens. Notice the focus from about 3 inches to infinity.

Stormy Seas at the dock. Voigtlander Heliar Ultra Wide-Angle 12mm f/5.6 Lens. Notice the focus from about 3 inches to infinity.

Twilights Bitter End…


No Words, just images…


The Bigger End, Olympus OMD.

The Bigger End, Olympus OMD.


The 2-fer, The pier & groin, Pawleys Island Twilight

The 2-fer, The pier & groin, Pawleys Island Twilight

The 2-fer, The pier & groin, Pawleys Island Twilight

The B&W 2-fer, The pier & groin, Pawleys Island Twilight


Further X-E1 Long Exposure Work


Fuji X-E1 280 second exposure at f/8

Fuji X-E1 280 second exposure at f/8


Or, if your are thrown off the horse, climb back on!


I went out tonight at sunset to the Pawleys Island Pier to try some more very long exposures with the Fuji X-E1.  I used the new 18-55mm lens with a B+W 6 stop ND filter until it got really dark then I shifted to just the lens.

It was just perfect out tonight.  A few clouds in the sky, medium wind and very little blowing sand in the air.  I setup with an angle on the pier with the moon behind my back.  I got there early enough to setup and pre-focus.

I used my Sekonic L758DR light meter with 6 stops of exposure compensation dialed in for the ND filter and started shooting.  In failing light, the hand held spot meter makes exposures easy, fast and perfect!  I simply aimed the 1 degree spot at the gray/purple band of clouds right next to the horizon and took my meter reading from that. Then I moved it from Zone 5 to Zone 6 or 1 stop brighter.  The meter gave me 15 seconds of shutter speed and f/22 so I simply added 1 more stop by changing the shutter speed to 30 seconds!  Very easy and by using the Zone system when thinking about exposure it can fast become second nature.

Fuji X-E1 30 second exposure at f/22

Fuji X-E1 30 second exposure at f/22

The first 10 min or so I was only able to get 30 second exposures but only at f/22.  I did have a 10 stop ND filter in the bag but I decided to just stay with the 6 stop. Even at 30 seconds, they were still quite pleasing!  I really like the Time mode on the X-E1 as it makes setup easy, but the Bulb mode is very well thought out. It gives a nice count up timer on the LCD screen and makes for perfect exposure!

Even checking the focus after it gets too dark to see is easy with the X-E1. Place the camera into manual focus mode place one of the pier lights into the middle of the focus square and push the jog dial straight in. This will cause the camera to magnify what is inside of the cameras focus box. You then go back and forth with the lens focus ring till you get the smallest sharpest light!  All done.

As it got darker I was forced to re meter the scene again and again. For this next shot the light had faded another entire stop and forced me to again double the shutter speed to compensate for the changing conditions and still allow me to capture the clouds on the horizon at Zone 6!

60 second shutter speed at f/8

60 second shutter speed at f/8


Things start to get very complicated and fast as the sun falls below the horizon.  The next image was metered at 140 seconds but during that exposure, the light dropped another 2 stops!  so I split the difference and increased the exposure by keeping the shutter open another stop or 280 seconds.  this worked quite well and gave a very pleasing exposure!  Please keep in mind that this image was taken after the sun was totally gone and it was quite dark out but with enough light left to give a good exposure of the clouds and pier. You can tell that this image was taken in very low light because the pier lamp reflections are prominent in the picture.  Here is that image:

280 second exposure, f/8

280 second exposure, f/8

Remember, for every minute of exposure the camera requires a minute of noise reduction. So for the above exposure the total time of forced waiting was 560 seconds!  So for this last image a lot of time passed while I waited and it was TOTALLY dark out now.  The moon gave very little light but the lights on the pier worked very well and put some interesting colors on the waters surface!

Ok for this last image there is ZERO light left in the sky.  The stars are very bright and fill the sky with a wonderful pattern.  But, the pier lights are so bright that they pollute the image and wash out the sky blocking the stars in the image.  Another complication is that it is just too dark out now to need the ND filter.  So I removed it and adjusted the meter so that the compensation is now set to zero.  The reading suggested was 425 seconds at f/8.  Why f/8?  Well I desired the sharpest image possible so I locked the meter to that.  I still needed to move the lower sky 1 stop brighter, you know from Zone 5 to Zone 6.  This made it necessary to move the shutter speed from 425 seconds to 850 seconds (14 minutes) and now I am ready to shoot.  So lets look at this last shot, 850 seconds of exposure then 850 seconds of in camera noise reduction.  So I have to wait for 28 minutes from the start of the exposure until the image popped up on the LCD panel!

Here is the final image of the evening, a 14 minute exposure at f/8.  Yes the pier light reflections close to the pier/water intersection is a little harsh but still, this demonstrates exactly what you can achieve by thing long exposure, but more importantly, it shows what the Fuji X-E1 is capable of capturing with a little bit of creative thinking!

850 second (14 min) exposure at f/8

850 second (14 min) exposure at f/8

Did you find any of this post helpful?  Please let me know!

Dang, “DID I REALLY DO THAT? REALLY!!!”


Sometimes you get the bear, sometimes the bear gets you…

Long day today at the gallery.  The electrician was in all day installing 22 new high intensity lights with floods to better light the co-op walls.  But the place has a lot of dry wall dust around and a simple sweeping will not be enough.

I needed to get away…

Skittles & me.

Skittles & me.

So at 5 I went home and took the doggy out.  She was happy to see me to say the least.  I really do not pay enough attention to her.   But after a half hour there with her I grabbed:

  • Fuji X-Pro 1 camera
  • Fuji 18-55mm lens
  • 3 stop ND
  • 6 stop ND
  • 10 stop ND
  • Sekonic L758DR spot meter
  • Remote shutter release

Please notice that I did not grab my camera bag…

So off we go to the island.  I did the Pawleys Island Pier the other night so I headed to the south end and the groin there to shoot some long exposures.

It was nice out, warm and empty of people.  Perfect.  Got out the Sekonic, dialed in 6 stops of EV to correct for the B+W 6 stop ND, set the meter to ISO 200 and started taking reading off the sky just above the watery horizon.  Got several changing values but it was fast getting dark.  The first few image captures went very well and I was starting to warm up to the evening on the beach.

Feel guilty being out here tonight, Ellen (my wonderful wife) loves the beach and has been deprived of this for the entire year and to add insult to injury she is working all night at the local hospital.  I suppose that i will just have to enjoy this for her.

Pawleys Island south groin.  30 seconds @ 30 seconds.  Fuji X-Pro 1 with the 15-55mm lens.

Pawleys Island south groin. 30 seconds @ 30 seconds. Fuji X-Pro 1 with the 15-55mm lens.

I got some very nice 30 second shots at f/11 but I was aching for something more meaningful, you know around 20 minutes!  So it is time to change things around and go after the really long exposure.  I get out the meter again, set it and the camera to f/8 for the best sharpness, check the shutter speed… hmm f/8 @ 8 minutes but this is a metered spot on the horizon and I simply do not want it in Zone 5, so I add in 2 more stops to move it into Zone 7, set the camera and shoot!

Time goes by…

Still going by…

Slowly…

10 minutes have gone by… Why didn’t I bring a flash light?  It is so dark that I can hardly see!  Gee Mark YOU KNOW BETTER THAT THAT!  So I give myself a smack on the head, then shake it in minor annoyance of myself and … HEY WHAT THE HECK!! MY FEET ARE WET!!  THE TRIPOD IS SINKING INTO THE SAND!  DANG!  DARN CRAP!!

Stop the exposure at 11 minutes and move the tripod up the beach to dry sand  and wait….

Still waiting…

Dang, the in camera long exposure noise reduction takes sooooo looooonnnnggg… Didn’t I tell you that what ever you long exposure is the camera takes the same time after it to do a noise reduction???

I QUIT!  I carry the tripod/camera to the truck  with it still doing the noise reduction when it happens… you know, the REALLY BAD THING!

The camera quit the noise processing and the image pops up into the LCD panel  and it is….

WHITE!   WHAT HAPPENED?  

I got wet for white? I stood here for 22 minutes for white?

THE EXPOSURE WAS PERFECTLY METERED AND ENTERED INTO THE CAMERA! THIS CANNOT BE MY FAULT…

Ohhh…

I am SO STUPID!  Look at that, the ISO has been set to 1600 instead of 200.  How did that happen?  I only shoot at high ISO’s when I am with the grandkids at Disney World! Now I recently got back from Disney and I took this camera and haven’t  used it since then…. No, that can not be it, the first 30 second images came out properly as metered…

Hmm, lets see, ISO 200 to 1600, and the image had already been shifted from Zone 5 to Zone 7!

DANG AGAIN!  That is an additional 3 stops of brightness..  ZONE 10!

!*:$@!)&$ DANG, (*!#&(^!(@&) DARN )(*&$&#@)$&

Ok, I am calm now, it didn’t cost any film, wet feet can dry and I can go out and shoot it again on another night.  ZONE 10!!!  No wonder the image was white! !#)*(#*@&(E*Q&R

22 minutes W A S T E D and no ultra long exposure.

_____________________________________________

OK, what did I/WE learn here?

  1. BRING A FLASHLIGHT!
  2. Be aware of the changing tide!
  3. If you are going to take super long exposures DOUBLE CHECK YOUR EXPOSURE VALUES and do NOT forget to check the ISO!  I think someone walked up to the camera in the dark and changed it on me while my back was turned!
  4. Bring a change in socks!

See, we all make mistakes, even photographers with 48 years of experience!

Got it?  I hope so, because I would be so embarrassed to hear that you made so many beginner  mistakes,  After all we do have appearances to keep up!

Smile, life goes on… and we occasionally get lucky.  In the parking lot packing up to leave I see this across the tidal creek…

Moon over the Marsh.. 4 second exposure

Moon over the Marsh.. 4 second exposure

So the bear won this time but there is always tomorrow night…

Update:

I have had a lot of questions about this creek image.  Mostly folks want to know how I got a dark blue sky in the deep night!  And it was totally black out when I took this image.  There was supposed to be NO moon this night.  But for some strange reason there was the smallest sliver of it showing under its bottom.  I mean so small that it was almost cut with a knife!  The clouds below the moon were barely there because for what ever the reason the moon was getting a little light it reflected down and highlighted the clouds.  Above the moon the sky took on the deep blue cast (again due the to the strange lighting on the moon).  This only lasted about 5 minutes then the moon disappeared totally, the sky turned black and the clouds lost their light and faded from view.

The exposure data:

  • ISO 200 (yes I double checked this time)
  • 4 second shutter
  • f/4

A DETAILED look at X Pro 1 long exposures….


The Fuji X Pro 1 camera system is VERY WELL suited to this style of photography!

Outer Banks FIshing Pier Sunrise, Fuji X Pro 1 + 10 stop ND filter

Avalon Pier Sunrise, 30 second exposure

I just got back from leading an advanced photo workshop & excursion to the outer banks on Nags Head Island in the Outer Banks!  The subject was HDR and Long Exposure Photography.  It was an amazing workshop filled with great students and we visited amazing locations.  What was so special about this was the sunrise locations at the Avalon Pier (which was broken into 3 parts) and the Outer Banks Fishing Pier.  The wave conditions were a little high due the the North Easter having just passed and made for tough long exposures due the the required shutter speeds!

As you can see with the image on the left, the waters surface was still a little bit misty even with a 30 second exposure.  The light was simply too bright and the waves too large to get a slower shutter speed.  Still, the image is pleasing and as you can see from the blue sky it is just after the sunrise was finished.

Ok, some discussion on equipment is in order here.

  • A sturdy tripod is a must.  It must be able to hold the camera steady even if the water washes over the tripod legs.  I use a large Gitzo Carbon Fiber Tripod with the Really Right Stuff large ball head on top.  The X Pro 1 has the Really Right Stuff L bracket installed.  This system works very well.
  • A remote shutter release is also a must.  The X Pro 1 can only use a mechanical one so I have two in my bag, a 14 inch and a 40 inch.  Both have a BULB lock which enables you to lock the shutter open.
  • A 10 stop and 6 stop ND filter.  I like the B+W versions due to their German Schott Glass construction.  BUT, be aware, the X Pro 1 (in fact most camera systems) cannot meter through the 10 stop ND filter.  If you have a hand held spot meter you can get accurate exposures even with the ND filter!
  • A lens hood is an absolute must for long exposures.  This will keep light from striking the objective element of your lens and reducing contrast and causing lens flare.
  • Know where the sun is going to rise!  There are several great apps for smart phones out there that will tell you this right on the spot!

For rough seas, the longer you can get the exposure the smoother the water will become.  The X Pro 1 will allow up to a 30 second exposure in the T mode. You simply use the arrow keys to change the exposure up or down, but 30 seconds is the max.  For longer, you must use the BULB mode.  The Fuji has a very well designed  BULB mode!  When you trip the shutter, a counter will start on the back LCD screen counting up!  This makes for very easy timing control.  Here then is an example of a 90 second exposure in both Black & White and color.

Outer Banks FIshing Pier Sunrise, 90 second exposure with the 35mm lens. Exposure: 90 seconds, f/16, ISO 200, 10 stop ND filter.

Outer Banks FIshing Pier Sunrise, 90 second exposure with the 35mm lens. Exposure: 90 seconds, f/16, ISO 200, 10 stop ND filter.

Voigtlander Heliar 75mm f/1.8 Lens

Not all long exposures require such a long shutter speed.  For some a shorter speed can generate a nice image as well.  Here are two for your consideration.  The first is simply a daylight shot of a creek mouth into the bay but with the exposure slow enough to smooth out the water and show a little pattern there! This was a 15 second exposure using the incredible Voigtlander Heliar 75mm f/1.8 Lens with the Fuji M mount adapter shot at f/16 and ISO 200.

Mid Day Creek Mouth, CV 75mm f/1.8 lens.

You can see patterns in the water just at the point on the right side.

The second image is of the Roanoke Marshes Lighthouse at sunrise. This was a .3 second exposure at f/3.2.  This image was a bit challenging as I wanted detail in the front of the lighthouse.  I used a Sekonic 758 DR hand held spot meter to measure the building and set the exposure accordingly. This is a very easy to use metering system and will NEVER fail you in use.  Sometimes you simply cannot use the cameras metering system to get the proper exposure.  This is always a factor when you are using ND filter attached to the lens!

For this shot I used the Fuji 35mm lens with a lens hood attached to keep incident light from striking the objective element at an angle.

X-Pro1-Roanoke Marshes Lighthouse Sunrise

Here are a few more sample images for you to think about.  I hope that you enjoy them!

Avalon Pier Sunrise

Outer Banks Fishing Pier Sunrise, 60 second exposure

Sunrise

60 second exposure, Outer Banks FIshing Pier Sunrise

So, take heart, get a ND filter and go out and try some long exposures at sunrise or sunset. If you do not have access to the ocean then use the exposures to slow the motion of the Clouds!  There are all sorts of possibilities out there for you to experiment with!

A Treatise on High Speed Water Drops with the Fuji X Pro 1 & Voigtlander 75mm f/1.8


How To: Extreme Macro High Speed Photography and the Fuji X Pro 1

The Perfect Bell

Macro photography is hard work.  There are so many technical issues to overcome that you have to be a very patient person with the correct camera equipment.  Now, add in the complexity of HIGH SPEED WATER DROP COLLISIONS to the mix and you are faced with one of the more complex camera and photographic setups and skills necessary to capture great images.  Most people think that water drop photography is purely luck or done with high speed computer controls.  While this statement is partially true, you still have to overcome the normal issues associated with macro photography in the 1:1 image ration realm.  By this I mean that a penny photographed  is the same size as if laid on the camera sensor, hence 1:1!

Bombs Away, Red upper water source, Blue lower!

Macro issues are tough:

  • VERY NARROW Depth Of Field (DOF), with the drop collisions being wider than what the camera can keep sharp.
  • Getting enough light on the subject to artistically present it with depth.
  • Getting the camera lens to focus at 1:1 with enough distance from the drops to keep water from splashing onto the front of the lens.

Now, add in the issues with water drops:

  • The inability of the shutter to stop the motion of the water movement.
  • Setting up several flash units in manual mode for stop action work around 1/120000 second.
  • Controlling the water drops for number and size, interval.
  • Keeping the water drops round and on target.
  • Controlling the flash firing delay to .001 second starting at about .150 second out to .500 second.
  • Setting up the camera shutter speed to allow all of this high speed stuff to happen (which actually requires a long exposure!)
  • Getting all of this without breaking the bank!

There are dozens of articles on the WEB about doing this in your sink with a baggy full of water and a pin hole in the bottom.  This can indeed be a fun experiment, but one that is doomed to failure.  Anyone who actually thinks they might enjoy this ALWAYS move up to some sort of computer controlled water drop machine. A unit that will:

  • Number of Drops
  • Size of Drops
  • Interval between Drops
  • Camera Trigger
  • Flash Trigger
  • Upper Water Tank
  • Computer controlled valve

Now the Camera equipment list:

  • ANY camera with interchangeable lenses.
  • Macro Lens at 1:1 (or the ability to modify an existing lens with extension tubes and/or close up diopter filters)
  • Remote shutter release.
  • 1 to 3 external flash units capable of being set in Manual at 1/64 power with stands.
  • PC flash wiring cables and a 1 to 3 wiring adapter (this is the inexpensive stuff)
  • Colored gels.
  • Difusers, Reflectors, and Colored Glass Sheets.
  • Small STABLE table tripod.
  • Food Coloring
  • Glycerin
  • Dish Soap

The Time Machine

I LOVE water drop photography so I choose a timing controller and a water drop controller from The Time Machine.  It is a small system of 2 small electronic boxes that run on 9v batteries (still on the original battery after a year). There are about 3 companies out there that sell these control systems, but to me, this one was the easiest and lowest in cost. The learning curve is short, but still, you will be required to do your homework and READ THE MANUAL (RTFM).  They even pack a bag of M&M candy in with it and tell you to go sit down, snack and read!

The Complete Setup, Uncluttered

The Drip Kit from the same company provides you with the 2nd box and upper water tank/valve/holder that talks to the Time machine through 1 simple cable.  It is easy to setup and understand! This is what it looks like from the dealer (right). Believe me when I tell you that this is the device that makes high speed water drop photography possible!  The entire kit cost me about $350 and was worth every penny.

My VERY cluttered setup!

OK, now then, here is an image of MY actual setup.  Notice that there is nothing uncluttered about it!  The thing is messy, disorganized and tons of fun!  You could even call it addictive!

TIP: I have also shown in the above image a large BOLT that I place in the lower tray of water, allow the drops to fall on it and use the threads as my focus points!

Did you notice that I am using 2 different colors of water?  Red on top and blue in the bottom tray?  This allows the colors to mix in the resulting collisions and give some very interesting color mixes as shown in the next photograph. For this image I used 2 flashes off to the left and right low on the water.  One was normal white and the one one the right had a red gel attached to further bring out the red colors.  Then I placed a blue & white mottled glass plate beyond the lower pan with the 3rd light positioned behind it with a white piece of paper between the flash and the glass plate! Look at the colors in the water foreground, the collision and the backdrop.  It all comes together!

TIP:  Add a squirt of Glycerin and a SINGLE DROP if liquid JOY soap to the upper water container.  This will give good mushroom caps with attatched drops moving away.  You will also want to add Glycerin to the lower water container along with your food coloring.

Red & Blue water mixing in a collision!

TIP: For the bottom tray, use a NON SHINY BLACK pan.  This will keep the flashes from reflecting back into the lens and not cause the pans colors, writing, or texture to influence the image.

Some people use MILK in the upper water container for some very good and interesting results!  The KEYWORD here is experimentation!

Some Thoughts on Camera Equipment!

Traditionally, I have always used Canon equipment for my water drop photography, but have totally switched now to my Fuji X Pro 1 camera system.  It is smaller, lighter and gives much better images.  I wanted to use my Fuji 60mm F/2 macro lens for this but it had several issues:

  • It was too close to the water drops and was getting covered in water/food color/glycerin.
  • It was subject to a central hot spot (bad one) when using flashes on water!  Nothing I did seemed to fix this issue!

CV 75mm f/1.8

So I got out my Voigtlander 75mm f/1.8 M mount lens, 2 Leica 10mm extension tubes and a Canon 500D +2 Diopter filter and have been using is successfully for quite a while now! I am using the Fuji M to X mount adapter as well.  This is a sharp lens with an easy, smooth focusing.

Leica 10 mm M to M extension tube

Finding extension tubes was a little difficult for the Leica M mount lenses.  Finally, I did find 3 OUFRO / 16469Y extension Rings at Igor’s Camera Exchange as well as on Ebay.  But the Ebay versions were easily 2 to 3 times the cost!  These tubes are very well made and even though they are bright silver on the outside, they are mat black  on the inside where it counts.  They are tight and have ZERO camera/lens play!

Now, why use the X Pro 1 with its mechanical shutter release when I could use a Olympus OMD with its electronic one?  Asking this question is really asking:  Why not allow the TIme Machine to trigger the camera’s shutter?  Well, for water drop photography, having the controller trigger the shutter release is not necessary.  The normal shutter speed is typically around .5s and since we are shooting in the dark, it is no big deal to set a 1 second exposure and have no impact o the image.  What you do:

  • Fire the camera shutter.
  • Fire the Time Machine.

Really Right Stuff Table Top

The rest is simply history!  But the plain truth of it all is that it simply works!  I LOVE the X Pro 1 and lens combination.  The camera gives STUNNING images and it is small and light!  What more do you need?  Being light, it enables me to use a small table tripod from Really Right Stuff that is a joy to use.  Complete with a great ball head, the camera is steady and does not move at all.

Ok it is time to talk about the Time Machine!

This controller allows you to control all aspects of the Drip Module through simple push buttons.  It is easy to use and requires minimal button pushes to achieve your desired effect!

  1. Mode.  The controller has about 15 modes for different types of photography.  For this post, we are interested in Drops.
  2. Number of Drops.  A count of how many drops to make when you press its fire button.
  3. Drop Size.  A timer (in .001 seconds) that controls how long the valve is open thus how large the drop is.  You have to be careful with this one because larger drops will move around as they fall and strike off center or out of round!
  4. Drop Interval.  A timer (in .001 seconds) that delays the time between the drops.
  5. Flash Delay. A timer (in .001 seconds) that delays the flash firing from the first drop.  Normally set to between .115 and .300.  By changing this timer you can directly control the state of the collision!
  6. Advance.  An incremental  timer counter that will adjust the Flash Delay (in .0001 seconds) from the previous shot.  This control will allow you to take a sequence of shots with an incremental Flash Delay and give the ability to see a stop motion display of the collision sequence! (see the end gallery of this post for a 20 shot sequence)

Here is an image of an imminent drop collision.  I got this by adjusting the Flash Delay timer down to the point that the first drop had hit the bottom water and bounced back up and the 2nd drop was falling to the point of almost reaching the rising column of water when the flashes fired!  The red was obtained by using a red glass background and firing a flash through it towards the drops from behind!

About to happen…

Again please note the mixture of blue and red in the water as provided by food coloring as well as gels on the flash units!

Yes, I realize that this has been a long post.  I am going to end it here with a gallery of 20 stop motion images where I set up the Time machine as follows.  I hope that you both enjoyed and learned something about water drop photography here!  When I setup to do this it is always in my gallery and I always post about it on Facebook as to invite other photographers to bring their cameras over and give it a try!  Follow me on Face book at https://www.facebook.com/mark.hilliard.33 to get notified of these photographic opportunities!

Now, On to the sequence shots!

This is a sequence shoot.  The Time Machine was setup as follows:

  • 19″ Drop from valve to lower water surface.
  • 2 Drops
  • Drop Interval at .057
  • Drop Size at .040
  • Flash Delay at .260 for first shot
  • Advance at .0010 second.  This amount of time is added to the Flash Delay after each shot.

So, here then are a sequence of 20 images taken with the exact same setup of water drops showing the difference made by shifting the Flash Delay timer UP by .001 second between shots!

Please, let me know what you thought of this post!

Fuji X Pro 1 for High Speed Water drops Anyone?


Or how to succeed without really trying with a world class camera system!

Ohh, a pretty lead in tease image!

Today was gallery day for me.  I really wanted to go out and shoot but decided that I needed to sit and be open.  So… I dug out my high speed water drop kit and setup on my work table and decided that today I would test out my Fuji X Pro 1 and my Olympus OMD for water drops.  This then is the X Pro 1 post!

First, I can hear you asking, “How can you possibly use the X Pro 1 for water drops?”, well the answer is both frightening and simple at the same time!  I do several types of photography where the camera in use must have an electronic shutter release so that I can hook the camera up to a remote controller, like a Lightning Trigger or a Time Machine for water drops.  But water drops really do not need to be triggered by the Time Machine since the exposure is about a second long to enable the machine to trigger the timed water drops generated for the collision, the size of the drops, the distance between them, the shutter release and lastly the strobes!  This is all done in the following order:

  1. User pushes fire button.
  2. Camera opens the shutter for around 1 second.
  3. Time machine drops the first drop at XXX size.
  4. Time machine Drops the second drop at XXX size.
  5. Time Machine waits a programmed delay.
  6. Time Machine fires two external Canon 580 EX2 strobes set at 1/64 power.

Thats it!  So, while sitting there taking about 600 OMD images of water drops and cursing the fact that the only macro lens I currently have is the 12mm to 50mm macro, I asked myself: “Hey Mark! Why dont you get out the X Pro 1 and put on the 60mm macro and set it up for water drops and simply push your mechanical shutter release at the same time you push the Time Machines fire button?”.  WOW, I was amazed by the simplicity of this thought and immediately got out the X and setup!  The rest is history!

Fuji X Pro 1 with the 35mm w/Canon 500D. Egg cup with green water and the time machine dripper with red water. Black backdrop.

Boat Drinks! Fuji X Pro 1 with the 35mm w/Canon 500D. Egg cup with green water and the time machine dripper with red water. Black backdrop.

Fuji X Pro 1 with the with 35mm w/Canon 500D. Egg cup with green water and the time machine dripper with red water. Black backdrop.

“Lizardo” Fuji X Pro 1 with the Fuji 60mm macro lens attached.

Now, I do have to tell you that I encountered a MAJOR issue with the Fuji 60mm Macro.  Since this technique uses multiple flashes to light and freeze the water drops, I discovered that the lens is VERY PRONE to LENS FLAIR!  ANY light that makes it into the objective from ANY angle reguardless of the placement of the flashes, even room lights will cause a flair in the direct center of the image EACH AND EVERY TIME!  This was VERY FRUSTRATING and took about an hour to overcome with CAREFUL flash placement, darkening of the room and shading the back of the camera to keep stray light from even coming into the gallery windows in the front!  I have to tell you that this was a major pain in the butt!  I can see another lens in my future to shoot macro with.  I even tried my CV 75mm f/1.8 but couldnt get close enough to the water drop to get a full frame image with a Canon 500d attached. So as you can see, the first 3 images were taken with the Fuji 35mm with a Canon 500D +2 diopter filter attached.  Even so this is as close as I could get.  The last image is with the 60mm macro.

Any suggestions for other macro lenses out there??

PLEASE??

Please let me know what you think!  The lens aside, you can see that the camera worked great for the images and I will be using it for this again provided that I find a more macro/flash friendly lens!

OK, so many emails!  Here is info on the time machine!

http://www.bmumford.com/photo/waterdrops/index.html

Fuji X Pro 1 and the Soligor MC C/D 70-300mm f/3.8 FD Lens


The Need to Reach Out and Touch Something!

These three old shrimp boats were in the boat graveyard in Georgetown, SC. The trouble is that they are just too far away to capture with any of the Fuji Lenses.  I have several other 3rd party lenses like the CV 12mm and 75mm f/1.8 but even the latter is just not long enough.  A friend dropped by my gallery last month and gave me a bunch of old Canon FD/FX lenses and one of them was the Soligor MC C/D 70-300mm f/3.8 FD Lens.  This is a big lens, about 10 inches long closed and 13 inches  zoomed out to 300mm.  It is a push pull design and surprisingly, clean of dust for a lens so old!  It is an amazingly smooth and sharp lens and a real pleasure to use.

One of the problems with the Fuji is that there are currently no long lenses out there.  Normally, this doesn’t bother me too much but once in a while I need the reach!  I am always keeping my eyes open for longer lenses hence the CV 75mm f/1.8 and the Soligor 70-300.  I also have a Canon 70-200 on the way from Roberts Camera which cost me $49.00.

I had to spend the day in Georgetown today so I decided to bring this lens along and give it a try!  This lens was designed to be the Canon L glass killer back in the day of FD/FX lenses. It is amazingly sharp. Now that the  X Pro 1 2.0 firmware is here manual focusing is EASY and SHARP!  When in focus the details just jump out at you.  I had a FD/FX to Fuji adapter on hand and after fussing with it and discovering that you had to adjust the position of the aperture lever inside the lens then mount the adapter I was in business!

As I said, focus is amazingly easy.  The glass is sharp and the combo works very good.  If you can find this lens out there in net land grab it, but I have NEVER seen one and searching online does not even turn them up!

The Three Shrimpers, Fuji X Pro 1 and Soligor 70-300, F/11, 1/2500, 400 ISO


Here is the color version:

The Three Shrimpers, Fuji X Pro 1 and Soligor 70-300, F/11, 1/2500, 400 ISO


I also wished to do some detail images for an upcoming magazine article so I took this camera/lens combination over to Stormy Seas and looked for boots and/or Gloves in the rigging!  Here is what I found:

The Work Gloves… Fuji X Pro 1, Soligor 70-300mm at 200mm, f/8, 1/1000s, 400 ISO


I was quite pleased with this combination.  As stated, the lens is quite large, but that is OK as I will not use it that often.  The new/old Canon 70-200 is only about half the size and hopefully it will work quite well also!

The Olympus OMD E-M5 and Long Exposure Water Images…


Wonder of Wonders…  Emotionally Charged Slow Water Images with the E-M5!

Etymology of the word ‘photography’:


From the Greek words phos (“light”), and graphis (“stylus”, “paintbrush”) or graphí, together meaning “drawing or painting with light” – allwords.com

Painting with light… Really this is just the perfect description of what I do with my photography!  I rarely take snap shots.  I will walk up to a subject and study it, allow it to wash over me and evaluate its emotional impact upon my sense of self, then I will take my my camera and use it as the tool of creation and force it to capture the scene as I visualize it!

Such was the case during my last workshop where Jamie Davidson and I took a group of students deep into the New  River Gorge in West Virginal to photograph Grist Mills, Water Falls and Vistas.  Usually I used my Fuji X Pro 1 (my main creative tool) but at one location I was forced to use a longer lens in order to overcome intense, harsh mid day lighting on a small set of water falls.  So I choose to try my new Olympus OMD E-M5 camera system with the Panasonic 14-140mm f/4 – 5.8 lens and a 10 stop B+W ND filter (110) and of course on the tripod.

These waterfalls images were very difficult to capture in the fashion that I visualized them in my mind.  I was looking for dark, forbidding images of the water and dark rocks surrounding it with a little  highlight detail on either side on the rocks. I ended up spot metering on the water then placing its exposure into Zone 7 on the 10 zone scale (yes I DO use the Zone system for exposure as you should!  This will be the subject of a future post!).  After setting the proper exposure for the Zone 7 water and very dark rocks  I then used a 900 lumen tactical LED flashlight to light paint the rocks around the water to bring out some slight detail there.   The exposures were long, 3.5 seconds for one and 1/5 second for the larger falls. The longer exposures allowed me to repeatably repaint the rocks with the very, very bright tactical light.  Take a look at the results below and decide if the effort was worth it or not!

Water Falls, New River Gorge, 3.5 second exposure, f/22, 10 stop ND with high intensity light painting around the falls area.

As you can see in this first image, I have created an etherial image with slight edge detail which was generated by the small high power tactical flashlight.  The image worked much better in B&W so I did not really work at the color version of it at all.  My intention was to create a dark moody image that would wash over me emotionally…

Water Falls, New River Gorge, Color, .5 second exposure, f/22, 10 stop ND with high intensity light painting around the falls area.

This second image in color was my 2nd attempt on a different location at the same series of falls.  I really like this one in color.  The exposure time was much shorter due to an increased amount of ambient light falling on the water and I did not have enough time to paint both sides of the falls with the light.  Still, all in all the image is quite pleasing and the colors brought out during the long exposure are quite stunning.

Water Falls, New River Gorge, B&W, 3.5 second exposure, f/22, 10 stop ND with high intensity light painting around the falls area.

This last image I chose to process in B&W with a little darkening of the image corners to make it slightly more moody.  I think that I like the Color image a bit more than the B&W version.  What do you think?

All in all, I have to say that I am very impressed with the functionality of the OMD camera body.  It worked perfectly for these difficult images and allowed me to capture the images as I envisioned them in my mind and that is the best that one can hope for  when you are out in the world creating art…  I will also admit that if I had a longer lens for my Fuji X Pro 1 at the time that I would have used it instead, but at the time the Fuji 60mm macro was the longest I had.  I have since purchased the CV 75mm f/1.8 for the Fuji!

LED Tactical Light

Now, as to the tactical light, Surfire makes lights for the police and military but will sell to you directly or at Amazon or even in a local gun store.  They are used in 2 ways, mounted on the weapon or hand held and are used during a gunfight to see the target and half blind them.  They can be VERY powerful and VERY costly.  Being LED, they will not burn out.  All of them have multiple  output powers and the one I used here had 2, 20 lumens and 900 lumens.  You must be very careful with the high power mode as you can damage peoples eyes with it but being so bright, you can use it during a bright sunny day.  These lights use lithium batteries and they will last about 30 hours on low power and 2 hours on high power.  I keep this light in my camera kit at all times as you never know when you will need to add some detail light on a scene!

UPDATE: Fuji X Pro 1 and Advanced HDR Photography with NIK, Photomatix & Merge


WOW, the world sure changes fast if you close your eyes!

OK after one of my readers left a comment suggesting that the new version of Nik’s HDR EFX Pro 2 was likely supported in Lightroom I decided that I should perhaps do a little research!

Here is what I found:

Detailed compatibility specs for NIK HDR EFX PRO 2

So, as you see, as long as you are running a 64 bit OS plus very specific hardware in the graphics department it seems as if you can now run this fine HDR tool in Lightroom and Aperture!

Nice upgrade Nik!

Fuji X Pro 1 and Advanced HDR Photography with NIK, Photomatix & Merge


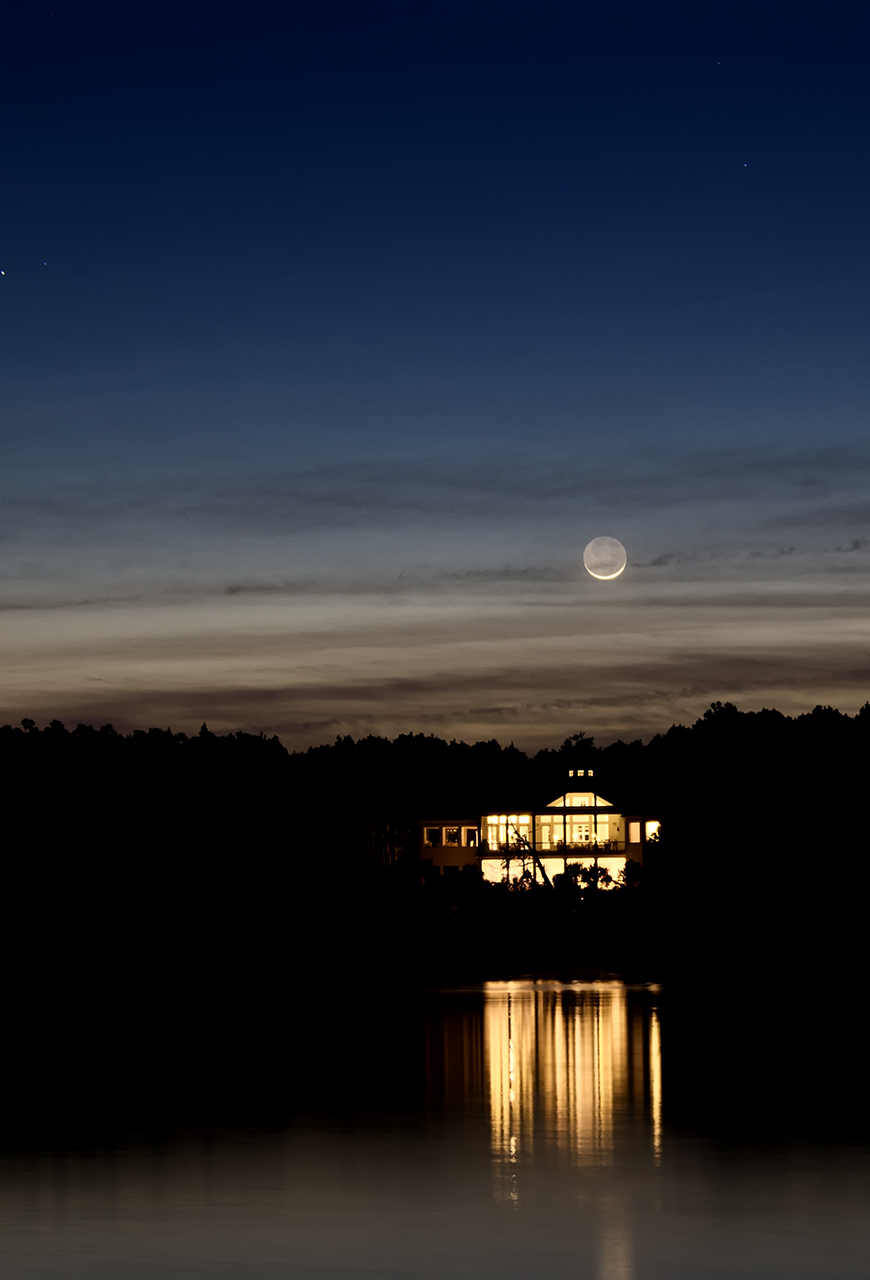
Or, Look Mom at  what I made!

A brief overview of the  4 major HDR tools…

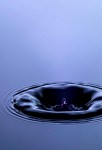
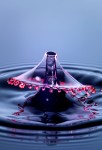
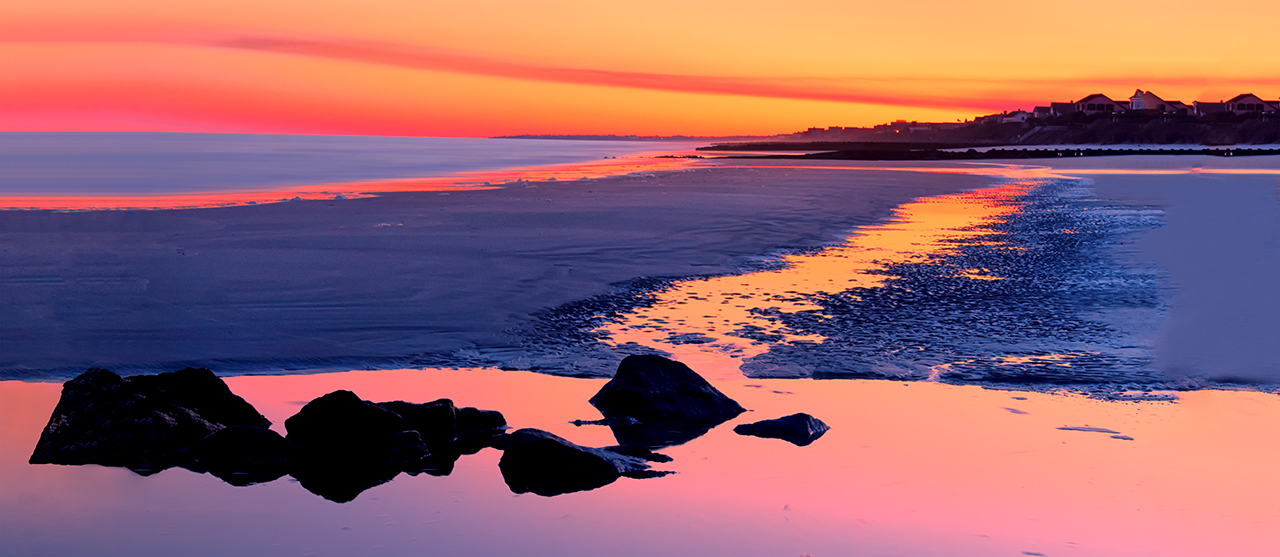
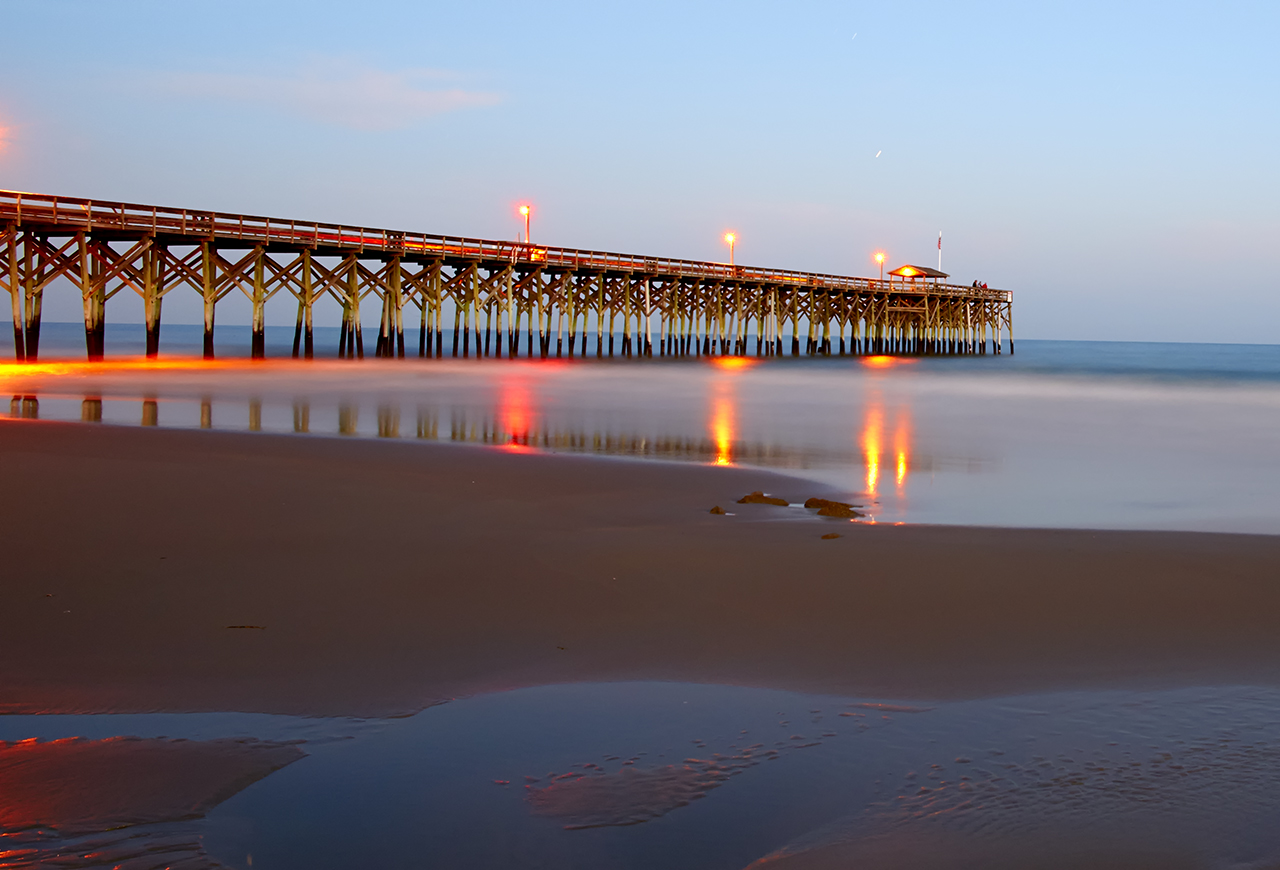
The Glade Creek Mill, Fuji X Pro 1 w/ 60mm lens, 10 stop ND and Nik HDR EFX Pro 2 with 3 source files

I just got back from a major workshop that Jamie Davidison and I led to the New River Gorge in West Virginia where to took our students on a hectic 4 day workshop/excursion.  We explored waterfalls, grist mills, trains and vistas while studying Infrared and Color post processing back in the classroom each night till about midnight.  This was EXHAUSTING to say the least but never the less, a great workshop full of great photographers who gave as much as they took!  My days started every morning at 5am and ended about 1am.  I am still recovering!

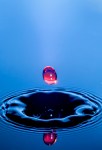
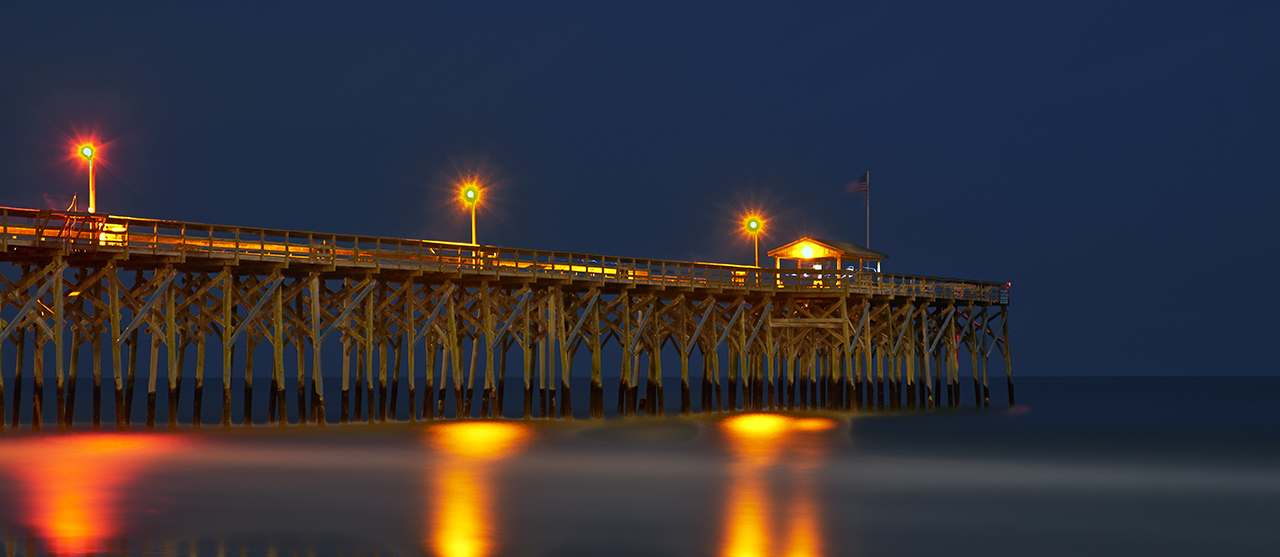
The Glade Creek Mill, Fuji X Pro 1 with the VC 12mm lens

While the main focus was shooting in Infrared and its associated post processing, I needed to provide loaner IR camera systems to those who did not yet own one, so even though I own three IR systems I was forced to shoot color!  The sky each day was free of clouds and very bright, so if I wished to photograph in color I was forced most of the time to shoot HDR images in order to overcome the dynamic range of the day!  A lot of the time I was able to successfully capture an image with The X Pro 1 in a single shot like the one shown here on the right of the Glade Creek Mill.  But the norm was indeed HDR. The X Pro 1 camera has an unfair advantage over most other camera systems, it has a wider dynamic range and can capture more image data!

Notice that the mill did have some running water which forced me to use very long exposures in the range of 10 to 5 seconds in order to slow the water down.  While there was not a lot of water flow there was enough to make the images very nice.  I used the 60mm lens on the camera along with a 10 stop ND filter in order to slow it down!

OK so let’s get to it!  From this point on, we are going to be working with the same three source files.  I will take you through the post processing for the following HDR tools:

  • Nik HDR EFX Pro
  • Nik HDR EFX Pro 2 (new)
  • Merge To HDR Pro (Photoshop CS6)
  • Fotomatix Pro 4.2.3

I also will be using Nik’s Color EFX Pro 4 and Viveza 2 for post processing (fine tuning) after the HDR conversions are finished!

Overview:

OK, what is HDR?  HDR stands for High Dynamic Range.  Think of it this way… You are out taking pictures during the brightest part of the day.  You can get a good image of the foreground subject, but the sky is totally blown out, you know pure white.  The total range of the light from black to white in your image exceeds what your camera is capable of recording, but our eyes can still see and understand the complete range.  So, in the world of photography, we have developed the ability to take several photographs, say three to six, each one with a different exposure from way too dark to really blown out.  With these pictures in hand you can now run one of several software programs available that will combine the best of each of these differently exposed image into one that can display the entire range of of the image from black to white!

Now this requires a image with more data than you can store in a 8 bit JPG image, and even more than your 16 bit RAW, TIFF or PSD image!  Now we move into the world of 32 bit images that can hold and display  a far greater range of black to white data.  Now, 32 bit images are all but useless to us in the real world so the HDR software will compress it down to 16 bits by removing select bits of brightness data without really negatively affecting the view of the image and making it possible to view and print the image!   Pretty neat technology don’t you think?

What I normally do when shooting HDR is to take a test image and evaluate the histogram.  I will look to see what areas are out range, or totally black or totally white.  Usually, the blacks will be fine but the whites will be blown out.  I will then retake the same image with a negative EV dialed in and re evaluate the image again looking to see if the blown out white areas of the image are now in the proper range.  This gives me an idea of just how wide the range of the image needs to be.  If the blown out areas take two or three stops of adjustment to bring them back into range then I will then  decide upon how many HDR images are needed to be taken to get the total range covered in 1/2 stop increments.  You will need to set your camera on a tripod and have it locked down to assure that you get the same exact composition in each shot.  You can either use the auto bracket mode on your camera to generate your shots or do it manually.   Weather or not you change the ISO or shutter speed is dependent upon the scene or your artistic intent.  Some cameras will bracket at most three shots, some 5 and some even 7 or more!  You can usually choose to bracket with Aperture, Shutter Speed or ISO.  It is important to keep the Aperture constant as to not change the depth of field.

For these shots, as long as I kept the shutter speed longer than 3 seconds I would not have any issues with keeping sharply defined slow moving water to generate the HDR.  So I chose a 3 stop bracket using the Shutter Speed, leaving the Aperture and ISO steady.

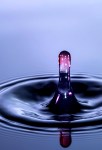
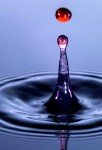
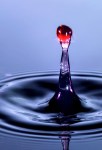
Here are the 3 component images that make up the final HDR image:

  • In the first, 3495, the trees and mill look good, the water is overexposed about a stop and has lost detail and the rocks are a little under exposed.
  • The second, 3496, the rocks are perfect but the water is very over exposed. There is some detail in the black area under the top of the falls.
  • The last, 3497, the water is perfect but everything else is just to dark.
  • The water was always the key to this shot, getting it so that it was not blown out is the reason to use HDR.  These three images generated by the camera without any processing other than raw conversion and bracketed .7 ev apart with -1.3 ev being one of them, -.6 ev and lastly –2 ev.  If you decide to try this, keep in mind that the closer together the exposures are, say 1/2ev the more data you will have to generate your final image.  You can also add more data with more images. Every HDR you setup and shoot will be different and you must evaluate how many shots to take at what exposure.
  • The very dark black under hang below the top of the waterfall was another consideration when deciding the exposure values of the component images.  I needed a brighter image to bring out some detail here as well.

3495, -1.3 ev, f/8 8 seconds, I chose this value to get the correct exposure on the trees

3495 Histogram, -1.3 EV

________________________________________________

3496, -.6 ev, f/8, 13 seconds. I chose this value to get the rocks and mill exposure correct knowing that the water would be blown out

3496, -.6 ev

________________________________________________

3497, -2 ev, f/8, 5 seconds,  I chose this exposure for the correct falling water exposure

3497, -2 EV

________________________________________________

These three images are the only ones that I will use to explore the various HDR processing software.

Final considerations on component images that make up the HDR image:

  • You MUST shoot on a tripod to control camera movement (prevent ghosting) and to lock the composition.
  • Use a remote shutter release.
  • Wind will cause plant and tree movement which will cause a ghosting effect (bad).
  • Keep the aperture constant to force the depth of field the same between shots.
  • ISO bracketing is ok as long as you keep the jumps in ISO below the level where noise is introduced by your camera.
  • Exposures closer together will allow you to generate better HDR’s as long as the subject matter doesn’t move.
  • More component images mean more data to  build a better HDR image.
  • Take notes in the field as you shoot so that you can remember what your intentions were at that point in time!  This will help you when you build the HDR.

Some notes on the software:

  • HDR conversions require image editing software that can process in 32 bits.  This means that unless you purchase HDR stand alone software like Photomatrix Pro you MUST use Photoshop CS5 or CS6. Elements and Lightroom simply will not work.
  • I do not like over cooked HDR images.  I process them to a natural look and feel, close to what I can see with my eyes!
  • CS5 & CS6 both include an internal HDR conversion filter called Merge to HDR Pro for free.
  • The NIK HDR software, HDR EFX Pro and HDR EFX Pro 2 require a 64 bit operating system and the appropriate 64 bit CS5 or 6
  • Photomatix Pro is a stand alone filter that does NOT run inside of Photoshop and will allow you to save a 16 bit HDR converted image that can be opened in Elements.
  • All of the conversion software will cost between $100 and $200.
  • I am not going to take you step by step through each of the HDR conversion packages.  This is HIGHLY SUBJECTIVE and no two photographers will get to the end results via the same path!  There a quite a few good books out there on this!

Photoshop CS6 Merge To HDR Pro

This HDR program comes built into Photoshop CS6.  It is quite powerful and gives you a lot of options.  I found it very easy to use and it gives very nice results.  You will find it under the FILE > Automate menu and it  will ask you to locate and open your component images or add images already open!

Once your images have been chosen, it will open them and drop you into a full screen dialog where you can make any image adjustments.  Once done the software will drop the finished image into Photoshop where you can then do your final tuning with Nik’s Color EFX Pro 4.  I like to use the Tonal Contrast filter due to the ability to adjust color contrast in the Highlights, Midtones and Shadows separately from each other.  This one tool will really bring out the full potential of your images.

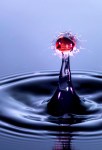
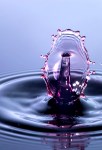
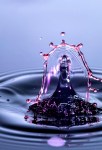
Here is my version of the three component images processed in Photoshop’s Merge To HDR Pro:

X-Pro1-3495 3496 3497 -Glade Creek Mill -2012 -M to HDR Pro

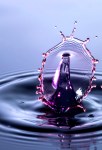
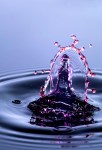
Here is my version of the three component images processed in Nik’s HDR EFX Pro:

OK, onto Nik Softwares HDR EFX Pro.  This is the first version that Nik offered earlier this spring (2012)  It has a great interface and does a pretty good job, but requires a little more fine tuning after the HDR conversion is finished.  The tuning process was again done using Color EFX Pro 4 and Viveza 2.  This is a plugin filter for the Photoshop family and requires that you run a 64 bit operating system in Windows or OSX.  It will NOT run on Elements and Lightroom.

I found that the images to be a little flat and lifeless until I applied the Color EFX Pro 4 in the after process tuning steps, then the images started looking pretty good.

X-Pro1-3495 3496 3497 -Glade Creek Mill -2012_NIK HDR EFX Pro

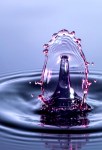
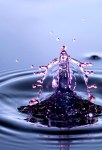
Here is my version of the three component images processed in Nik’s HDR EFX Pro 2:

OK, now, this is a MAJOR upgrade to Nik’s HDR software.  This one revision corrected all of my complaints about flat and lifeless images!  There is VERY LITTLE fine tuning needed at all.  I think that Nik’s HDR EFX Pro 2 is my favorite conversion tool out there.  But I will let the images speak for themselves!

X-Pro1-3495 3496 3497 -Glade Creek Mill-2012 NIK HDR Pro 2

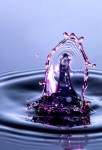
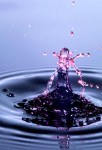
Here is my version of the three component images processed in Photomatix Pro ver : 4.2.3

Photomatix is likely the most popular HDR conversion package on the market.  It cost around $150 and does NOT require CS5 or CS6 to run.  It is a standalone system and when it finishes it will directly save a 16 bit version of your HDR image on your computer that you can then open for further editing.  It has many recipes and adjustments and you can do great work with it. I highly recommend it even if you are already running a 64 bit operating system and CS6. You will not be sorry!

X-Pro1-3495 3496 3497 -Glade Creek Mill -2012 -Photomatix Pro HDR

As you can see, the 4 converted HDR images are not at all the same.  That would be difficult if not impossible to achieve.  Each software package has its own adjustments and none of them are exact.  I like Nik’s HDR EFX Pro 2 and Photomatix 4.2.3 the best.  They are all easy to use and as long as you properly evaluate the scene that you are trying to photograph and properly choose the exposure values of the component images you will get really nice HDR shots!

What do you think?  Please let me know!