Controlling your Dynamic Range in B&W Film photography


Stormy Seas in a approaching storm!

Stormy Seas a the dock… 6×12 medium format Tmax 100 film

Dayi 6×12 showing the ground glass and shade and my custom dark cloth attached.

This Super Pano was taken on my Dayi 6×12 medium format view camera. Lens is a Rodenstock 90mm f/6.8 Super Grangdagon N and while it is a bit slow it is VERY sharp and quite beautiful!  This is a very different style of camera and will take 5 images per roll of 120 film. 


Dayi 6×12 Grand Glass Back

This is an amazing combination of a ground glass focus and calibrated distance focus system.


Dayi 6×12 with the Rodinstock 90mm f/8.6 installed showing the alternative, calibrated focusing system

Shrimp boats are one of several subjects that I will drive hundreds of miles away to photograph! I am very lucky to live so close to a lot of them locally! Because of the continuing loss of our shrimp fleets here I am both driven and inspired to document them every chance I have. You have to admit that they are very beautiful when done in B&W and what better way to document them if not film?

This was a very difficult shot to achieve! To get it I had to overcome the super bright sun coming over my shoulder highting the boat and buildings to the point that they were totally burned out. The storm in the background was dark and foreboding…
The lesson here is to learn and realize that you can control all aspects of your image’s exposure along with taming the dynamic range of the scene through use of thoughtful developing and scanning.
I used a Sekonic 758 to get these results by using  a combination of exposure averaging  with 6  one degree spot metered measurements, saving each reading in the meters memory then telling the meter to give me the zone 5 average which then became my base exposure.  The 758  then showed me the the exposure with a chart of any data over or under exposed thus out of the film’s dynamic range.
Knowing this, I then used a technique where you can either compress the the dynamic range of the image into a smaller space thus allowing the film to compensate for a wider dynamic range that it was designed for!  This is called +/-1N developing. You can change developing time down to compress the dynamic range of the image by squeezing the image down from the whites towards the blacks which compresses the highlights  into range!   The opposite is also true by going +N.   But for this image the -1N was enough.   I then then used another creative process during the wet mount film scanning by expanding the dynamic range to fit into the wider print profile by  +1 to the highlights in Viewscan to put them where I desired for a powerful and moody print.  There are a lot of books out there that will teach this technique, but my favorite is Creative Exposure Control by Les Meehan which will teach you the development side of the process.   The scanning side is easily done in Viewscan and there is a good book on that on Amazon. 
I will also expand upon this in future posts as well!

Rodenstock 90mm f/6.9 Grandagon N, while a slow lens it is super sharp and beautiful!

The wet mount scanning technique will be taught in a future post here along with a video on Youtube!  But to do it you will need an Epson 700, 750, 800 or 850 scanner as those are the only ones that the wet mount kit will fit!

 
Data: Dayi 6×12 – f32 .4s – Roll 4 F3- Avg Metering 6 measurements – Yellow Filter – Stormy Seas- Tmax 100 – Perceptol 1:1 at -1n  – 2018

As always please let me know what you think!

The Amazing (and affordable) Dayi 6×12 Medium Format System!


BIGGER is BETTER!


This is the Causeway to the Litchfield Inn in Pawleys Island.
100TMX processed in Xtol 1:1. Yellow filter, f/22 at 1 second metered on the white roof on the distant boat house where the water seems to end an placing that in zone 7 to 4 seconds then to 6 seconds for reciprocity..


Well… Yes, I have a NEW medium format camera system! Not new used, but NEW NEW!

It is the Dayi 6×12 and is custom made in China for each order.  It is very affordable, the camera, lens cone (adjusted for you lens ahead of time) film back, focus screen and shade, viewfinder and a Arco swiss mounting foot!  All in all this ran me around $1000 and took 2 months from payment to delivery.  There are several companies selling them but I chose ecbuyonline2008 on Ebay, contacted them and then dealt directly with them for a nice discount. They provided a direct email at ecbuyonline@foxmail.com.

Dayi 6×12 showing the ground glass and shade and my custom dark cloth attatched.

Ok, the camera itself is very well balanced and easy to use.  As with most types of cameras of this design it uses a lens cone cut specifically for the focal length of the lens used.  If you use a different length lens as a 2nd then you will need another cone designed for it as well.

Dayi 6×12 showing the film back and ground glass

The focus is controlled by a CALIBRATED helical mount that gives very fine control of the focus.  Because it is calibrated, you can just dial in the distance and forget the ground glass.  Me?  Not so much.  My eyes are not calibrated very good.  Now, a cheap laser rangefinder would be just the thing.  Fire it, dial in the distance and shoot!  I use the ground glass as my focus operation.  I have a custom made dark cloth that fits the glass frame and works very well.  I have a nice 8x loupe that I use to make up for my old eyes!


There are calibration screws around the outside edge of the lens cone and you can see the small hole for one at the end of the video above.  These allow you to set the infinity point and place the lens in the correct position.  You can find a tutorial HERE for this process.

Lenses that will work on this camera can be found HERE.

The camera is a bit heavy and not suited to handheld work, but it can be done.  It is a VERY well designed and built camera system and has ZERO light leaks.

When the camera first arrived, the film holder was scratching the surface of the film emulsion.

Here is the issue, a spring next to a roller that is too high in the film plane with rough edges! It is the bright silver line under the roller.  See how it is bent up in the center?  It actually touched the film.

The complete assembly

I took it apart and realized that a spring was adjusted too high on the film holder back and touching the film.  It was a simple adjustment to fix this but I still sent an email about it and a few days later this video arrived showing how they said to fix the issue which is exactly what I had found!

This goes to prove that they are responsive to customer complaints, problems or suggestions!  That is a big plus in my book!

The system is simply a joy to use.  It is bright in the corners (of course that is lens dependent) and the focus is spot on!  I have put about 10 rolls of film thru it so far including some Ektar 100 (which I have not processed yet but have the chemistry). Now that the scratching issue is fixed I see a great future for the camera in my kit.

The folks at the company in Hong Kong are easy to work with and very responsive  over email.   I highly recommend them.  They have MANY other cameras for sale also including a larger 6×17 version of this one.

Stormy Seas, Dayi 6×12, not the best composition but a good example of the quality from the camera!


I hope you enjoyed this short post on the new pano camera system.  There will be more following!

Finding Myself In The Old Ways…


It seems that I am addicted to film…

Miss Lue & A Hungry Egret

I still shoot with digital (A7RII) and love the look and capability of it, but FILM is what I go to every time I go out shooting… It is Terrible and exciting at the same time! It is so bad that I am looking for another freezer to store my excess film stock!

This is (again) Stormy Seas in Georgetown, SC

This is (again) Stormy Seas in Georgetown, SC (perhaps the most photographed boat in the Low Country). I have hundreds of images of it but I am pulled to photograph her in B&W film each and every time I am in Georgetown. There is something about her lines and textures that inspire me to document her life, and I have for years. Yes I will visit ANY shrimp boat (or grist mill for that matter) and each and every time I visit I see something different and unique… Yep addicted!

DATA:

The image was taken about 5 days ago on a 6×9 Fuji GW 690 II using medium format Fuji Acros 100 film and a red filter, developed in Perceptol 1:1 and Wet Mount scanned on a Epson 850 pro. The 6×9 format will give me 8 images per roll and I will usually scan 2 or 3 per roll, but I am very critical and selective because the wet scan process takes about 3/4 hour per scan!

The top image is near Stormy Seas in Georgetown, about 2 blocks away at another commercial dock and seafood house.  I have shot this a hundred times on both digital and film, but never have I captured such a pleasing image  as this.  It is to me a more enriching image full of mood, contrasts and tells a story.  I pleases me to no end the tell the story on an old FILM camera of an old boat and failing lifestyle just as the shrimp boat is in the background and the Egret in the foreground telling a different yet the same story!

There is also the consideration that is tied to the process of working in film.  It is slower and much more deliberate, a truer work of love in that you control every single step of the process…

  • Film choice (Kodak Tmax 100, Tmax 400, Fuji Acros 100 or Rollei IR400)
  • Camera and lens choice (Medium or Large Format)
  • Considering the composition and lines.  
  • Getting the exposure dead on (how many of you do that in digital?)
  • Adjusting for contrast and detail in shadows or highlights.
  • Film development and processing for highlights or shadows (another complete immersion of self discovery)
  • Drying (yep at lest 24 hours in a dust free drying cabinet)
  • Choosing the best image for exposure, sharpness, composition, contrasts, lines, dust & hair and so on..)
  • Wet scanning (at least a 1/2 to 3/4 hour project per shot)
  • Cleaning up on the computer by removing dust and hair and adding a bit of contrast)

All in all, the top image took about a week to complete from end to end!  I simply love the process, being immersed in it and becoming one in the creative process.   Yes it is slow but when I am done it is a total representation of MY PERSONAL VISION!

Film is making a HUGE come back in the world of photography!  So much so that you will be shocked when you visit Ebay and look at the prices of old film cameras and systems!   All of the major film makers in the world are increasing their production of films and even Kodak is bringing back discontinued film products!   New film companies like New55, Impossible Project, and FILM FERRANIA have opened up and are making emulsions!

Developing has never been easier, there are many mail order labs out there but you can process your own film in your kitchen with very little effort and investment!  You will need:

  • Dark Tent or changing bag to move your film to a daylight tank.
  • Daylight tank (I reccomend a Stainless Steel tank with steel developing reels by Hewes)
  • Distilled Water
  • Developer ( I recommend Perceptol by Ilford)
  • Stop Bath
  • Fixer
  • Wash
  • Water Rinse
  • Distilled water rinse with wetting agent
  • Clips to dry your film in your bathroom shower
  • A flat bed scanner like Epson 500, 600, 700, 800 or 850)

Total you are looking at about $120 for everything accept the scanner!   There are great videos on Youtube that will take you thru every step in the process!

Tybee Island Light, Kodak Tmax 100 FIlm on a Fuji GW 690 II camera.

The image above of the Tybee Island Lighthouse was taken last month on Kodak Tmax 100 rated at 50 ISO  on the 6×9 format medium format Fuji System.  It was hot and the area full of tourists, even up on the top of the lighthouse itself!  Still the act of creating this image was both fun and fulfilling and I walked away with exactly what I envisioned as I stood there looking at the scene!

I especially love shooting with Medium Format cameras.  They are easier to travel with and the negatives are large enough to give amazing prints.  I do have 3 4×5 large format cameras also that are great fun to you but as you can imagine, they are difficult to travel with.  Once in a great while I will shoot with a 35mm camera, usually smaller rangefinder that were sold in the 60’s and 70’s!

Medium Format:

  • Fuji GF 670 (this is my travel camera in 6×7 format with a 85mm lens that folds up into a thin light camera)
  • Fuji GW 690II (this is a 6×9 format camera with a 90mm lens and a bit larger and better built than the GF camera)
  • Fuji GW 690 III (a newer version of the 690II)

Large Format:

  • Shen Hao 4×5 Cherry Field Camera with 5 lenses and film adapters for also using 120 film.
  • Polaroid 900 converted to 4×5 with a 150mm Fujinon lens.  Think of 4×5 travel camera!
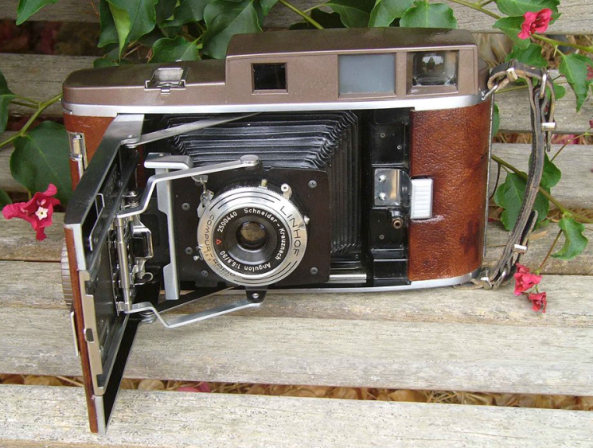
  • Polaroid 110B converted to 4×5 with a 90mm Schneider Angulon lens, again travel!

So, while film does indeed require much more effort over digital, the results simply cannot be compared.   These medium format negatives have a native resolution to create a 71×53 inch print without upsizing it at all!  The amount of detail is simply stunning and more importantly (at least t me) is the fact that the process become a Zen like activity in creation!

I hope that you enjoyed this post but more importantly to me at least that you considered my words on the creative process and taking complete control of it!


Become the Master of your craft….


Pelican Dock - Type 55 4x5 Film, Wet Scan

Pelican Dock – Type 55 4×5 Film, Wet Scan


This is the Pelican Dock on Pawleys Island, SC. It is a 4″ x 5″ FILM image taken  on Polaroid Type 55 film from one of my film workshops.

Polaroid 900 w/ 150mm Fujinon lens converted to 4x5 by Steven Icanberry.

Polaroid 900 w/ 150mm Fujinon lens converted to 4×5 by Steven Icanberry.

I did this with a Polaroid 900 converted to 4×5 format camera and the film was expired (16 years) Type 55 instant 4×5 film that also creates a fragile negative which was scanned Wet Mount on an Epson 850 . This single image costs about $35 to create and process!

But look closely at the image, notice the calm peace of the scene, the amazing clarity and sharpness that is a gift when working with large format film, but more importantly, the edge process markings created when working with this amazing film!

But of greater importance than how I created this image is the why

We all see amazing scenes as we travel through life, but how many of us actually take the time to really experience and feel on an emotional level what we are actually experiencing as we create our art? I watch so many great photographers skitter from scene to scene like a bee to pollen that it leaves me feeling sad.

Let me ask you, “How can you create art that will appeal to your viewers on an emotional level if you yourself refuse to slow down long enough to feel the emotional impact yourself as you create it?

The key here is to stand before the scene and take it all I. Get a feel for what you desire to share with your viewers before you even pick up your camera! SLOW DOWN, take your time, investigate it from many angles and exposures. Yes this is a single image, in fact the only one I took due to the cost, but I spent a half hour studying the scene, moving around looking for the best impact and knowing that I would get the edge markings and using them to increase overall impact!

This is a hard lesson to learn and harder still to practice. This is one of the the lessons forced upon us who still shoot film as I do. After all, Film = $. We have to slow down and make every shot count so the next logical step is to connect on an emotional level with your subject and thus create art that is charged with mood that will draw your viewer in.

Just because I use FILM as an example here for you do not think that it does not apply to digital!  Yes, once you pay back the investment of your digital equipment with image sales (you do sell your work don’t you?) the cost per image is basically paid only in terms of your time.   But time also has a value and if by slowing down and imparting emotional impact in your image then you will be on the true path of photographic nirvana!

Take your time, explore your scene, feel it’s emotional impact, SLOW Down!

Do not copy the Bee, rather strive to be a master of photography…

One Perfect Image…


Sometimes we just have to stand there taking it all in!

Hoodoos in Bryce National Park at the Sunset Point Overlook. Olympus XA with Kodak Tmax 100 film. This is MY defining image for my entire trip!

Hoodoos in Bryce National Park at the Sunset Point Overlook. Olympus XA with Kodak Tmax 100 film. This is MY defining image for my entire trip!

Ahh, have you ever had one of those defining moments in life where you KNOW that you are witnessing something truly special that touches your soul?   Well that is exactly what this was for me.  We had been on the road for almost 11 days on a trip from Rapid City thru Wyoming and Utah.  Our last stop of the trip was supposed to be in  Zion National Park but we had to cancel due to terrible rain and flooding in the park.  We extended our time in Arches which was really nice but it was not until I stood here in Bryce National Park at the Sunset point looking down into the canyon that I realized that I had made a mistake… I should have added onto the time there.   We only had ONE day to explore Bryce and it was very nice there with many great vistas and rock formations, but this image at the Sunset Point was the defining moment for the entire trip for me.  

Hood Valley, Bryce Canyon, Sunset overview.

Hood Valley, Bryce Canyon, Sunset overview, Sony A7rii

Understand, that I am NOT talking about either of the  photographs captured and shown above, but rather the moment for me personally standing there taking it all in, becoming one with the scene, no camera, no thoughts of photography only the experience and impact of witnessing the greatness of the scene.   I stood there for a good half hour drinking it all in and I will remember the emotional impact upon me for the rest of my life.   Yes… it was that powerful.  

There is some serious food for thought in this last statement.  In these days of rapid fire digital photography don’t you think that we can quickly loose sight of what it is that we are trying to create in our art?  Shooting in film slows you down which aids in the creative process.  This is not to say that we cannot do this with our digital systems because we can and I do, but rather most of us who practice this art tend to “hurry, capture and move on to the next thing!”   

Olympus XA 135mm

Olympus XA 135mm

It was almost as if it was an afterthought that I actually took my Sony A7rii with me up the trail to the overlook and took a few images which were actually quite nice in color, but after the sensory overload of the scene I could only think of one thing, B&W and FILM.  Yes, I could convert the color image above to B&W in post processing and do quite a good job of it but NOTHING can compare to what I can create with film!  So, it was a bit of a walk back down to the car where my wife and 7 year old grandson were resting because of the long drive to get here, but down I went with only one task, to trade the digital for a TINY B&W film camera, the Olympus XA.  The XA is the worlds smallest 35mm rangefinder camera. It has an amazingly sharp lens with easy focus, but the key is the fact that it is pants pocket (not those bulky cargo pockets but regular ones), it is light and handy.

I took so much camera equipment on this trip that the only space I had for a film system required that it be tiny.   Against all of my experience I threw in this tiny camera along with just 5 rolls of Kodak Tmax 100 film and off we flew.  I am so glad that I did now but having said this it is only fair to share that this was a colossal mistake.  I should have made room for a medium format (120 6×7) camera and taken out a lens or two for the Sony.   I have learned my lesson and will never repeat this mistake.  Don’t get me wrong, the XA captured an amazingly detailed and  sharp image. I love how it turned out.  The Kodak Tmax 100 film along with the Perceptol developer generated a image (yes small) with tiny grain and great sharpness.  Am I happy with the result?  You bet!  Would I have been happier with a larger 120 negative, OMG YES!!  Can I have a do over please?  Yes, I know, not to much of there ever being a chance for that.

So lets sum this up a bit shall we?  

  • SLOW DOWN,  take the time to really look at your subject!  If you do this your chances of creating a world class image will greatly improve.
  • Look closely at what is in front of you, take the time to feel its emotional impact upon you and only then bring out the camera and with your skill and insight to the scene make the camera (nothing more than a tool) capture what you saw!
  • Think in both color and B&W.  Remember though that B&W removes the clutter and confusion of normal color work.  In my opinion, B&W allows you to capture the soul of the scene! So yes, take color but also take B&W, you might be surprised at how well you can do.
  • If you are working in digital only, during post processing work color first completely, save the image THEN process for B&W generating all of the mood that you possibly can!

Ok, this post is done.  Get out there, shoot and create, but slow down and think about what and WHY you are doing it!

Mark Hilliard, ATELIER is the East Coast Representative for Alpenhause Kamera Werke


Polaroid 4×5 conversions

Steven Icanberry’s Alpenhause Kamera Werke Polaroid 110b and 900 camera conversions for 4×5 and select instant films

My Polaroid 110b with 90mm Super Angulon

My Polaroid 110b with 90mm Super Angulon

You have to see these wonderful camera systems! They are as functional as beautiful! If you have one of these Polaroid cameras, or a large format lens in the range of 90mm to 150mm (we have a list of what works and what doesn’t).  Steven can create a CUSTOM conversion just for you!

For your conversion he will:

  • Clean and make any repairs to the rangefinder.
  • Clean and test your lens of choice.
  • Calibrate the rangefinder within the camera to the lens.
  • Modify the frame lines for the lens.
  • Change the camera’s clothes and paint colors to make your camera an original that you can be proud of!
  • He has many options for the systems also.


Back view showing the custom machined back.

Back view showing the custom machined back.

I have 2 of his conversions and can tell you that they are amazing camera systems. He has a custom designed machined metal camera back that can hold any standard film holder that is the nicest on the market.

My 900 converted to 4x5 by Alpenhause Kamera Werke

My 900 converted to 4×5 by Alpenhause Kamera Werke

You can call me if you would like to visit and see my conversions from Steven to get a “hands on”.

In the meantime here is a LINK to a post I did on Steven several months ago!

You can visit Stevens web site HERE!

Going Home to Mama…. Returning to Film!


The joys of returning to our photographic roots…

Pier

Murrells Inlet Fleet, Polaroid Type 55 4×5 film, Wet Mount Scan

Have any of you considered film photography?

There is something about working with film that is very calming which can center one’s soul allowing you to really connect with your art. For me it was like going home to Mama.  The feeling of working with your hands as part of creating your art will make it more involved and enable you to to really influence the hidden nuances in your work. It will add a bit more complexity to your workflow but trust me it is worth the effort.  The single largest change is forcing you to slow down in your creative process, it forces you to really consider every part of your workflow. It really is not any more difficult than digital photography, but it is a bit more involved.

Polaroid 900, Tmax 100 4x5 @ 64, Perceptol

Polaroid 900 with a Fujinon 150mm lens, Tmax 100 4×5 @ 64, Perceptol 1:1 developing

Take a really close look at the details in this image, click on it and look at it in the full screen mode.  Look at the GEARING on the edge of the wheel.  The detail there will take your breath away!

Film Cameras

Olympus XA 135mm

Olympus XA 135mm

I have way too many film cameras to list them all, some really small like the Olympus XA which is the worlds smallest 35mm rangefinder and a joy to use.

I also have an Olympus RC 35 camera that is another fixed lens rangefinder. It is simple and fun to use and can be found for very little money.  I have mine rebuild and given a bright blue suite that suites it quite well!

My Custom Olympus 35 RC Film Camera, one of dozens of film systems I shoot.

My Custom Olympus 35 RC 

My Leica M7 Film Body

My Leica M7 Film Body

My last 35mm camera system is a Leica M7 system. It has interchangeable lenses and is one of the best built camera systems that I have.  Couple it with the world class Leica lenses and you have an unbeatable 35mm system.

Confusion, Petri 7S 35mm, Eastman XX flim

Confusion, Petri 7S 35mm, Eastman XX flim

Fuji GF670 Medium Format

Fuji GF670

Fuji GF670

Fuji GF670

Moving up to Medium Format 120 film systems I have three.  I have the Voigtlander Bessa IIIw system that is 6×7 format and the Fuji GF670 camera (also sold under the name of Bessa III) with a longer 85mm lens (left & right). The 670 is my medium format travel camera of choice.  Not only is it a functional camera with a built in meter but it is attractive and it always will draw a crowd when I get it out to use! Another nice point to the GF670 is that it folds down on itself to a thin easy to store camera in your bag!

Mamaya RZ Pro II system

Mamaya RZ Pro II system

And lastly the Mamaya RZ Pro II SLR ( Right) with interchangeable lenses and a world class metering system. This camera is large and heavy but easy to use and a very powerful camera system! I have a f/4 65mm and f/4 180mm lens for it.  I also have both the waist level finder and a metering prism with spot and matrix!  Like I said, heavy and big, but I use it for ultra long exposures on the coast with the Fuji Acros 100 film which has almost NO RECIPROCITY failure up to 140 seconds then only 1/2 stop after that!   The film base is a little on the thin side but still my film of choice for long exposures.

Stormy Seas, Fuji GF670, Tmax 100, Perceptol 1:1, Wet Mount Scan

Stormy Seas, Fuji GF670, Tmax 100, Perceptol 1:1, Wet Mount Scan

Beautiful!

Polaroid 110 with 90mm lens converted to 4×5!

My 900 converted to 4x5 by Alpenhause Kamera Werke

Polaroid 900with 150mm Fujinon lens converted to 4×5

Moving up to 4×5 Large Format cameras, I have three. first I have a Shen Hao cherry field camera.  Functional as it is beautiful.  I rarely take it out, rather I am using a Polaroid 900 converted to 4×5 with a Fujinon 150mm lens and a Polaroid 110B camera converted to 4×5 with a Schneider Super Angulon 90mm lens.  It is a beauty and very wide!

Yes, as you may have noticed, some of these cameras are quite large.  This is due to the negative size.   Let me give you some idea as to why digital cameras can never come close to the resolution of film.

Focus Test - Epson Wet Adapter Across 100 Perceptol 1:2 Springmaid Pi

Montreat Cascades, 4×5 Tmax 100 developed in Perceptol and wet mount scanned.

Lets start with medium format:

  • Medium Format 6×7 format makes an image 2 1/4 inches tall and much wider.  Scanned at native resolution of 6400 dpi on an Epson 850 Pro scanner gives me a file resolution of 16452 x 19668 dpi or a print size at 300 dpi of 4.5 feet by 5.3 feet!  This is huge.
  • Large Format of 4″ x 5 ” scanned at 6400 dpi (native) gives a file size of 29107 x 36070 dpi or a print size of 8 feet x 10 feet!  There is not a digital camera system in the world that can come more than a small fraction of this!

Film

Film has turned wildly popular again in the past several years and many of the big film manufacturers have started increasing their film production lines again. This is especially true in the medium format lines (120) and 4×5 large format films! Film can be found in single rolls or in bulk almost everywhere again.  The big box companies like B&H, Adorama and many others carry almost every type and format that you could ever want!

Processing in B&W has never been easier at home with eco friendly chemistry with no darkroom needed. Only an initial outlay of around $150 will get you started. Cameras can be found anywhere for next to nothing!  You will need:

  • Dark Bag, a cloth bag that it light proof with arm sleeves that enable you to put your film, developing tank, reel an lid inside with your arms to move the film into a light tight developing tank!
  • Developing Tank, I recommend a stainless steel version.
  • Film Reels, I like the Hewes stainless steel ones.
  • Developer, comes either in a powder or a Liquid.  I like Perceptol and/or Rodinal R09.
  • Fixer, to remove un-used silver
  • Liquid wetting agent to prevent drops to dry on your negative.
  • Clips to hang you film up to dry!

You can scan your film into your computer with a good Epson scanner like the 700, 750, 800 or 850.  You can also buy an adapter for your camera allowing you to scan by photograph!

While I work in both color and B&W, digital and film I find time after time I pick up a film system and load it up with a good B&W film. The process of developing your film can really help you connect to your work as well.

I like several films, here they are in order of favor:


  1. Kodak Tmax 100 in 35, 120 and 4×5, very small grain, good dynamic range easy to process
  2. Fuji Acros 100 in 35, 120 and 4×5, very small grain, good dynamic range NO RECIPROCITY FAILURE, easy to process
  3. Rollei IR400 in 35, 120 and 4×5, Infrared or normal B&W, good dynamic range, easy to process
  4. Rollei Retro 80S in 35 and 120, amazing clarity and sharpness, good dynamic range easy to process
  5. Eastman XX in 35, motion picture film used in B&W movies of the 50’s, smooth gradient transitions.


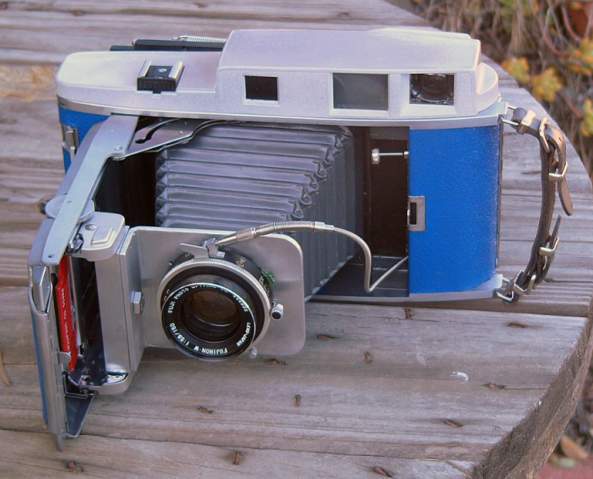
As an example here is the top image from last week of the fishing fleet taken on 20 year out of date Polaroid Type 55 monochrome instant film. The camera is also a Polaroid 900 that my daughter sent me years ago from a garage sale that I had converted to 4×5 with a Fujinon 150mm lens. A MOST beautiful camera in a bright new blue suite that is just fun to use. It is both rangefinder and ground glass focusing that forces you to slow down and really consider each and every image you capture!

The Type 55 film, even outdated, works flawlessly and generates amazing images where the edge markings add to the artistic impact of your subject

Pelican Dock - Type 55 4x5 Film, Wet Scan

Pelican Dock – Type 55 4×5 Film, Wet Scan

So what do you think?  Are you tempted to try this out?  It is easy.  For starters, you can look at the continuing education departments at a local college or hight school.  Most offer B&W film photography with darkroom work.  This will teach you enough to allow you to determine if you would like to further investigate this wonderful medium!

You can also contact me and request info on one of my film workshops held in Pawleys Island SC.  I would love to have you and share this amazing link to our past!

Please let me know what you think of this post!

Amazing Polaroid 4×5 Camera Conversions: Alpenhause Kamera Werke


Let me introduce you to Steven Icanberry!


My 900 converted to 4x5 by Alpenhause Kamera Werke

My 900 converted to 4×5 by Alpenhause Kamera Werke

The story begins…

Several years ago my oldest daughter and her husband gave me a complete Polaroid 900 Camera system for fathers day.  I like old cameras and this one sat in a glass display case in my studio for years.  It was a beautiful camera but with film no longer being made it was living its life as a hanger queen only.

My Polaroid 900 Camera Set

My Polaroid 900 Camera Set

Steven Icanberry at Alpenhause Kamera Werke

Steven Icanberry at
Alpenhause Kamera Werke

One day while exploring one of the 4×5 Facebook groups I came across a post from  Alpenhause Kamera Werke and Steven Icanberry,  He was advertising a conversion on the older Polaroid  Land Cameras like my 900 to 4×5 film with a film back and a coupled rangefinder calibrated to the new 4×5 lens he would install!  Steven is a disabled veteran who makes his living from converting these cameras!

This was simply too good to be true and after calling him and with his advice for options and lens selection I sent off my camera to him to be converted.

About the film holder!

About the film holder!

Now, a little bit of info on his designs and options.  His 4×5 film back is of his own design and is small and lighter than any other on the market.  He has them made by a local machine shop and I can attest to the quality of it!  He removes the old lens and makes a new lens plate mounting your choice of lenses.  

I choose a Fujicon 150mm lens.  He couples the lens to the rangefinder system in the camera and calibrates it to be perfect. (This was the big draw for me as I was looking for a simple 4×5 carry around camera).  

He also cleaned all of the rangefinder optics assuring sharp clear viewing.  

I was offered a large selection of colors and new clothes for my camera, I choose bright blue and a silver top along with a built in shutter release cable.   Look at the top image above and tell me that the camera doesn’t look stunning!

His camera conversions are simply stunning in their beauty and functionality!  For those of you who like and desire to shoot film I strongly suggest picking up one of his cameras.  You will not be disappointed at all and you will be helping a disabled US Veteran make a living.  But more importantly you will have a camera system that is as beautiful as it is functional.   I am going to close this with a few images of some of Stevens cameras and the first shot I took with mine.  

He advertises starting pricing at around $500 for a converted camera in stock and also does custom conversions (like mine).  I paid $900 for mine, but I chose a new custom lens and several other options!   

Am I satisfied?  YOU BET!!

Please consider having Steven Icanberry and Alpenhause Kamera Werke do a conversion or sell you a stock conversion!  It is my wish to spread the camera goodness around and this is one good company!

Handheld Converted 900 image with TMX 100

Hand held image from my Converted 900 image with TMX 100

Colors colors colors

Colors colors colors

Beautiful!

Beautiful!

Screen Shot 2016-07-03 at 7.51.07 AM


4x5 Film Back

Stevens custom designed 4×5 Film Back


My converted 900

My converted 900

Out And About With Film….


Wandering the shrimp fleets of Georgetown with my Voigtlander Bessa III 120 film camera….

Voigtlander Bessa IIIw 120mm camera system

Voigtlander Bessa IIIw 120mm camera system

Yep, early this morning I grabbed the bag with my wide angle 120mm camera system and headed out to Georgetown where I was going to spend a bit of time with the shrimp fleets and some film….  I chose the Voigtlander Bessa IIIw system.  It has a 55mm lens on it which at 6x6mm equates to around 35mm and at 6x7mm to 30mm.  This is pretty wide and allowed me to capture several very wide angle shots of various shrimp boats around the water front.

One of the other things that I do when shooting film is to keep a accurate written record of the exposure data for each and every frame.  This assists in keeping my process the same once I get the proper exposure, contrast and desired grain for each of the film types I use.

I enjoy this camera system very much.  It has a lot going for it specifically its 6x7mm negative size which makes for some pretty big scanned files when all is said and done.  I also like the fact that it is a rangefinder which pretty much defines my youth and what I had learned to use when very young!  It is not too heavy, has a leaf shutter which is totally silent and goes up the 1/500 second for exposures. This could be a little faster but I can work with it.  A 120 roll of B&W film gives me 10 exposures at 6×7 which is the format I like the most. 

Rodinal One Shot

Rodinal One Shot

I normally use stand film processing with Rodinal at 1:100 ratio with water, a water bath then the 1 hour processing and normal fixing and a wash, but for these rolls I am going to use Ilford Perceptol ultra fine grain developer in hope of a sharper  image with greater contrast.  So, we will see next week how this new combination works for my finished film!

Stand processing is not dependent upon chemistry temperature, ISO or even Film type!  You put the film in its can, give it a 5 min water wash, then pour the developer in, gently agitating for 1 min then letting it sit for another 60 min!, Water Stop, since and done!     But there are trade offs with Stand processing, namely Bromide Drag which is shown as the slightly darker vertical streaks in the image below.  These come from the developer chemistry being exhausted.

Voigtlander Bessa IIIw with Rollei IR400 120

Voigtlander Bessa IIIw with Rollei IR400 120

Jordan and his film camera

Jordan and his film camera

So with the Perceptual chemistry (6 min develop time) I will not see Bromide Drag and it is supposed to give sharper smaller grain and higher contrast.   So instead of a 1 hour develop time we are looking at 6 min now, sharper negatives with higher contrast!  We will see….

I will hold of processing these images till the first weekend in May so that my 7 year old grand son come come with me to the studio and process his own 35mm film at the same time!  Yes, I am teaching him how to photograph and process film! You gotta start them young so that they catch the film bug!

Cooking the film!

Cooking the film!

Come on back in a few weeks to see the results of todays outing!