Using M mount glass on the Sony A7rii camera


The AMAZING just got better….

Stormy Seas with the Voigtlander 12mm Ultra Wide Heliar M Mount Lens and the Techart Auto Focus Leica to Sony adapter

Stormy Seas with the Voigtlander 12mm Ultra Wide Heliar M Mount Lens and the Techart Auto Focus Leica to Sony adapter

Look closely at the image above.  It was taken with a Voigtlander M mount 12mm Ultra Wide Heliar lens and the Techart M to FE AUTOFOCUS adapter on a Sony A7rii camera. The cleat on the bottom right is about 6 inches from the front of the lens!  The color rendering is amazing and there is very little distortion that is normally found with an ultra wide lens!   I can hear you asking how I accomplished this!

I recently picked up the Techart M to FE Sony mount adapter for my Leica and Voigtlander lenses.  It has been my desire to use them on the Sony A7rii, A6300 and A6500 cameras.

The Techart auto focus adapter is amazing. I actually moves the lens in and out to get a sharp focus.  It has several rules that you must follow to use it and as long as you do it will provide great service.  It is quite fast!

  • Use a center focus point on the camera
  • Set your camera aperture to f/2 and leave. It there
  • Set the real aperture directly on the lens.  
  • Don’t try to focus with the lens set to f/22, keep it around f/8 or f/11
  • The Exif data will shot f/2 but the exposure meter will correctly meter the subject.
  • Don’t try to use a heavy lens on the adapter unless you support it.

12mm Voigtlander M lens with the Techart autofocus M to FE adapter

12mm Voigtlander M lens with the Techart autofocus M to FE adapter

Here is a link to a short video demonstration of the Techart M to FE adapter on my Sony A7rii:


B&W work with this lens as well as my other Voigtlander and Leica M mount lenses are just as sharp weather in color or monochrome!

Stormy Seas with the Voigtlander 12mm Ultra Wide Heliar M Mount Lens and the Techart Auto Focus Leica to Sony adapter

Stormy Seas with the Voigtlander 12mm Ultra Wide Heliar M Mount Lens and the Techart Auto Focus Leica to Sony adapter

I also have and use a Metabones M to FE adapter which gives the same results but with manual focus only.   Sometimes manual focus is necessary depending upon your subject but reguardless of focus type both adapters and all of my M lenses work wonderfully on the A7rii camera system!

Stormy Seas with the Voigtlander 12mm Ultra Wide Heliar M Mount Lens and the Techart Auto Focus Leica to Sony adapter

Stormy Seas with the Voigtlander 12mm Ultra Wide Heliar M Mount Lens and the Techart Auto Focus Leica to Sony adapter

If you have a selection of M lenses then the cost of a M to FE adapter is well worth the money.  But I am VERY impressed with the new autofocus adapter!


Please let me know what you think!


How to Adjust White Balance In Lightroom


Another good post from my friend, colleague and student, Rhonda Griscti. Her post this time is on understanding White Balance. A good read to be sure!

My Leica Travels

Why should you care about White Balance? Because a proper white balance is how we get the colors in our images to be as accurate as possible. Why would you need to get the color right in your shots?  You might have noticed when examining shots after taking them that at times images can come out with an orange, blue, yellow etc look to them – despite the fact that when you were taking them the scene looked quite normal. The reason for this is that images different sources of light have a different ‘color’ (or temperature) to them. Fluorescent lighting adds a bluish cast to photos whereas tungsten (incandescent/bulbs) lights add a yellowish tinge to photos.

We don’t generally notice this difference in temperature because our eyes adjust automatically for it. So unless the temperature of the light is very extreme a white sheet of paper will generally look…

View original post 305 more words

Overcoming the Back Focus issues of the Leica 135mm M mount lens…


Yes, HOW could such a high quality Leica Lens be so problematic….


Leica 135mm

Leica 135mm

Leica 135mm

Leica 135mm

In todays world of modern digital camera systems, the Leica M 240 really stands out above the others.  One of the reason for this is the duality of an electronic viewfinder with a robust peaking focus system coupled with a real range finder focus as well!  This makes this camera IDEAL for mounting any lens that can be manually focused with reasonable expectations of good focus!

But what happens if you have some of the older Leica systems like the M9, Monochrom, M8 or a film body like the M7?  Should we not be able to expect the same focus quality of the M 240 using the built in rangefinder?

Well for ALL of my Leica and Voigtlander glass this has been a truism until I met the famously hard to focus 135mm lens.  Now understand that this lens has been through 5 (FIVE!!) versions and each and every one has had the same bad press on their inability to sharply focus!  If you ask Leica about them you are told to set your aperture to f/11, focus and shoot hoping that the DOF will overcome the shortcomings of the focus cam system inside of the lens!

Now, I badly desired a longer reach lens with a M mount but was convinced that I could not overcome the focus issues with these lenses.  So one of my students from the Arcanum (a online photograph school) had one of the 135s and sent it to me to experiment with.  It was one of the older models, looked kind of funky but had a tripod mount on the lens!  Reviews of ALL the 135s said that this model was the best one for the money!

So with the lens on camera (M 240) I set out to test the rangefinder focus vs. Electronic focus with peaking…

Suffice it to say that the lens BACK FOCUSES so badly that unless you are shooting at f/11 or f/16 you have very little chance of a sharp image!  I focused the lens using the range finder then again with the electronic peaking system and discovered the following failure:

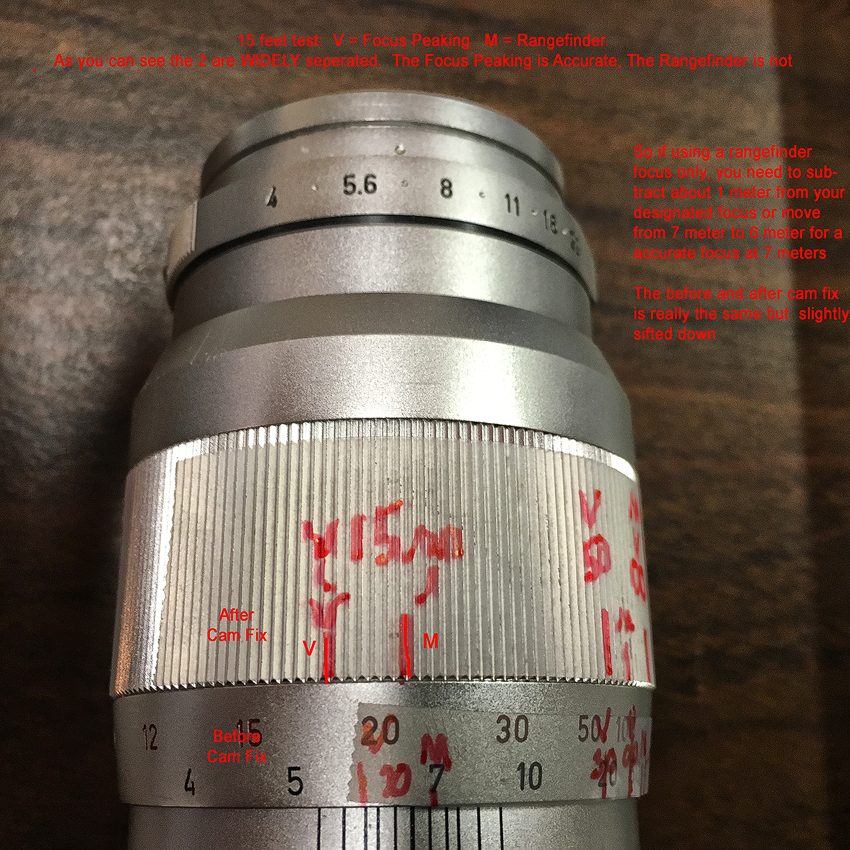
  • 7 meter subject.  The lens needed to be adjusted to 6 meters to be in focus!
  • 50 meter subject.  The lens needed to adjusted to 20 meters to be in focus!
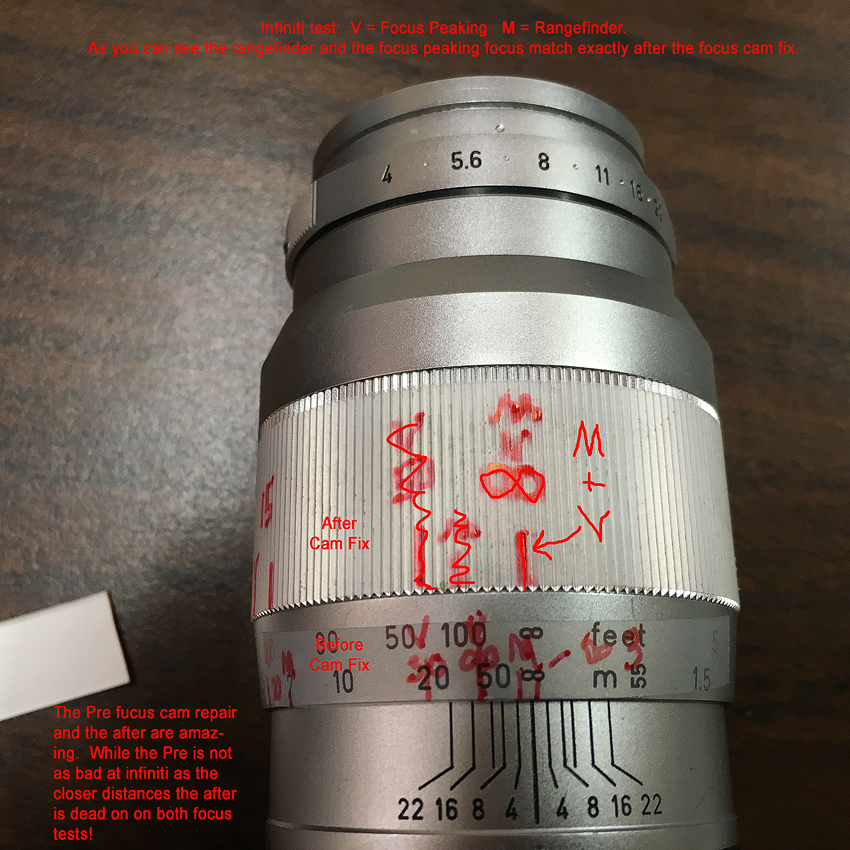
  • Infinity subject.  The lens needed to be adjusted between Infiniti and 50 meters!

The adjustments were the difference between the rangefinder focus and the peaking focus!

Well….

If you were to turn over and look into the mounting flange on it you will notice that there is a focus cam that moves up and down as you focus the lens.  This is NOT adjustable!  But… I had an idea!

Enter High Tac Copper Tape…

High tack copper tape

High tack copper tape

Tape Application Leica 135mm

Tape Application Leica 135mm

What if…

What if I were to tape one or two layers of this really sticky copper tape onto the end of the focus cam?  Could I at least get the infiniti focus point dialed in? 

YES!  It can be done!

So, I ordered a very thin roll (1/2 inch) from Amazon, cleaned the cam and cut 1 thin sliver of the tape and applied it to the end of the cam and redid my focus tests!

After cleaning the cam with Alcohol  I applied the tape, smoothing it down with a wooden dowel and allow it to sit for an hour giving the adhesive a chance to cure.

Mounting the lens again onto my M 240 I re-ran my range finder and electronic peaking focus tests on the same subjects and distances! I carefully (on a piece of tape attached to the lens marked the two focus marks for each test on the lens so that I could visualize both the size of the focus error as well as where it was on the overall focus scale.

Here are my results with only ONE layer of copper tape.  I knew that my target was to get my infinity focus dead on and that the closer distance focus points would still be off but hopefully by smaller amounts.

Test data is marked on the lens showing both RF focus/Electronic Peaking focus points.  The peaking points are dead on and hopefully we could bring the two closer together!

If you look at these points you will see the non cam taped focus dat on the bottom and the corrected cam data on the top.  The V stands for Electronic Peaking and the M for Range Finder focus.

7 Meter Focus Tests…

7 Meter Focus Test Leica 135mm

7 Meter Focus Test Leica 135mm

So for the non corrected cam we see a subject at 7 meters as focused with the rangefinder, but with the Peaking focus it is moved down to 6 meters to be sharp!  This is a 1 meter difference and unless you are shooting with a small aperture you will get a very soft focus!  When we do the test after the cam change the difference between the range finder and peaking is actually a bit wider.  This was expected…

Now, The 50 meter tests…

100 foot focus test on Leica 135mm

100 foot focus test on Leica 135mm

As you can see on the uncorrected cam side focusing at 50 meters on the rangefinder we needed to adjust down to 20 meters… That is WAY OUT OF RANGE!  Yet at f/11 we can get it into focus!  

With the corrected cam the difference between the range finder focus and the peaking focus gets closer together at about 30 meters which is a 10 meter reduction of focus error!  Better and better!

Infinity Focus Test

Infiniti Focus tests on the Leica 135mm

Infiniti Focus tests on the Leica 135mm

Ahh, the pre cam measurement using the rangefinder sets the lens to the infinity as expected but the peaking focus sets it down about 1/3 of the way towards 50 meters.  Way off to be sure but small than before.    

BUT…

The corrected cam BOTH THE RANGEFINDER AND THE PEAKING focus match at infinity!!  We are now dead on on the far end of the lens!

What this means is that knowing the differences between the rangefinder and peaking that we can adjust the 135mm lend down about 1/3 of the way between the major distance measurements to get much closer to being dead on.  As long as we shoot at a reasonable aperture (f/8) we can be reasonably assured of a sharp focus!

I have found that these measurements are the same with the current Leica 135mm as well!


So there you have it.  The online posts of issues with these lenses have been endless over the years.  They are known as very difficult lenses to get a sharp focus with and now we know why and more importantly how to overcome it!


I hope that you enjoyed this discussion on what could be a very nice and powerful lens to have in your bag!


Using Fumed Alumina To Fix Paper Issues in Van Dyke Brown


An Easy & Cost Effective Way To Fix Paper Issues!

Stormy Seas, Van Dyke Brown, Lana Paper, Fumed Alumina Brush Coated, Gold Toned

Stormy Seas, Van Dyke Brown, Lana Paper, Fumed Alumina Brush Coated, Gold Toned, 720nm Infrared

Testing Fumed Alumina…

Van Dyke Brown emulsion is basically on the acidic side of things chemically and as a result of this I have been forced to wash most of my papers with a acid bath. This caused a increase in my process by 2 days. So I am testing Fumed Alumina which is acidic unlike Fumed Silica which is neutral. I decided to go with the Alumina test first and will do a followup post down the line with the Fumed Silica.

Bent Tree, Van Dyke Brown, Lana Paper, Fumed Alumina Brush Coated, Gold Toned

Bent Tree, Van Dyke Brown, Lana Paper, Fumed Alumina Brush Coated, Gold Toned, IR400 120 Film

Initial results were quite pleasing with both Revere Platinum and Lana Aquarelle papers. I got a MAJOR increase in Dmax with both the Lana and Revere papers, but upon completion of my final wash the Revere was VERY EASY to damage with finger smudges until it dried. The Revere had a tendency for the Alumina to easily rub off the Alumina while wet whereas the Lana was strongly attached.

Anderson Mill, Van Dyke Brown, Lana Paper, Fumed Alumina Brush Coated, Gold Toned

Anderson Mill, Van Dyke Brown, Lana Paper, Fumed Alumina Brush Coated, Gold Toned, Leica M Monochrom

The Alumina did fix ALL of the spotting issues that I had when using the Revere Platinum paper but the fact that it will rub off when wet causes some concern but it is easily overcome with careful handling.

Magnolia, Van Dyke Brown, Lana Paper, Fumed Alumina Brush Coated, Gold Toned

Magnolia, Van Dyke Brown, Lana Paper, Fumed Alumina Brush Coated, Gold Toned

The Process:

  1. Dry roll on the Fumed Alumina in 2 directions and rap the paper edge on the table to remove the excess.  Make sure that you use a good mask to filter out this dust as it might irritate your lungs.  DO NOT OVER COAT or you will get streaks when you coat the emulsion.  The rolling step only takes about 30 seconds! You will need to put about 1 TSP of the Alumina into a small paint tray then pre load a small (3″) HARD foam roller with it.
  2. Coat as normal after you roll on the Alumina. You will need about 12 extra drops of VDB emulsion due to it absorbing more. My basic quantity of VDB emulsion for a 8×12 sheet of paper coated with Alumina is 48 Drops of emulsion and 2 drops of Tween 20 at 25% (you will need to dilute the Tween from 50%) solution.  For this post I brushed on the emulsion.  In the past I would normally use a glass rod for coating but the Alumina creates a very rough surface and I was afraid of damaging the paper.
  3. Dry and Expose. Here you will find that the addition of the Alumina will DECREASE your exposure about 1.5 stops!
  4. 1st water bath with distilled water and a pinch of citric acid, 2 min.  This bath will remove any extra ferric ammonium citrate which will cause a yellow paper stain. This bath will darken the print.  Do not worry as the FIX will balance contrasts and bring out the highlights!
  5. Fresh water bath to remove citric acid. 2 min. If you are Gold Toning, this step is VERY important as any Citric Acid will destroy the toner bath!  
  6.  Gold toning bath 2 to 5 min to taste.  The toning process requires CONSTANT AGITATION! After 2 or 3 prints toned add 5ml/print of Gold Chloride to bring the bath back up to strength. This  toning bath will further darken the print.  Do not worry as the FIX will balance contrasts and bring out the highlights!
  7. Fix for 2 min with Sodium Thiosulfate for 2 min. 30g/L. I do not believe that any further time will help the process.
  8. Final moving fresh water bath for 30 min.
  9. Air dry,  I spread out old towels on a table top and place the print on it for about 10 min to absorb most of the water thru the back of the print.  I will then hang the prints to dry by a corner.  
  10. Use a  heat press to flatten your prints at 170deg for 20 seconds. The heat press step is to make the paper flat again.
  11. Hand rub in SOFT custom wax coating for protection then heat to force the wax to be absorbed into the paper fiber with a hair drier (more about this in a future post).
Dinghy, Van Dyke Brown, Lana Paper, Fumed Alumina Brush Coated, Gold Toned

Dinghy, Van Dyke Brown, Lana Paper, Fumed Alumina Brush Coated, Gold Toned, Leica M Monochrom

All in all this was a VERY easy fix to the acid washing step  and only added about 30 seconds to roll on the Alumina. The Fumed Alumina can be purchased at Bostick & Sullivan for $15/500g which will do about 100 sheets of 8×12 paper.

2 Dinghys, Van Dyke Brown, Lana Paper, Fumed Alumina Brush Coated, Gold Toned

2 Dinghys, Van Dyke Brown, Lana Paper, Fumed Alumina Brush Coated, Gold Toned, Leica M Monochrom

The increase in Dmax with the Fumed Alumina is amazing and the resulting images are stunning.

Please let me know what you think of this post and with suggestions for future posts!

Continued Work In Van Dyke Brown Alternative Print Process!


Perfection in Brown


Glade Creek Mill, Van Dyke Brown, Revere Platinum Paper exposed for 5 Min

Glade Creek Mill, Van Dyke Brown, Revere Platinum Paper exposed for 5 Min


Oak Reflections in Infrared, Van Dyke Brown, Revere Platinum Paper, 3 Min Exposure

Oak Reflections in Infrared, Van Dyke Brown, Revere Platinum Paper, 3 Min Exposure

After another 2 weeks working on the negative density, I have finally gotten to the point of good negatives, not great yet but I will get there.  I have to master the use of UV blocking color in the negative for them to be perfect and that is a project for the future. To date though I have reached perfection using normal B&W negatives.  

My CORRECTED Digital Negative for the Van Dyke Process

My CORRECTED Digital Negative for the Van Dyke Process

Here is the corrected negative that I used in the image of the Oak trees above.  It is much dense and has been corrected for the mid tones as printed in the Van Dyke Brown Process!  It has much greater contrast and required only a 3 min exposure in my UV unit. 

One thing that you have to remember when making your UV exposures is to place the ink side of your negative down on the paper surface.  If you reverse this the picture will be backwards, but more importantly, the UV light will burn the ink surface and ruin both the negative and the print.

B&W Negative for Van Dyke Brown Print exposure calculated for 3 Min.

B&W Negative for Van Dyke Brown Print exposure calculated for 3 Min.

Compare it to the negative on the right.  This negative was used in the previous post here where the image printed much darker and with less mid tone data.  Take a close look at the difference between the two negatives, the first has much brighter areas for increased black contrast and more detail in the trees. The difference is amazing and was easily achieved by the process discussed below…

Here is a small copy of the print generated by the 2nd negative from the previous post.  Notice how much darker it is and that there is no detail in the mid tones of the image!  It only took me a short while to create the Gradient Map from the process that I learned in Peter Mrhar’s book below.

Van Dyke Brown Print, Over Exposed by 2 stops due to the uncorrected negative

Van Dyke Brown Print, Over Exposed by 2 stops due to the uncorrected negative

Easy Digital Negatives is another remarkable book by Peter Mrhar

Easy Digital Negatives is another remarkable book by Peter Mrhar

Easy Digital Negatives is another remarkable book by Peter Mrhar that I use in the creation of my negatives.  It enables you to easily create Gradient Maps to adjust the mid tone values of your negative tailored to the alternative process that you are printing with!  I highly recommend this text over all of the others!

There are several good books on Digital Negatives out there but As I said the is the easiest that I have read and used plus the results of using a Gradient Map over a Custom Curve.  I suggest that you purchase several texts and try them in your workflow to see what works best for you!

I hope that you enjoyed this short post on the Van Dyke Brown Process.  You can look for more about it in the future!

Van Dyke Brown Printing, 1842


A new (read OLD) way of printing!

8x12" Van Dyke Brown Print

8×12″ Van Dyke Brown Print

Alternative Printing from History!

Van Dyke Brown is an early photographic printing process. The process was so named due to the similarity of the print color to that of a brown oil paint named for Flemish painter Anthony van Dyck.

The Vandyke brown print is based on the first iron-silver process, the argentotype, invented in 1842 by the English astronomer, Sir John Herschel. Both processes utilize the action of light on ferric salts and their chemistry is very similar. The Vandyke process gets its name from its similarity in color to the deep brown pigment used by the Flemish painter Van Dyck. Vandyke brown prints are very simple and economical to make, with the sensitizer consisting of three readily available chemicals. Clearing is carried out in water and fixing is done in a weak solution of hypo.

Van Dyke Brown Step Wedge Calibration Chart for 3 Min Exposure

Van Dyke Brown Step Wedge Calibration Chart for 3 Min Exposure

As you can see, this is a very early way of printing developed a long time before our current Silver Salt paper process.  The images are a deep brown instead of the normal black and white that we are used to seeing.  They are somewhat easy to create provided that you have done your homework and created the proper calibration images to create a calibration Gradient Map or Curve to apply to your negatives which adjust them for loss of mid tones in the printing process.

This is strictly a CONTACT PRINTING technique that requires a true negative that is placed on top of paper that YOU as the artist coat yourself with the Van Dyke Brown emulsion that you mix from simple chemistry!   The coating process is done with a special brush that requires a very light touch or a glass coating rod that you use to push a line of liquid emulsion across the paper.

B&W Negative for Van Dyke Brown Print exposure calculated for 3 Min.

B&W Negative for Van Dyke Brown Print exposure calculated for 3 Min with the calibration applied.

The liquid emulsion is measured by the number of drops from a glass eye dropper into a small glass then with a drop of two of a wetting agent like Tween 20 to help the coating process.  The paper/emulsion is allowed to dry then the negative which was created using my Epson 7900 printing on transparency material is placed on top of the coated paper.  This sandwich is then placed in a printing box filled with 12 Fluorescent Black Light tubes which then expose the paper with UV light.  The exposure for the current paper I am using (Revere Platinum) has been calibrated to 3 or 4 min based upon the test chart above.

Van Dyke Brown Print, Over Exposed by 2 stops.

Van Dyke Brown Print, Over Exposed by 1.5 stops.

This process is a POP process in which the image after being exposed can be seen on the paper once removed from the UV box.  It is orange and yellow in color.  It is placed in 2 consecutive distilled water baths that remove the yellow and darken the orange.  Then it is placed in the fixer solution (Sodium thiosulfate) for 2 min.  When the image is placed in the fix, it IMMEDIATELY changes from orange to a very dark brown and white picture. Finally the print is placed in a live water wash for 30 min then dried!  

This is a simple process that creates beautiful images that will leave you breathless as you view them!  I am going to further develop and learn the process over the next month or two before I start on mastering the Platinum/Palladium printing process as well!

Look forward to many more posts on the processes as I master them!

Leica M240 Digital..


Oh, No… Another Camera System…

Leica M240 24 mpx Digital

Leica M240 24 mpx Digital

Well, in a wild turn of events I have picked up some new camera equipment… This is a really no surprise as it is a sickness or rather addiction!   But onward and upward!  

I do have to tell you that I am REALLY excited over acquiring these new systems though.   And unfortunately, one thing has let to another and thus a long journey has also been started into the realm of film again!

But first let me highlight the “What”!

As you can see in the top image, the newest body is the new Leica M240 24 full frame 24 mega pixel body.  It also has a true “live view” which allows use of all sorts of other lenses like the Leica R series that you would NOT normally be able to focus.  This means everything from long telephotos to true macro (subject of the next post!). After a few months of use I can tell you that this is the BEST digital system that I have ever used!  Along with it I also picked up several lenses.

Leica 50mm Summalux ASPH f/1.4

Leica 50mm Summalux ASPH f/1.4

First, the main lens is the Leica M 50mm f/1.4 Summalux ASPH lens in silver.  This is a HEAVY lens.  If attacked by a bear I could use it to beat him half to death.  The lens itself has turned into my main lens that I use 60% of the time. It has a built in leans hood and takes 46mm filters.  The Bokah that this lens can generate is amazing beyond description. It is extremely smooth and easy to use and generates images that are truly amazing!

Tulip at f/1.4, Leica 50mm Summalux ASPH

Tulip at f/1.4, Leica M240 w/ Leica 50mm Summalux ASPH


Leica 28mm Elmarit ASPH

Leica 28mm Elmarit ASPH

The next lens is the Leica M mount 28mm f/2.8 Elmarit ASPH.  This is a TINY light lens that takes 39mm filters.  These smaller filters sized considerably cut the cost of purchasing top of the line B+W filters.  Since the M240 camera is a full frame sensor the 28mm really is 28mm! The lens is sharp beyond words and quick to focus.  I am really please with this lens and use it for landscapes and lightning photography when mounted on my Fuji X-T1 camera.

The example image for this lens below is a texture overlay.  The main image was an Infrared image taken by placing a R72 (720nm) infrared filter on the lens giving a white IR image of a palm leaf, then doing a texture overlay of colored flowers.


M240-1916-Palm Overlay-2014 in both 720nm Infrared and Color

M240-1916-Palm Overlay-2014 in both 720nm Infrared and Color


Leica Macro-Elmar-M 90 mm f/4

Leica Macro-Elmar-M 90 mm f/4

The next lens is the Leica Macro-Elmar-M 90 mm f/4 and its macro adapter with split image view.  This is a very unique lens in that it collapses for storage.  By itself it is a great 90mm lens and has proven useful for mid range subjects as well as for Infrared work with the addition of a R72 IR filter.  When you add its macro adapter (extension tube coupled to a viewfinder modifier) it will then give you macro capabilities down to a 1:3 image ratio!  Below is an example of a macro image shot with this lens last week at Moore Farms in Lake City .

Leica Macro-Elmar-M 90 mm f/4

Leica Macro-Elmar-M 90 mm f/4

Now, I already had my two Voigtlander M mount lenses that I was using with the Fuji systems, but they are M mount!

Voigtlander 75mm f/1.8

Voigtlander 75mm f/1.8

First is the Voigtlander Heliar 75mm f/1.8 Lens.  This is an amazing lens that is very fast at f/1.8. The focus is smooth and long and it works very well with M mount extension tubes for true macro work (1:1 image ratio).  I do have 3 of the 10mm extension tubes for it as well as a Canon 500D closeup lens.  For my really small stuff this is my goto lens.  It is a little long but has a very nice clam on lens hood.  While it is NOT a Leica lens it is very close in terms of quality and ease and the f/1.8 aperture gives lovely bokah!

Here then is an example of a 1:1 life-size macro shot with it!

Green Dots...

Green Dots…

Voigtlander 12mm Ultra Wide Hellar

Voigtlander 12mm Ultra Wide Hellar

The last lens that I am going to talk about here is the Voigtlander Ultra Wide-Heliar 12mm f/5.6 Aspherical M Mount lens.  Another heavy all metal lens with remarkable focus and DOF.  Since it is so wide you can almost have a DOF from right in front of the lens out to infinity!  Plus 12mm is really 12mm on the camera!  Given that the camera is both full frame and has a live view you can see the power of using this lens and the ease of composition and focus!

In the example image below please notice the extreme range of the depth of field!

Stormy Seas, down low and dirty... Voigtlander 12mm

Stormy Seas, down low and dirty… Voigtlander 12mm


As you can see, all of the system components are extremely high quality and easy to use giving stunning results.  I like to create Long Exposure and Infrared images as well so I thought that I would share some of them with you below.  

M240-BW 59s16ND PI Pier-0148-2014

Pier, Leica M240 60 second exposure

M240 w/ R72 IR Filter

M240 w/ R72 IR Filter

Leica M240 w/ 28mm Elmarit,

Leica M240 w/ 28mm Elmarit

6 Shot HDR, Leica M240

6 Shot HDR, Leica M240

Blue Hour in B&W, Leica M240, 60 second exposure

Blue Hour in B&W, Leica M240, 60 second exposure

M240-1109-60 s PI LE-2014

Low Tide, Leica M240, 45 second exposure


I hope that you enjoyed this post.  I will have several more shortly in the future highlighting more of this system as well as some new FILM work!! 

Stay Tuned!